• The Roadster Factory Recovery Fund - Friends, as you may have heard, The Roadster Factory, a respected British Car Parts business in PA, suffered a total loss in a fire on Christmas Day. Read about it, discuss or ask questions >> HERE. The Triumph Register of America is sponsoring a fund raiser to help TRF get back on their feet. If you can help, vist >> their GoFundMe page.
  • Hey there Guest!
    If you enjoy BCF and find our forum a useful resource, if you appreciate not having ads pop up all over the place and you want to ensure we can stay online - Please consider supporting with an "optional" low-cost annual subscription.
    **Upgrade Now**
    (PS: Subscribers don't see this UGLY banner)
Tips
Tips

MGB Follow along as Drew tears down an MGB engine!

drooartz

Moderator
Staff member
Gold
Country flag
Offline
Fun for the whole family! You too can follow along from the comfort of your own home as Drew flails his way through the teardown, inspection, and possible rebuilding of a B-series MGB engine. :grin:

For those just joining us, the engine originally came from a '76 or so MGB and was given to me by a friend who is doing an engine sway in his B. The plan is to do a careful tear down and inspection, and to then either rebuild the engine as a spare or to use some of the parts for an eventual rebuild of the original engine in my MGB. This will be a slow project, something to entertain during the long, cold winter.

Along the way you will have a chance to participate as questions arise around amounts of wear, parts identification, and other areas of general Drew-cluelessness.

So sit down, grab a CAB, and follow along...
 

Flash_Harry

Jedi Hopeful
Country flag
Offline
Waiting with bated breath for the first installment. May do the same thing in case my rebuilt one goes South... Already is apparently burning oil in #3 cylinder.
Harry
 
OP
drooartz

drooartz

Moderator
Staff member
Gold
Country flag
Offline
Episode 1: Engine on a stick

Every journey starts with the first step, usually requiring an immediate step back -- a lets-get-going jig of sorts. For the great engine teardown the first step was to get the engine up on the stand, as working on the cold concrete floor on an old rotting pallet is not the sort of thing reasonable people do for fun.

engine2stand1.jpg

The first step was to get the engine and transmission separated. Not difficult, just required a couple of sockets and a bit of muscling things around -- and a trip out to the barn for the trusty engine hoist.

Today's work is a good reminder of why it's often the right course of action to buy a tool rather than rent one. Back in ancient times when I was working on the Tunebug I decided to go ahead and buy an engine hoist and stand, figuring I'd get enough use out of it to justify the (modest) outlay of cash. Planning ahead does work sometimes, I suppose, as for this part of our adventure all I need to purchase were 4 2-1/2" 3/8x24 bolts. Important safety tip: buying 3" bolts will require a few of those words you can't say on TV and an additional trip to the hardware store for the correct lengths.

engine2stand2.jpg

Next up was removing the clutch pieces, flywheel, and engine back plate. Again, simple enough to tackle with yet another useful tool purchase from the past -- the trusty impact wench. Off came the clutch with relative ease. The flywheel required a few more important tools, namely a hammer, torch, punch, and a pair of pry bars. Always fun when you get to hit something.

engine2stand4.jpg

Once all was ready and the requisite return trips to the hardware store were accomplished it was time to get the engine up on the stand. When I worked on the Tunebug I used a special adaptor made by a fellow BCF member (ChrisS), but that won't work for the B-series engine so I dug out the universal adaptor that came with my stand (the 750# Harbor Freight model). With the proper length bolts and a bit of fiddling everything lined up and the engine was mounted and ready for future work.

engine2stand5.jpg

Nice to have this step done, as the engine hoist lives out in the barn and one good snow would keep it there until Spring. Now I can putter to my heart's content for the rest of the winter.

Questions for today's episode:

  1. What sort of wear do I look for on the flywheel?
  2. How do I inspect the clutch and associated pieces?
That's all for today's episode. Thanks for watching! :savewave:
 

Bob Claffie

Jedi Knight
Country flag
Offline
Re: Episode 1: Engine on a stick

OK, I'll be the first to contribute. As far as the clutch components go, it's such a pain in the forehead to replace the clutch in an MG, I would deep six all of them. In a perfect world that would be a no-brainer but here in your "experiment" it would be good for a second opinion. Personally, I try to reuse any and everything but I am a consumate cheapskate.

My opinion of the flywheel is somewhat different. Look for heat marks , change of color, and minute signs of cracking. After the inspection the choices will be 1: Toss it, 2: Have it refaced and/or balanced, 3: Reuse as is, 4: Keep for a spare, 5: Give to someone you don't like.

Lets hear from the pros or semipros or the wannabe's. Bob
 
Offline
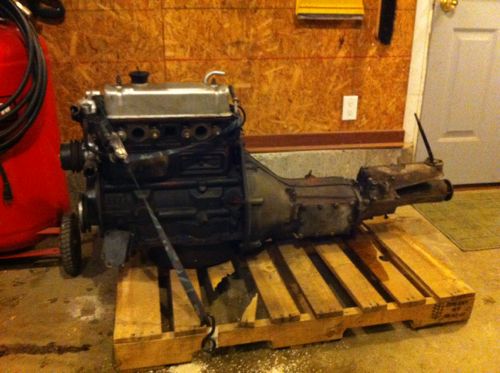
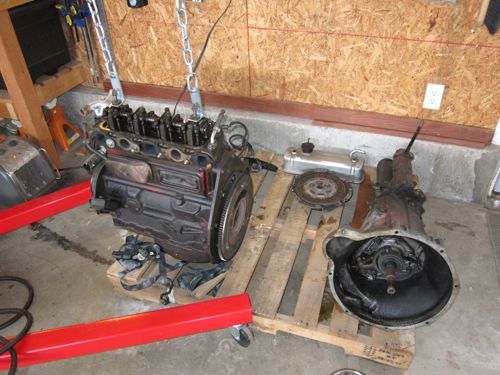
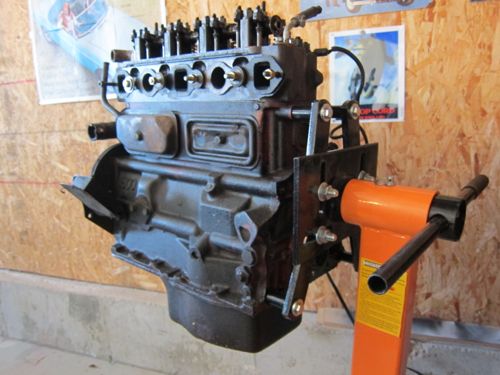
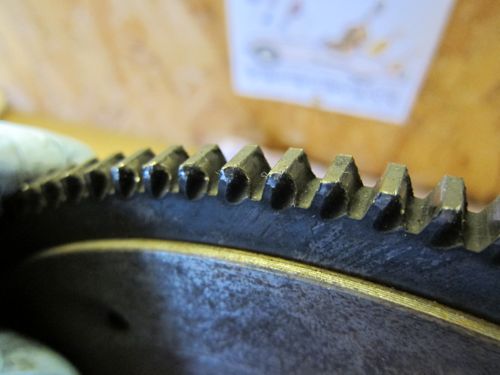
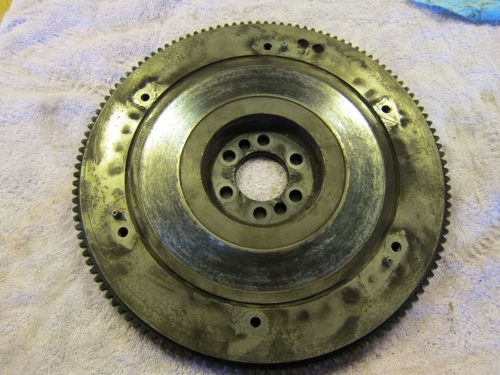
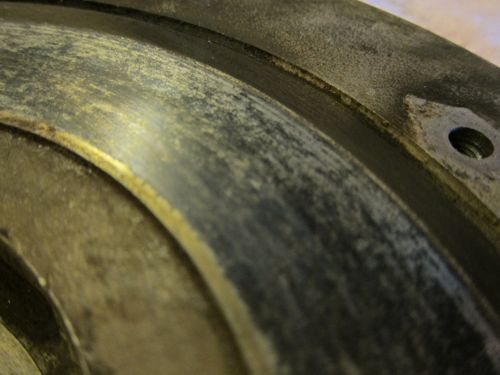
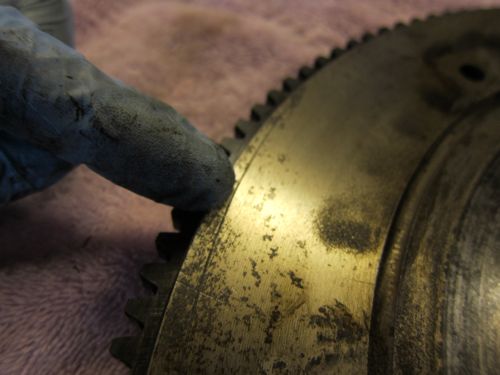
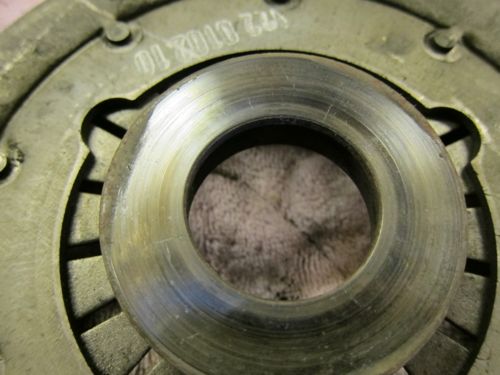
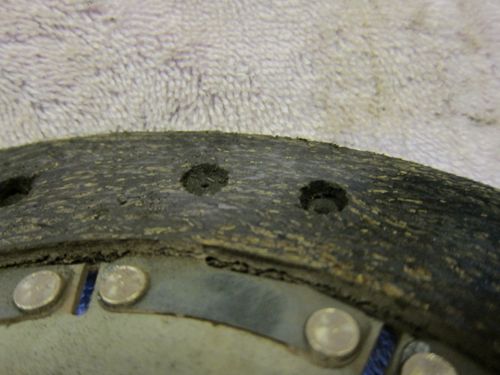
Drew, on the flywheel, look where the clutch rides on the fylwheel, can you feel grooves with a fingernail, if so, it need to resurfaced, heat spots like Bob said would also be a good reason to resurface the flywheel, it is reasonably smooth, has no bad discoloration, then you can skip this, next thing to pay close attention to on the flywheel is the the starter ring gear, if you see wear, replace it, both of these, for the most part, will be performed by a machine shop for you.

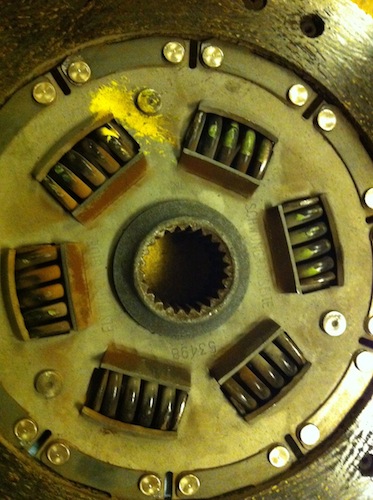
On the clutch, on the disc you can look at the wear of the friction material, in realationship to the rivets which attach it to the metal disc. On a pressure plate you look for wear on the button where the throw-out bearing makes conrtact, and the friction surface where the clutch disc rides. For the most part unless a clutch were to look brand new, you would never chance putting a questionable clutch back into a engine, because the work needing to happen to later replace it, far outweighs any savings you would have, much better to go with a new quality clutch.

FWIW, Drew I think you are a good canidate for doing this, the key is wanting to learn , and looking forward to the learning process. This is why I started my engine rebuilding kits with free tech advice , I know it sounds like a advertisment for my busness, but if money were all it this was about, I for sure would be doing something else other than building MG engines :smile: I think for me it comes down to what you do with what you have learned, I could hold it tight to chest, or I could try to share it with MG community, I choose the latter. There so many little things to engine build that are not covered in a manual, and then there is sequence, and going to the machine shop, people just don't to this often enough to cover all the bases. I had to build alot of MG engines, before I came up with a "system" so to speak, doing this alot of times makes it alot easier, but that's not something most in the hobby regardless if they own mutilpe cars will ever do, heck it not even something a professional repair shop does alot, this is why I don't work on customer cars, I didn't want to be a mechanic, I wanted to be a engine rebuilder. Parts and their quailty are a biggie in rebuilding MG engines, there are bascilly two trains of though in the vendors's minds as for selling MG engine parts, if a choice is even offered, one beaing cheap, which can be good quailty, but often is not, or higher quailty, which normally is better quailty, but cost a little more. In some cases like for example, really high quailty camsahfts and lifters, good quailty can cost a good bit more, but this is a good place to spend extra money on, becasue these items due to thier qauilty, or lack of, are the ones that wil fail prematurely. I like the tech advice part of the engine kit , I like helping people do this job right, and often wonder why some customers don't ask for more help, and advice than they do. Alot of time a tech call is confirmation, and other times I literally, over the phone, walk someone thru something , for example cam timing. It is very rewarding to help someone get to the point where they understand a given process, and be able to carry it out.

In the car repair world,it always been the same deal, us vs them, mechanics/rebuilders vs part vendors, this is as old as the car itself, the two always have inner battle going on, and for the most part one doesn't understand the other's job. For example a mechanic, may not underastand what parts are available, and the part vendor is not a end user, so he sells something he may not ever have work with. Thats what I try to elminate with my kits, a end user, who know what parts are available, good or bad.

In short, call me, if you get to a point where you have a question, I think I gave you my cell number, so even Saturdays are ok , if you don't have me cell number, PM me, and I'll give it to you.
 
OP
drooartz

drooartz

Moderator
Staff member
Gold
Country flag
Offline
FWIW, Drew I think you are a good candidate for doing this, the key is wanting to learn and looking forward to the learning process.
Thanks Hap, that's why I want to dive into this. Partly because this is my hobby and I enjoy the process, and partly because the more self-sufficient I can be with these old cars, the longer I can keep one on the road. I've not had great luck with local mechanics, and can't always send my stuff off to the shops out of state. The more I know, the better -- and I really do enjoy learning something new.

Besides, I'm tired of being frustrated when the manual says "remove and check for wear" -- great advice, as long as you know what wear looks like! :crazy:
 
OP
drooartz

drooartz

Moderator
Staff member
Gold
Country flag
Offline
Episode 2: flywheels and clutches and starters

With Bob and Hap's advice in mind (thanks for the ideas) I took advantage of some free time today to look at the bits I have off the engine now. That means the starter, flywheel, and clutch. First up was the starter. Looks to be in decent shape, though the threads on the brass post are a bit buggered. The gear that meshes with the flywheel looks to be in decent shape as far as I can see. Bit of wear (you can see the shinier bit towards the front of each tooth) but doesn't seem too far advanced as far as I can tell.

flywheelnbits1.jpg

I put that aside and focused on the flywheel. First up was the ring gear, which does seem to be showing some wear. Was not completely consistent, but does seem to have some wear on the engine side of the ring gear, from the starter engaging I assume. I'll need some advice here, but I'd probably figure on replacing it were this flywheel to be reused.

flywheelnbits2.jpg

On to the flywheel itself. It's greasy and a bit dirty, not that surprising. I didn't see anything that looked directly like a heat mark as Bob suggested, but I'm not really sure what I'd be looking for. The part where the clutch disc presses seemed smooth (couldn't feel any scratches with my fingernail) but there was definitely a ridge where that area met the rest of the flywheel.

flywheelnbits3.jpg


flywheelnbits4.jpg

There was one obvious and deep scratch on this side of the flywheel -- it went about 1/2 way around the flywheel. There were a couple of these on the other side as well. Other than that there were some miscellaneous scratches on the clutch side. I couldn't see any evidence of cracks, but not sure I would be able to see that without a magnifying glass.

flywheelnbits5.jpg

From here I moved on to the clutch pieces. Knowing what a PITA it is to do a MG clutch, I would always replace these on a rebuilt motor, but was curious to learn how to tell what was worn. Looking at the button where the throwout bearing pushes I could see what were obviously cracks radiating out from the center (visible in the picture below). A little faint in the picture but definitely visible to the eye.

flywheelnbits6.jpg

Lastly I looked at the clutch disc itself. Seemed in good shape as far as I could tell. I measured the depth of the shallower rivet holes on both sides, all were in the .044" range. Not sure what new is, but that seamed to be a reasonable amount of clutch disc material left (maybe?). Again, I'd plan to put in a new one if I were to put this back in a car, but worth looking at all the same.

flywheelnbits7.jpg

This is probably all I'll get to for a while. Once the holidays are over I'll give Hap a call and walk though the teardown process with him to make sure I understand what I need to do, and to figure out what tools I'll need to acquire. My gig schedule is getting busier as well, but I should be able to put aside a bit of time in early January for the next step.
 

DrEntropy

Great Pumpkin
Platinum
Country flag
Offline
Ring gear shows the typical wear in one area. The engine will usually stop in approximately the same place of rotation when turned off, the starter routinely engages the gear in one area and will eventually wear that dozen or so teeth.

That line on the flywheel face looks like a tool mark from a previous trip to the machine shop. Not harmful but evidence the machinist was a little careless, methinks. If the mating face shows no discoloration, grooves or cracking, some #100 sandpaper and a D.A, sander would be fine for cleaning it up a bit.

TOOLS!! OOooh! A good set of micrometers and bore gauges! $$ but good to have if you really plan to continue with the "hobby". You'll need measuring tools to quantify what sizes journals, bores et al are on tear-down.

KD makes a good inexpensive piston ring expander... and you'll want an appropriate size ring compression "sleeve" too. The last two come later, for assembling.

Just some preliminary musings. :wink:
 

Bob Claffie

Jedi Knight
Country flag
Offline
No pic of the main clutch face but you should see a half dozen small springs, maybe 1/2 in dia and 3/4 lg. Every once in a while one of those springs will fatigue and a remnant will lodge between the clutch and the pressure plate. That usually puts an end to disengaging the gear box and also puts a heck of a groove in some of the rotating parts.

On my sometimes "budget" rebuilds I ALWAYS replace the carbon type T.O bearing and NEVER replace the pilot bearing. Clutch disc could go either way depending on the depth of material left and the surface condition, pressure plate will stay if no previous problems. Ring gear depends on the tooth wear (yours looks to be a candidate for replacement).

No way, no how am I going contrary to what Hap is saying. He is a PRO and his goal is to do a job right the first time. As a "home mechanic" I have significantly more time than money and can afford to gamble on a fix (except in matters of safety) so my opinions are for the financially challanged.

Love this thread, interesting to see the differences of opinion and the mental processes behind various outlooks.
Bob
 
Country flag
Offline
Thanks Hap, that's why I want to dive into this. Partly because this is my hobby and I enjoy the process, and partly because the more self-sufficient I can be with these old cars, the longer I can keep one on the road. I've not had great luck with local mechanics, and can't always send my stuff off to the shops out of state. The more I know, the better -- and I really do enjoy learning something new.

Besides, I'm tired of being frustrated when the manual says "remove and check for wear" -- great advice, as long as you know what wear looks like! :crazy:

And what to wear when you're looking for wear is important to know as well!! :eagerness:
 
OP
drooartz

drooartz

Moderator
Staff member
Gold
Country flag
Offline
If the mating face shows no discoloration, grooves or cracking, some #100 sandpaper and a D.A, sander would be fine for cleaning it up a bit.

TOOLS!! OOooh! A good set of micrometers and bore gauges! $$ but good to have if you really plan to continue with the "hobby".
I'm thinking now that I'll plan to clean up the flywheel and replace the ring gear. If nothing else it'll make a good spare -- I looked up the price of replacement (admittedly aluminum ones) flywheels and they're not cheap. I'm still not quite sure what sort of "discoloration" I should be looking for.

Need to get a magnifying glass too. Eyes aren't what they used to be. :rolleye:

I definitely plan to continue with this hobby -- sadly enough it's really the only hobby I have (music doesn't count, as that's both passion and profession).

No pic of the main clutch face but you should see a half dozen small springs, maybe 1/2 in dia and 3/4 lg.

On my sometimes "budget" rebuilds I ALWAYS replace the carbon type T.O bearing and NEVER replace the pilot bearing. Clutch disc could go either way depending on the depth of material left and the surface condition, pressure plate will stay if no previous problems. Ring gear depends on the tooth wear (yours looks to be a candidate for replacement).
Ask and ye shall receive. Looked at the springs and they seem to be fine (what do those springs do, anyways?). Remind me, the pilot bearing is the one in the end of the crank that the input shaft of the transmission rides on, correct?

Glad you're enjoying this thread. I'm hoping for a nice mix of opinions and expertise here, as I've a lot to learn about engine building -- everything, really.

clutchsprings.jpg

And what to wear when you're looking for wear is important to know as well!! :eagerness:
One in every crowd. :rolleyes: :grin:
 

DrEntropy

Great Pumpkin
Platinum
Country flag
Offline
Clean the face well with denatured alcohol, look for bluing of the contact face of the flywheel, along with "crazing" or cracking along the surface.

Those springs are a device intended to weaken, break and cause the need to replace the clutch. :devilgrin: :jester:

Actually they are a sort-of "shock absorber" to take some of the engines transferred torque out of the transmission/driveline. As Bob said, they can chunk from work-hardening or wear and end up making disengaging the clutch impossible. Just replaced the one in the Alfa due to rattling springs. The one removed sounds like a tambourine when shaken. Luckily it stayed intact before removal.
 
Offline
The springs make for easier, less tramatic clutch engagment, for example on our race clutch disc, we have no springs.
 

glemon

Yoda
Country flag
Offline
On my sometimes "budget" rebuilds I ALWAYS replace the carbon type T.O bearing and NEVER replace the pilot bearing. Clutch disc could go either way depending on the depth of material left and the surface condition, pressure plate will stay if no previous problems. Ring gear depends on the tooth wear (yours looks to be a candidate for replacement).

No way, no how am I going contrary to what Hap is saying. He is a PRO and his goal is to do a job right the first time. As a "home mechanic" I have significantly more time than money and can afford to gamble on a fix (except in matters of safety) so my opinions are for the financially challanged.

Bob
I agree with Bob, I often see the "replace it while you are in there advice", and sometimes I do, sometimes I don't, a professional mechanic of course does it all the time and loses money if they have to go back in and correct their work, I have ignored the "always replace both clutch and pressure plate at the same time" advice many times and just replaced the clutch. I have also taken trannies out for other reasons and not replaced the clutch "as long as I am in there". One other difference is that for most of us these are hobby cars and see limited miles, a half worn clutch may last 5 or 10 years or as long as you live or own the car. As far as motor rebuilding, not en expert, but have done it a few times, along the lines of what was talked about before, some will say replace all head studs, and maybe other bolt hardware in the motor, if you are not rebuilding for racing and not on an unlimited budget, and the pieces look good I don't and haven't had any problems. Agree with the advice about getting some good micromeasuring tools, they are very useful in engine rebuilding, indispensable actually, and once you have them can be very useful for all sorts of other purposes, measuring wear in new v. used parts, etc. Good luck and all due respect to Hap and others whose opinions or ideas on rebuilding may differ. Good luck, Greg
 
Offline
I'm thinking now that I'll plan to clean up the flywheel and replace the ring gear. If nothing else it'll make a good spare -- I looked up the price of replacement (admittedly aluminum ones) flywheels and they're not cheap. I'm still not quite sure what sort of "discoloration" I should be looking for.

Drew I will say this though, a aluminum flywheel at aprox. $350, if you have to resurfce a flywheel, balance it, and replace the ring gear, the Aluminum flywheel start to look more like a bargian. The MGB greatly benefits from the lighter weight aluminum flywheel, because it is heavy rotating mass engine for it's displacment, and a slower revver at best, the aluminum flywheel reduces the to weight in half, actually a little more than half,and this grealty helps the MGB engine abilty to rev, which it greatly needs for anyone with performance in mind. The aluminum flywheel is one of those items that make a "seat in the pants" difference and put smiles on people faces. I use lots of aluminum flywheel on my B series engine build, never had a complaint yet, everyone, but the "grandpa tooling to the grocery store" crowd loves the difference it makes in the B series engine.
 

glemon

Yoda
Country flag
Offline
I don't know what is available to "trim off" the stock MGB flywheel, probably not half the weight, but anyway I am sure there it some, I have had my stock flywheels machined to a lower weight when rebuilding other engines, my local clutch and brake/machine shop does it for $60-80 bucks. As Hap says there is little or no downside, for whatever reason most of our brit car motors have more flywheel than they need, they drive just as well and rev a little easier with the lighter flywheel, truly a painless performance increase.
 

riff_raff

Freshman Member
Offline
A neat thread, I went down this path last winter with most of my parts from Basil. ('79 B) I made a number of mistakes, but the final outcome was well worth the efforts. Your getting proper guidance from Hap and others, but I"ll chime in if I see you go down the path of my mistakes.....
 
OP
drooartz

drooartz

Moderator
Staff member
Gold
Country flag
Offline
Drew I will say this though, a aluminum flywheel at approx. $350, if you have to resurfce a flywheel, balance it, and replace the ring gear, the Aluminum flywheel start to look more like a bargain.
When I get around to the real build on the engine in my B I'll probably go down the Aluminum flywheel route -- this is more for my learning process, and to have a spare on hand if it is in good enough shape.

Your getting proper guidance from Hap and others, but I'll chime in if I see you go down the path of my mistakes...
Thanks! Always good to have another set of eyes watching.

Will be a couple weeks before I can get back to this -- gig schedule is getting nutty right now, no free time to spend futzing out in the garage.
 

ralph_s

Jedi Trainee
Offline
Nothing here you can't handle, you did survive your BE so the B is a piece of cake!. I'm a duffer at this, but have rebuilt two of my B engines and a 1275 for my BE. it's a great learning experience (sometimes the hard way) but still good. As a novice, there is no bigger thrill then hitting that switch the first time to crank it over for oil pressure, then starting the engine. Very satisfying to "enjoy" the fruits of your labor w/ a nice drive on a warm day. Just can't beat the feeling.
ps the "while you're in there" syndrom can be a blessing or a curse....choose wisely grasshopper!!!!
 
OP
drooartz

drooartz

Moderator
Staff member
Gold
Country flag
Offline
ps the "while you're in there" syndrom can be a blessing or a curse....choose wisely grasshopper!!!!
I went down that road with the Tunebug, and I'm much more cautious this time. Going to be more sure of what I want before I drop the large $$$ this time.
 
Similar threads
Thread starter Title Forum Replies Date
drooartz The teardown begins, follow along at home! Spridgets 51
jlaird Want to follow along Spridgets 11
CARSINC Follow My Spriget Blog As I Complete SpyderMite Spridgets 24
jlaird MGB Follow up to my bad post on prewar MGs MG 4
longbridgehealey Horn question follow up Austin Healey 12
glemon TR5/TR250 Stumped TR250 Running Rough--Follow Up Triumph 3
glemon General Tech Follow up on Master Cylinder and Brake Fluid Triumph 11
P TR6 Follow-up to hard starting Triumph 4
F Follow on questions from HD6 carburetor rebuild Austin Healey 5
D TR6 Follow-up question Triumph 3
P Follow up to valve job Triumph 3
KVH TR4/4A TR4A OD Follow Up Triumph 10
tahoe healey Gunson colortune follow-up Austin Healey 17
nevets intermittant sputtering follow-up Austin Healey 13
eschneider TR2/3/3A follow up - TR3 broken pushrod &compression test Triumph 1
G follow up question on ZDDP Triumph 12
tahoe healey dizzy follow up Austin Healey 7
KVH TR4/4A Tires and Wheels on a TR4--A follow Up Triumph 9
G Follow-Up Horn Question Triumph 2
T Wedge Follow-on TR8 interior question - seats Triumph 4
N TR6 Follow up on lean TR6 carbs Triumph 1
J Failed State inspection-tie rod end..follow up Spridgets 4
C Follow up on Datsun 5 Speed Spridgets 11
RickB MGB-GT Follow up ?... Exhaust on the MGBGT all good MG 9
X Schumacher follow up. MG 3
martx-5 TR2/3/3A Follow-up on TR3 Master Cylinder Resevoir Triumph 2
B TR6 Follow-on question regarding new TR6 tires... Triumph 5
B Darn Things Follow Me Home. Spridgets 14
Trevor Jessie Repairing a dual gauge, follow up Spridgets 4
nevets OD follow-up Austin Healey 0
jlaird Follow on question, Differintal Spridgets 3
S atmospheric crankcase follow up Triumph 1
S Wedge The TR7 Fuel Gauge Follow-up Problem !?!? Triumph 12
Jayplum For Sale SU HS6 for sale along with a long intake Triumph Classifieds 3
AngliaGT A Few More along Highway 220 Spotted 3
F TR6 Sputtering along Triumph 14
PC sing along British Motorbikes 0
dougie 100-S Ride Along Austin Healey 3
AngliaGT Saw a Few Along the Trip Spotted 4
TulsaFred Bugeye garage paint job - start to finish [almost] with lessons along the way Spridgets 28
T '76 Midget driving along then chugging? Spridgets 18
HealeyRick Nasty Boy Ride Along Austin Healey 6
longbridgehealey interior is coming along Spridgets 31
dougie Ride Along With One of the Best Austin Healey 3
M 1275 Exhaust Manifold Needed - Along with Advice Spridgets 5
T TR4/4A Randy - how is your TR4 engine build coming along? Triumph 18
PAUL161 T-Series TF Coming Along MG 32
T TR2/3/3A Tush - how is the TR3 coming along? Triumph 1
T Tush - how is the project coming along? Triumph 5
Tabcon Rolling Along II [with good link] Triumph 3

Similar threads

Top