• The Roadster Factory Recovery Fund - Friends, as you may have heard, The Roadster Factory, a respected British Car Parts business in PA, suffered a total loss in a fire on Christmas Day. Read about it, discuss or ask questions >> HERE. The Triumph Register of America is sponsoring a fund raiser to help TRF get back on their feet. If you can help, vist >> their GoFundMe page.
  • Hey there Guest!
    If you enjoy BCF and find our forum a useful resource, if you appreciate not having ads pop up all over the place and you want to ensure we can stay online - Please consider supporting with an "optional" low-cost annual subscription.
    **Upgrade Now**
    (PS: Subscribers don't see this UGLY banner)
Tips
Tips

TR2/3/3A door gaps on a TR3 prior to paint

Jerry

Darth Vader
Gold
Country flag
Offline
Group,
Does anyone have an opinion on door gap for a TR3A prior to any paint? IE: 3/16 or smaller? I have one door at 3/16 and the other at 1/8 right now. The 1/8 almost rubs now without paint so I think it is too tight.

Jerry
 

mallard

Luke Skywalker
Country flag
Offline
After 3 coats of primer, and 4 coats of paint I have an all around door gap of 1/8". I would open it up some by moving the front fender forward, and adjusting the hinges. The hinges can be bent some to help with adjustment. I even had to shave some material off the back side of one.
 

Jersey_Royal

Freshman Member
Offline
I would think 3 to 4mm as ideal finished, Got bear in mind body flex whilst driving.

Cheers
Guy
 

luke44

Jedi Warrior
Silver
Country flag
Offline
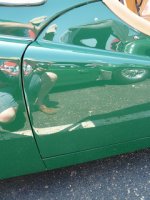
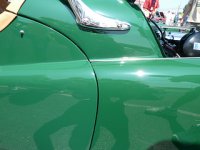
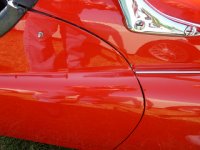
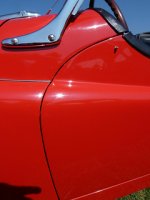
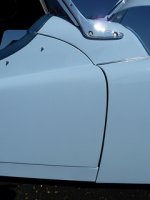
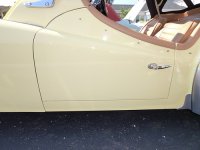
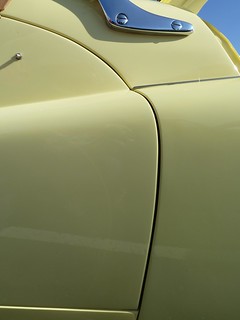
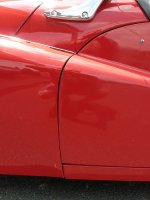
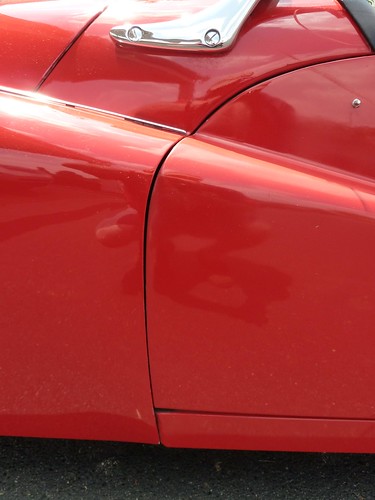
Ah, the old door gap question. I remember it well. Be sure to get this part right. Spend more time and more money here, because the quality of your build all goes from there. I went to the 2010 TRA to check finished cars as I was at exactly your point in my build. I took probably a thousand pictures of every gap on the cars. Some of these were best in show, some were drivers, and some were in between. As you asked specifically about door gaps, here is a sampler.

Let's just say when I got back I knew what I was not going to settle for and what the target to shoot for was. Good luck with the build.

PS - still learning the new board software - some of these click and enlarge, others don't.

8235669034_3d6ff83e73.jpg

8235669222_b348a3ab48_n.jpg

8235669900_7604e70e9d_n.jpg

8234606107_6d7e928314_n.jpg
8235669376_3eb9b96fe9_n.jpg
 

Attachments

  • 8235669462_7962b8dc1b_n.jpg
    8235669462_7962b8dc1b_n.jpg
    28.4 KB · Views: 156
Last edited:
OP
J

Jerry

Darth Vader
Gold
Country flag
Offline
thanks guys, do any of you remember what you started with with bare metal prior to paint? IE: did you add 1/16 of paint or more?

Jerry
 

TexasKnucklehead

Jedi Knight
Country flag
Offline
Those are some great pictures, and worth more than a thousand words. I think the gaps consistency is more important than the actual width of the gap. -That is, the door should be centered, and the gaps on each side should be the same as the gap on the bottom, and about the same as the gap at the hood, rocker, etc.

It's easy to add/subtract shims under the hinges to move the door forward or rearward until the latch works properly. It's harder to move the fender, and even harder to move the rocker -especially the slight bend under the front of the door.

I think my gaps are ok, but I'm still lacking body work and paint.

View attachment 24535
 

luke44

Jedi Warrior
Silver
Country flag
Offline
thanks guys, do any of you remember what you started with with bare metal prior to paint? IE: did you add 1/16 of paint or more?Jerry

I wouldn't get too hung up about that. The paint isn't really much thicker than 2 sheets of paper. Typically 4-8 mils when measured with DFT (dry film thickness )gauge like a Defalko. A 1/16th is closer to 60 mils. Just get the gaps even as noted. The TR3 doors gaps are notoriously tight. You'll know if they are too tight as they will bind. Even and consistent is more important. It isn't easy and can be time consuming. I definitely paid more (more hours) for the fitting of my panels than the prepping and painting.
 
OP
J

Jerry

Darth Vader
Gold
Country flag
Offline
Well, I have spent a day apiece on each door so far. I got the passenger door even but probably too tight. I may wait till later to trim. The drivers side is pretty good. I think a little more work on the fender fit and I will be happy. Then back to the front apron and bonnet. I seem to go back to spots I already worked on after I decide they are not good enough. Maybe if I take off my reading glasses, it will be fine.

Jerry
 

LarryK

Yoda
Country flag
Offline
You can also get a car guy ( one who appreciates and knows about such things ) to be an offside help. Sometimes the eye wants to be more perfect than it needs and another visionary will help. Seems you are on the right track. Sometimes a file or grinder works too! These were all handbuilt so they will not be perfect.
 
OP
J

Jerry

Darth Vader
Gold
Country flag
Offline
Oh, I have gone through lots of grinder wheels and sander wheels. Pat (on the forum) came by with some advice. He has given me some ideas on the finish quality. It was very useful, I hope to have it ready for stripping and first coat of epoxy primer soon. I say soon but real life gets in the way.

thanks for all the advice.

Jerry
 

CJD

Yoda
Country flag
Offline
Oh, quick tips with gaps...

Be sure to install the door latches at the rear of the door while you are setting gaps. It is possible to set the gap at the rear, and then find that the latch assembly will not fit. Always a bummer!

The frame and body will sag very slightly once everything is installed, so the gap at the upper rear will close just slightly after the restoration. We are talking 1/32" or so.

Test your lower door seal before painting. The new seals are thicker than the originals and are a problem. If your lower edge gap is decent, the seal will not fit. I left mine off. Others trimmed their seals to fit the gap. In any event, best to know how you will deal with it before the paint goes on!

I would think 1/16" is the absolute minimum. More than 3/16" starts to look excessive. But the main thing is that the gap is the same along the length of the gap. In otherwords, 1/16" at the top and 1/8" at the bottom will look like the door is sprung.

Good luck...don't feel bad when you get frustrated with gaps...they are a bear, but well worth it for the life of the car after the resto!

John
 
OP
J

Jerry

Darth Vader
Gold
Country flag
Offline
I am surprised to hear you say the frame will sag. The frame is much stronger than on my Healey. But I will take your advice. I have been fitting the doors with the latch still on the door , mainly because it holds up the rear of the door in place, and also because all the screws are stripped and I have to drill them out. What fun!
Jerry
 

CJD

Yoda
Country flag
Offline
Maybe "sag" is a bad word. "flex" in the downward direction under gravity is a better description!

Its a settling of everything from the weight of the engine, tranny, and body fittings...as well as the rubber body cushions. Not a lot...but noticeable, just the same. If your engine and tranny are already in place, it may be negligible.

John
 
Similar threads
Thread starter Title Forum Replies Date
Zitch TR4/4A Door gaps Triumph 6
BOBBYR Body panels and door gaps Austin Healey 5
K TR4/4A TR4A door gaps again? Triumph 6
Lotuswins Door Gaps Austin Healey 22
I Bugeye door gaps/fit Spridgets 13
T TR6 Let's talk TR6 door gaps! Triumph 20
chicken Correct measurement for door gaps [BJ7] Austin Healey 3
J TR6 Door gaps on a tr6 Triumph 5
TR6oldtimer TR6 TR6 Optimum door gaps? Triumph 13
G Door gaps MG 18
B 3000 Frame [ Door Gaps & Frame/Body Sag ] Austin Healey 8
bighly Correcting door gaps and door fit Austin Healey 4
drooartz Spring service of the 4-door Sprite (Morris Minor) Spridgets 0
A 100/6 BN4 Door Lock Austin Healey 15
SpeedyG TR4/4A Door window regulator spring Triumph 5
SpeedyG TR4/4A Interior door handles and escutcheons Triumph 9
AngliaGT Wanted Two inside window handles & Regulator for Driver's Door - '67 GT MG Classifieds 6
AngliaGT MGB-GT WANTED: Driver's Door Regulator + Two (2) interior handles. MG 1
D Older door panel clips Restoration & Tools 4
S TR2/3/3A Aluminum door capping for tr3 Triumph 12
BoyRacer Door Skin Removal Austin Healey 6
Southwarks TR2/3/3A TR2 door help! Triumph 2
M For Sale 2017 Jaguar F-TYPE Premium 2-Door Convertible for Sale mlbirk@aol.com Jaguar Classifieds 0
R MGB MGB Roadster Door Panel Speakers MG 9
D Top Door rubber and fuzzy seal Spridgets 5
J For Sale Triumph TR3 door, left, for sale Triumph Classifieds 0
Popeye TR4/4A Door seal channel near top of windscreen Triumph 6
fordmstr 73 Midget rocker panel end caps and door handle gaskets advise Spridgets 3
D MGB Older style door pulls MG 0
V Door Seals Austin Healey 8
Bayless Door seal question Spridgets 3
B BJ7/BJ8 Door Check Straps Austin Healey 10
Donald1107 TR2/3/3A Door hinges Triumph 14
algot1901 1950 Prefect E93A-946480 - door bottom rubber Other British Cars 14
D Door Seal Fit Austin Healey 18
D For Sale BT7 interior door cards - new ! Austin Healey Classifieds 0
E 3000 Healey Door Checks Austin Healey 1
A MGB MGB a glove box door MG 10
chicken BJ7 Door Fit Austin Healey 27
Patrick67BJ8 Glazing Door Window Glass in BJ8 Austin Healey 15
F Door Panel Hardware Austin Healey 3
LAW75 Door Latch Adjustment Austin Healey 22
BoyRacer Door Panel Measurements Austin Healey 3
LAW75 BJ8 Door Locks Austin Healey 2
Cappy Occasional Door Malfunction Austin Healey 1
nichola TR6 Door handle and window crank installation Triumph 0
J Door Draught Metal Clips Austin Healey 4
F Interior Door Handle Removal Austin Healey 2
F Wanted wanted new old stock driver side door latch Triumph Classifieds 2
F TR2/3/3A looking for door latch review Triumph 7

Similar threads

Top