• The Roadster Factory Recovery Fund - Friends, as you may have heard, The Roadster Factory, a respected British Car Parts business in PA, suffered a total loss in a fire on Christmas Day. Read about it, discuss or ask questions >> HERE. The Triumph Register of America is sponsoring a fund raiser to help TRF get back on their feet. If you can help, vist >> their GoFundMe page.
  • Hey there Guest!
    If you enjoy BCF and find our forum a useful resource, if you appreciate not having ads pop up all over the place and you want to ensure we can stay online - Please consider supporting with an "optional" low-cost annual subscription.
    **Upgrade Now**
    (PS: Subscribers don't see this UGLY banner)
Tips
Tips

TR2/3/3A Removing and replacing distributor in TR3

M

Member 10617

Guest
Guest
Offline
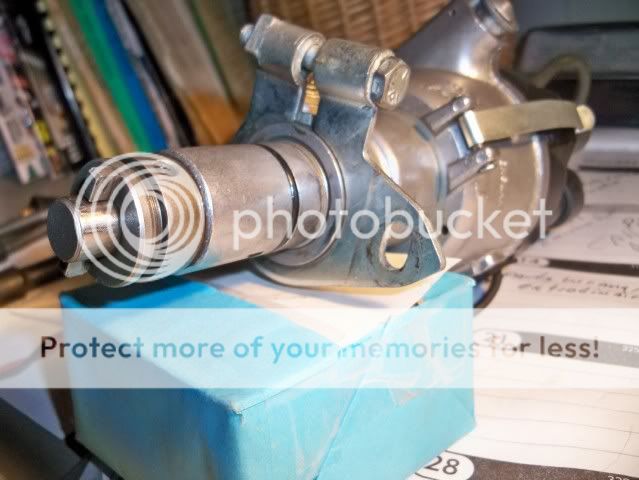
I posted a few days ago that I had pulled my distributor in order to look for the small screw that holds the condenser to the plate but which, somehow, had worked its way loose and fallen out. I pulled the distributor, shook it, turned in every which way, looked under the plate, but never found the missing screw. This is a real mystery.

I reinstalled the distributor. Everyone who had advised me on this process said that the dog at the bottom of the shaft is offset and therefore the distributor can go in only one way -- the correct way.

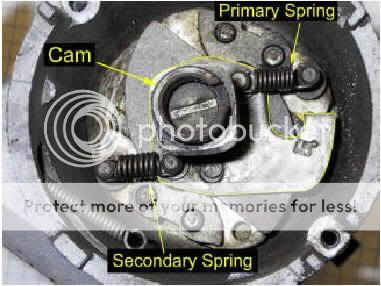
But I've just read the following in the Haynes manual: "Note the position of the slot in the rotor arm drive in relation to the offset drive dog at the opposite end of the distributor. It is essential that this is reassembled correctly as otherwise the timing may be 180 degrees out."

If the offset prevents the distributor from being installed improperly, I don't understand the Haynes warning.

Can someone explain it?

NOTE: I did not remove the cam spindle, so as far as I can tell, I didn't disturb the slot in the rotor arm drive. Can I assume that this is what Haynes is talking about???
 

TomMull

Darth Vader
Silver
Country flag
Offline
I don't understand that warning either. The distributor only goes one way. However, even if the distributor is correctly installed you should still adjust the timing. Tom
 

poolboy

Yoda
Country flag
Offline
That 'warning' is so that if you have removed the driven dog from the distributor drive shaft and are going to reinstall it (the driven dog) be aware that it will install 180* different from the way it came off and to use the position of rotor (on the other end of the distributor shaft) as a guide to getting it right.
100_0336.jpg

Drift the driven dog pin out of the hole and you can remove the driven dog from the distributor shaft.
 

TR3driver

Great Pumpkin - R.I.P
Offline
poolboy said:
That 'warning' is so that if you have removed the driven dog from the distributor drive shaft and are going to reinstall it (the driven dog) be aware that it will install 180* different from the way it came off and to use the position of rotor (on the other end of the distributor shaft) as a guide to getting it right.
:iagree:

If you have just removed the distributor, without removing that pin (or disturbing the gears inside the pedestal), then it only goes back one way.
 
OP
M

Member 10617

Guest
Guest
Offline
Whew! That's a relief to know.

I didn't do anything but pull the distributor (twice) and look around for the missing screw (which, as I said, was nowhere to be found!!??).

I didn't disassemble anything, so apparently the warning did not apply to what I had done.

I haven't given up on the screw, however. Unless the screw wasn't there to begin with (highly unlikely) or that it fell out unnoticed when I took the distributor cap off (also unlikely), it has to be there somewhere. I am going to pull the distributor out again, loosen the points plate and lift it enough to look under it once more, and take one more look.

Many warm thanks Poolboy and Randall.

Wish me luck.
 

poolboy

Yoda
Country flag
Offline
When you remove the points plate expect to see something like this.
Centrifual advance weights and springs.
TRdistributor.jpg
 

TR3driver

Great Pumpkin - R.I.P
Offline
And note that there is still a small space below the bottom most plate that you can see in poolboys photo. Normally I think, it wouldn't be large enough for that screw to fit into, but it may have gotten jammed in there somehow. In that case, though, I think you'd notice that the shaft was hard to turn (it should spin freely).
 
OP
M

Member 10617

Guest
Guest
Offline
Poolboy and Randall,

I got to that stage the first two times I pulled the distributor. I removed the two screws holding the plate and lifted it as far as I could without detaching the spring from the vacuum unit so I could see around the weights. In the little space around the weights, I found no screw. And it appears that there is no space under the weights for the screw to fall into.

Also, nothing seemed to be binding, and nothing rattled or fell out.

That is the mystery.

Just to recap. My car began missing on a road trip. After checking other likely suspects, I took a look at my points, which were fine. It was then that I saw that there was no screw holding down the condenser and wire. I then checked the points for pitting, but found none, so the condenser must not have been malfunctioning very long (otherwise there would have been some damage to the points). I find it very hard to believe, but perhaps the screw had been left off at some point, and the condenser and wire were making intermittant contact being pressed down but not held down by the screw. This missing problem also occurred about two months ago, but I thought it was a faulty spark plug wire. When I had the wires replaced, the problem went away.

One of life's mysteries....

Poolboy: I always appreciate your good photos. They really help in solving some of these problems.


One last question on this topic: the Haynes instructions on distributor maintenance, removal, repair, and replacement are fine, as far as they go. But for someone new to this they leave a lot unsaid or undefined. Is anyone aware of a more detailed and step-by-step set of instructions -- useful to the amateur -- for working on the distributor? Someting like the great manuals available for SU carburetors.
 

poolboy

Yoda
Country flag
Offline
Well,Ed, when it comes to distributors, except for changing points or converting to Pertronix I don't mess with the internals. For one reason I've never had to and for another, one of the first things I do is send mine off to Jeff Schlemmer.
As far as removing and replacing the distributor for whatever reason. you have to admit it's pretty simple as is finding the starting point for timing.
Fine tuning is something I can't resist doing, as is fiddling with the carb mixture when things get unbearably boring around here.

But if you want some information about procedures that in my opinion are best left to Jeff I have this to offer:
https://www.jcna.com/library/tech/tech0015.html

And then there is this:
https://www.acecom.com.au/TR6_images/LucasFaultDiagnosisServiceManual.pdf
You may already have this one: https://mgaguru.com/mgtech/books/lts_otcc.htm

Between those 3 there's bound to be enough information for just about anyone to screw things up.
And, thanks for the comments about the pictures, Ed.
 
OP
M

Member 10617

Guest
Guest
Offline
Poolboy,

Thank you for all the references. I'm with you -- except for changing points and setting timing, I try not to mess with the distributor. I sent mine to Jeff and he rebuilt it for me.

Pulling the distributor, as you point out and as you guided me through some time ago, turns out to be pretty simple.

But unexpected things happen... like the missing screw (the fantom screw), which led me poke around in the distributor looking for it. And I'm still looking for it...

Although I certainly don't want to rebuild one or mess with mine other than changing points and setting timing, I am curious about how the distributor is constructed and how it works. My interest in a more detailed manual is just to answer that interest.... but not to take one apart.If for no other reason, I like the thought, as I drive down the road, that I have some notion of what's going on under the hood... and elsewhere on this great car. Makes life more interesting, right?

You are right.... leave the complicated stuff to Jeff... he's great.

Thanks again for all your wise advice.
 

TR3driver

Great Pumpkin - R.I.P
Offline
LexTR3 said:
Although I certainly don't want to rebuild one or mess with mine other than changing points and setting timing, I am curious about how the distributor is constructed and how it works. My interest in a more detailed manual is just to answer that interest.... but not to take one apart.

So, why not pick up a junker dizzy on ebay and take it apart? That would allow you to see how it works, and how it comes apart, without risking the freshly rebuilt one you have now. They frequently sell for under $20 (plus S&H) in rough condition, a modest price for educational materials. If you're lucky, it will also supply some spares (like that screw, which is kind of special as I recall). Eg,
https://www.ebay.com/itm/MG-MGB-EARLY-DIS...84d&vxp=mtr
or
https://www.ebay.com/itm/Lucas-Distributo...15f&vxp=mtr

(I am not recommending either of those as a "good deal", they are just examples. You could probably do better if you are willing to spend a lot of time looking.)
 
OP
M

Member 10617

Guest
Guest
Offline
Randall,

As a matter of fact, I have a backup, newly rebuilt distributor that I purchased from Jeff. I haven't taken it apart, but I look at it when I am reading about distributors. The idea of a junker dizzy on ebay sounds like an even better idea.

BTW. Here is a little manual that I have found useful: It is Martin Thaddeus' Classic Car Electrics (Enthusiast's Restoration Manual, Veloce Publishing). It's pretty basic... but, hey, my knowledge is pretty limited... and I'm not trying to become an expert at all this.
 

Geo Hahn

Yoda
Country flag
Offline
TR3driver said:
...So, why not pick up a junker dizzy on ebay and take it apart? That would allow you to see how it works, and how it comes apart, without risking the freshly rebuilt one you have now. They frequently sell for under $20 (plus S&H) in rough condition, a modest price for educational materials...

You could even make one of these - what I call 'The Visible Distributor':


The-Visible-Distributor.JPG


More fun than 'The Visible V-8', more educational than 'The Visible Woman', less disturbing than The Visible Head.
 
OP
M

Member 10617

Guest
Guest
Offline
George,

Ha, ha... well, I don't think I need to get that close to the action. But it's a great idea if I were in a classroom setting.

Don't know if it would work, however, because the one in the photo seems to be missing its low tension lead.
 

Geo Hahn

Yoda
Country flag
Offline
Look closely, it's there.

The photo is the TR4 which routes the low tension lead from up by the timing cover, behind the dizzy and then to the coil.
 
OP
M

Member 10617

Guest
Guest
Offline
Oh, ... there it is. I was misled by the empty clip and I didn't notice the clip on the other side.
 
Similar threads
Thread starter Title Forum Replies Date
L Removing Master Cylinder Without Paint Damage Austin Healey 27
D Removing the steering wheel hub Spridgets 12
J General MG Thoughts on removing a stubborn 2-ear spinner MG 5
K TR2/3/3A Removing scratches and scrapes fro the wind wings that screw to the windshield? Triumph 9
Gatheringtree TR2/3/3A Removing the headlamp bezel rim Triumph 2
R TR6 Removing the charcoal cannister considerations Triumph 7
S TR2/3/3A Removing a stuck oil drain plug Triumph 13
K TR2/3/3A Removing TR3 windshield stanchions Triumph 4
KVH General Tech Removing Piston Wrist Pin Triumph 2
C Removing AH Sprite Mk 1 windscreen washer pump Restoration & Tools 2
M Need help removing the pinion assembly from a late 1275 steering rack Spridgets 7
jfarris TR2/3/3A Removing choke cable from dash insert Triumph 3
doakley Spitfire Removing facia Triumph 2
7 Wedge Removing sunroof frame Triumph 5
D Removing the last rust from pitted steel Restoration & Tools 11
D Removing Old Radio Austin Healey 4
S Removing Overdrive Shaft Lever Pin Austin Healey 7
L TR2/3/3A Any trick to removing TR3 doors? Triumph 12
M TR2/3/3A Removing Wires From Stator Tube Triumph 7
BN6_2197 Removing connecting link between shock absorber and rear axle Austin Healey 4
T TR2/3/3A Requesting help on removing TR3A steering column and box Triumph 21
longbridgehealey Removing BN4 Bonnet Austin Healey 9
C Removing the Healey "Flash"? Austin Healey 11
Gliderman8 TR6 Removing Left Rear brake line... help! Triumph 9
maxwedge5281 Removing Complete Rear End From BN6 Austin Healey 5
Jim_Gruber Removing a Spridget Engine Checklist Spridgets 5
S TR2/3/3A removing the temp gauge needle Triumph 5
Sarastro General Tech Any good ideas for removing liners? Triumph 20
R TR2/3/3A Removing WD-40 Triumph 6
F Removing oil and water guage from BT7 dash Austin Healey 17
R TR2/3/3A Removing transmission Triumph 3
Joe Schlosser Removing Control Knobs Spridgets 9
W TR2/3/3A Tell me there is a trick to removing lower control arm pin... Triumph 45
Bona42na Spitfire Removing Transmission/Gearbox from underneath Triumph 3
pkmh Removing Passenger Rear Bearing Nut Austin Healey 26
BN6_2197 Advice on removing the float from the chamber Austin Healey 6
B TR6 Removing the ckoke/heater control knobs Triumph 4
Jim_Gruber Removing the Rear Axle Seal Spridgets 4
Jim_Gruber What is the correct tool for removing brake lines from a BE Master Cylinder Spridgets 10
K TR2/3/3A Removing windshield stanchions? Triumph 8
R TR2/3/3A removing sending unit from tank of TR-3. Triumph 8
Jim_Gruber Removing back Radius Arm Bolt Spridgets 12
KVH TR4/4A Removing Rear Differential Seal--Solid Axle Triumph 1
JimTR4 TR4/4A removing the rheostat Triumph 5
Z MGB 1979 Timing problems after removing distributor - Help Please! MG 28
M TR2/3/3A Can radiator be fixed without removing it? Triumph 20
KVH TR4/4A Removing Glass Windshield Triumph 4
KVH TR4/4A Removing the Differential Triumph 7
T TR4/4A Removing wiper motor - inner cable Triumph 4
Joe Reed MGB Removing stuck blade on factory electric cooling fan??? MG 7

Similar threads

Top