• The Roadster Factory Recovery Fund - Friends, as you may have heard, The Roadster Factory, a respected British Car Parts business in PA, suffered a total loss in a fire on Christmas Day. Read about it, discuss or ask questions >> HERE. The Triumph Register of America is sponsoring a fund raiser to help TRF get back on their feet. If you can help, vist >> their GoFundMe page.
  • Hey there Guest!
    If you enjoy BCF and find our forum a useful resource, if you appreciate not having ads pop up all over the place and you want to ensure we can stay online - Please consider supporting with an "optional" low-cost annual subscription.
    **Upgrade Now**
    (PS: Subscribers don't see this UGLY banner)
Tips
Tips

TR4/4A I Removed My Overdrive--TR4A

KVH

Darth Vader
Country flag
Offline
I'm finally there. Type A Overdrive.

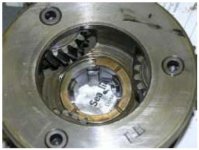
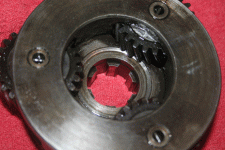
About those eight springs. My manual speaks of them being 4 long and four short.

Mine are all the same length. Is something wrong?

Also, I don't have all of the internal parts out yet. The brake ring seems really tight to the casing, and won't yet budge, and I'm a bit confused on how it all separates, but when it does, I suppose I ought to remove the pump just to look at it--or just leave it be? I'm only doing all this to check the thrust washers since I found bit of bronze in the oil.

Finally, what about the non-return valve? I see a ball bearing, a spring and a plunger. But no valve per se, like for the operating valve. Is that correct?
 

TR3driver

Great Pumpkin - R.I.P
Offline
The springs aren't necessarily a problem, probably just sagged a bit. But check the thickness of the wire, as the outer ones are usually heavier wire and may reach coil bind if used on the inside. Someone, I forget who offhand, traced their slippage problem to those springs being installed wrong.

The brake ring does fit tight in the housing, you'll probably need a hammer & drift to get it out. Work on one side until it moves just a bit, then work on the other side.

You could probably get by without pulling the pump, you should be able to clean up any swarf by just removing the plug in the bottom. But I pulled mine anyway, just to be sure. Used a bolt, nut & a piece of flat iron stock for a puller; then some all-thread (10-32 maybe?) and thin-wall brass tubing to guide it back into place. Note that it only goes in one way, otherwise the valve won't line up.

That's all there is to the "non-return" valve. It's just a simple check valve, the ball seals against the seat in the pump body when it is closed. When the pressure inside the pump rises higher than the pressure inside the accumulator (plus the spring pressure), the ball lifts and lets oil flow from the pump into the accumulator.

DSCF0040.jpg
 

TR4nut

Yoda
Country flag
Offline
Check your springs again. They can look the same length but can in fact be different. Take some threaded rod, washers and nuts and compress the springs until you get coil bind - check the bound length. Not my tip, just a friend in my club who had those springs in the wrong location and it created a big problem.
 
OP
KVH

KVH

Darth Vader
Country flag
Offline
Good advice, thanks. Looks like I see another issue. Moss shows a thrust washer, Item 866-560, also shown as "25" in the TR4 Workshop Manual, but my OD does not have that unless by Thrust Washer, in that instance, they mean a very fine steel ring that appears to be under the planet gears in the planet gear assembly. I want to be sure no one took the Mills pins out of the Planet Assembly then forgot the thrust washer.

I started all of this because of bronze pieces and bits in the OD oil, but I can't believe it disintegrated and left just shavings either. I'm thinking there might be OD models or changed specs, because I don't see anything looking like a substantial thrust washer in that area.

Any help appreciated. thx
 

TR4nut

Yoda
Country flag
Offline
It sounds like you lost the thrust washer that is in the planet gear assembly, and probably now you know the source of the those brass bits. It is brass, its is small, and it, unfortunately, is fragile. And regrettably difficult to replace as you have to remove one of the planetary gears to get clearance to put it in. I can take a pic of one if it helps you, let me know.
 
OP
KVH

KVH

Darth Vader
Country flag
Offline
Yes, I'm beginning to think that's what happened, but what about the "seat" for the thrust washer? I see that bright shiny steel ring in there; I wonder if the friction just polished it up a bit?

And, yes, I'd like to know how to remove and replace a Mills pin. I'll take it to a machine shop if necessary. I don't think Moss sells new pins. They are partially exposed on the sides with access slots (holes).

thx
 

TR4nut

Yoda
Country flag
Offline
It's just friction I think - that's just a machined recessed area for the thrust washer. The Buckeye Triumph has a pretty good writeup, though I've never attempted it:
Overdrive article
 

TR4nut

Yoda
Country flag
Offline
Forgot to add, and unfortunately I don't have the link - but someone out there is manufacturing a stouter thrust washer. It requires machining the recess to handle a thicker washer. No experience, but it sounds like a decent remedy to that very small washer.
 

TR3driver

Great Pumpkin - R.I.P
Offline
Here's a shot of (part of) that washer in situ (taken from the article on the VTR website by Sam Clark & Larry Young). They do frequently break (I just replaced mine earlier this year).

What I found on my OD was that the end float was way higher than specified, even with all new thrust washers and the thickest available shims. I note that Sam & Larry found the same thing (broken washer plus too much end float). I have a suspicion that everyone is doing as they did and leaving it too large (or as I have done in the past and just not checked it at all :smile: ).

My theory is that the excess end float is what causes the thrust washer to break, because when you switch out of overdrive, the sun gear gets thrust to the rear by the motion of the clutch, and the excess clearance lets it slam into that thrust washer. I think the breakage will stop if the clearance is brought within spec (which for me required machining an additional spacer washer).

But that is just a theory at this point, ask me again in another 10 years :laugh:
 

Attachments

  • 27094.jpg
    27094.jpg
    20.8 KB · Views: 795

TR3driver

Great Pumpkin - R.I.P
Offline
Oh yeah, I believe the pin has to be removed the way that Nelson, Sam & Larry all did it; which is to say drill it out. Normally a Mills pin will have provisions for driving it back out the way it went in, but not in this case. That is why none of the manuals cover disassembling the planet gears, IMO.
 
OP
KVH

KVH

Darth Vader
Country flag
Offline
Here is a picture of my planet gear assembly with no thrust washer. So--where is it? Do I need to go searching thru the transmission now for chips and slivers?

Am I OK to drop a new one in after working out the Mills pin, etc.

If if comes thru, you'll also see the chips I found plus a new thrust washer for comparison.
 

Attachments

  • 27095.gif
    27095.gif
    92.9 KB · Views: 738
  • 27096.gif
    27096.gif
    79.8 KB · Views: 731

TR3driver

Great Pumpkin - R.I.P
Offline
Looks to me like it would probably be OK to just install a new one. The shaft will hold it in place even if the pocket doesn't; and if the surface is a bit rough then it will just turn with the carrier instead of with the sun gear (when in overdrive). But I am just guessing and hoping, since mine looks very similar and that is what I did.

I do suggest checking the end float and being sure to bring it within spec. You may need more spacers if some of the carrier is worn away.

Also check that the end of the sun gear is still reasonably flat where it will contact the thrust washer. If it is worn to a funny shape from hitting the carrier, you may need to dress it down or replace it. And I believe the book says the annulus, sun gear and planetary gears should all be replaced as a set.
 

TR4nut

Yoda
Country flag
Offline
Useless bit of trivia to add: the first picture Randall added is for a 28% gear set probably from a Healey. You can see that the planetary gears are slightly smaller than the gears in the 22% gear set in the second set of pictures. The nice benefit of the 28% set up is that the thrust washer doesn't interfere with the gears and can be changed easily.
 

TR3driver

Great Pumpkin - R.I.P
Offline
KVH said:
Do I need to go searching thru the transmission now for chips and slivers?
On re-reading this, I see that my answer might be misinterpreted. Yes of course you should clean out the swarf from the broken washer. And since the transmission and OD share oil, there will almost certainly be pieces of it in the transmission.

In my case, what alerted me I had a problem was that bits of the broken washer were getting caught in the non-return valve, causing the OD to not develop enough pressure.
 
OP
KVH

KVH

Darth Vader
Country flag
Offline
Hmmm.

OK, I'm ready to pull the overdrive pump. It's a force fit, so I hope nothing breaks. I assume this is a worthwhile exercise and that I'm not just being compulsive? I guess I'll look for bronze chips there as well.

Then, I'm also ready to remove the annulus assembly from the rear OD housing. I understand I need to press it out. I am finding absolutely no end float as it now exists. None. Does that mean that the prior owner didn't use correct spacing washers, messed up the brass thrust washer, etc? Could that all be the source of my problem?

More questions: Is this a perfect excuse to visit Harbor Freight for a hydraulic press?

And: Once I get this back together, do I really need to test it somehow on a bench? Most setups I see are with an electric motor, though I think Randall and others have mentioned a good size drill as a possibility. Is it a given that no transmission goes back in without a bench test?

Thanks all.
 

TR3driver

Great Pumpkin - R.I.P
Offline
The Laycock manual is very specific about there being some end float in the rear bearings, so I'd say there is a problem if you have none at all. But it might just be some particles from the broken washer jammed in the bearing. The spacing washers are hard steel, so I doubt they are broken or that the lack of clearance in the rear bearings has anything to do with the broken thrust washers.

There are probably other ways to get the annulus out and back in, but the press sure makes it easy. I'm glad I've got one. It's also real handy if you discover you need to replace the clutch bearing.

I guess the wisdom of bench testing depends on how confident you are that everything is perfect, and on how much you love removing and installing the gearbox in the car. Seems like everyone (myself included) always finds at least one issue to correct, and I'm not at all fond of doing the R&R, so I'm definitely glad I tested mine. I think George has a test setup, maybe you could borrow his. Get the pressure gauge too :smile:
 
OP
KVH

KVH

Darth Vader
Country flag
Offline
OK, I'll check all that. I'll find the problem. Is your press 12 tons, 20 tons? Floor stand or bench? Is the 20 ton one total overkill? The one at Harbor Freight on the floor here is $199, at 20 tons, 5 feet tall, a bit bulky, but I can get a smaller one, too.

The pressure gauge at Harbor Freight is for 5000 psi; I suppose I can guesstimate between the calibration marks, but a bit sloppy.

This is sure fun.
 

TR3driver

Great Pumpkin - R.I.P
Offline
My press is a much-abused floor model, bought used. I don't know how much it actually develops, but there is a big sticker that says not to use a jack over 15 tons. But I rarely use either full force or full height, a smaller bench model would probably cover 95% or more. I added casters to the bottom of mine, so I can roll it into the corner when I'm not using it.

For the gauge, I meant to borrow George's (if he will let you). There is a special fitting required, and it's best to use a 600 psi oil-filled gauge. Pressure gauges are most accurate near the center of the scale, and become rather poor especially at the low end. If you would rather buy your own, here is one place you can get both the gauge and the fitting:
https://webspace.webring.com/people/tj/jholekamp/

PS, suitable gauges are readily available; I got mine at MMC for about $20. The adapter is the hard part. I machined my own from billet; or if you have an extra valve plug handy, you can drill it and braze on a fitting. But unless you really enjoy fabricating tools, it probably makes more sense to just buy from Jay.
 
OP
KVH

KVH

Darth Vader
Country flag
Offline
I think I need to better understand what I'm doing. I reading the "Theory" part of the Buckeye article. Complex.

I'm having trouble understanding the function of the accumulator piston?

Also, when the solenoid is turned on, and the operating lever kicks up, raising the operating valve, what exactly is happening to make the OD work? I assume the pistons somehow push out against the thrust ring, but where is all that pressure generated?

Thanks.
 

TR4nut

Yoda
Country flag
Offline
The accumulator piston basically stores the energy to engage the overdrive - the pump pushes oil into the accumulator against the accumulator spring - until it hits a relief port - you probably build up 300 -450 psi or so pressure stored up there. Then when the operating valve kicks in the fluid is transferred to the operating pistons which engage the cone clutch and enable the overdrive. You get very quick engagement that way.

I haven't worked on a J-type, but I don't think they have the accumulator piston, so when you engage the pump needs to build pressure to the operating pistons, which takes time so the engagement on a J-type is longer.
 
Similar threads
Thread starter Title Forum Replies Date
K TR2/3/3A Can anyone confirm that if you replace the ammeter with a voltmeter ( generator removed and alternator added) that you...... Triumph 5
R General Tech Preserve eng/trans that has been removed Triumph 11
D TR6 1976 TR6 - Can Rubber Guards be Removed from Bumpers? Triumph 9
N MGB-GT Have you removed your car's rubber bumpers? MG 7
germanmichel Camshaft change , oil pan has to be removed ? Austin Healey 2
2billydavies TR2/3/3A just removed the pistons/sleeves... can't believe she ran as well as she did! Triumph 6
RJS Water Pump Noise Resolved [removed Water Wetter] Triumph 20
KVH TR4/4A TR4A IRS Differential and Axles Removed Triumph 11
RickB I've got that Buick hood removed from my Sprite. Spridgets 10
7 Ignition light stays on after key removed. Why? Triumph 19
BugeyeNJ58 Removed heating system from bugeye....Questions Spridgets 26
theleisure Steering rack check, removed from car Spridgets 2
M removed Spridgets 1
scoutll Removed interior on the 63 for carpet replacement Spridgets 5
RickB Steering wheel-removed but new wont fit +New Pics! Spridgets 26
T TR2/3/3A Can you drive TR3 w/ temperature sender removed? Triumph 13
T More of DPO Pedro removed Triumph 18
RickB Removed Frank's bumpers today!! Spridgets 58
PeterK TR2/3/3A Just removed the 3A front apron Triumph 23
jlaird Off to have a mole removed Spridgets 4
jlaird Status Report - Springs removed Spridgets 16
Bret Ignition running on after key is removed? MG 8
S Knock-Off Hub bearings - Can they be removed? Jaguar 1
RickPA Overdrive Oil Pressure Austin Healey 8
bighealeysource Leaking Overdrive and Gearbox Drain Plugs Austin Healey 19
71TR6 TR6 Type-J Overdrive identification Triumph 4
luke44 TR2/3/3A Calling all Wiring experts TR3 Overdrive Wiring ver A or ver B or are they the same? Triumph 8
T Wanted Working overdrive unit Austin Healey Classifieds 2
D Overdrive Stops Working After Oil Change Austin Healey 26
S TR2/3/3A overdrive does not function Triumph 45
T TR2/3/3A A type overdrive hard engagement Triumph 36
S Overdrive Throttle Switch Austin Healey 4
KVH General Tech Overdrive--Afraid it's Serious Triumph 45
M Overdrive Pressure Test Austin Healey 2
BN6_2197 Gearbox/Overdrive Removal Austin Healey 25
T For Sale MGB Black Label Overdrive For Sale Or Trade For New RB Parts MG Classifieds 2
Fanch00 Non-Overdrive Benefits? Austin Healey 10
AUSMHLY BJ8 Overdrive Oil Passages Austin Healey 2
R TR6 J-Type overdrive will not disengage when warm Triumph 8
S Overdrive Relays Austin Healey 2
AUSMHLY Overdrive Buffer Pad Austin Healey 3
L Stuck in Overdrive Austin Healey 10
AUSMHLY Flushing the Transmission/Overdrive Austin Healey 7
T Weight of BJ7 Transmission/Overdrive Austin Healey 10
P Overdrive Not Engaging Austin Healey 4
S BJ8 Overdrive Stays Engaged Austin Healey 35
AUSMHLY BJ8 Overdrive Accumulator Spring Tube Austin Healey 1
RonC TR2/3/3A J Type Overdrive in TR3A Triumph 4
AUSMHLY BJ8 Overdrive Pressure Loss Austin Healey 11
AUSMHLY BJ8 Overdrive Oil Pressure Austin Healey 14

Similar threads

Top