• The Roadster Factory Recovery Fund - Friends, as you may have heard, The Roadster Factory, a respected British Car Parts business in PA, suffered a total loss in a fire on Christmas Day. Read about it, discuss or ask questions >> HERE. The Triumph Register of America is sponsoring a fund raiser to help TRF get back on their feet. If you can help, vist >> their GoFundMe page.
  • Hey there Guest!
    If you enjoy BCF and find our forum a useful resource, if you appreciate not having ads pop up all over the place and you want to ensure we can stay online - Please consider supporting with an "optional" low-cost annual subscription.
    **Upgrade Now**
    (PS: Subscribers don't see this UGLY banner)
Tips
Tips

Hood frame fit

bob hughes

Luke Skywalker
Country flag
Offline
:wall:

Hi guys, fitted the hood frame back onto the car yesterday, wound up the windows for a check on the fit. I have two problems. The side woods are reluctant to line up, as if they are binding at the joint possibly the lengths need to be reduced a little? I found that if you pushed the parallelograms of the frame forward a tad and the woods lined up. Not sure if this can be done once the hood fabric is fitted.
I also raised the side windows up for a trial fit. The drivers side is not too bad, but the passenger side has a gap at the top rear, and the gap tapers down to nothing at the front. I took a dimensional check beween the two sides at the high point towards the rear of the glass and the passenger side looked to be 10mm lower, I was able to pull the glass up at the back by hand and the gap looked much better. ( this could not be done on the drivers side, the glass did not want to be moved) Is there any way that the glass can be tweaked to raise up at the back a bit, could the nylon sliders have some bearing on this? I did replace some once but if my memory is correct I did not replace them all so there may be one or two missing on that side and they could influence the throw of the glass.

Bob

:cheers:
 

AUSMHLY

Obi Wan
Country flag
Offline
Hi Bob,

If the wood is binding where they meet and no one has moved them, then your frame may need a little adjustment. The fix may be as simple as adding a thin shim to the two front bolts under the mounting plate. Try that before cutting the wood. If that works you may find the gap around the side window and the wood has now changed. It may even fix that window gap issue you mentioned. But don't think for a moment, you'll be that lucky :smile:

I doubt the nylon guides are not the problem, however you should have all the guides in place to keep the window firm in the track and to help with travel. As is true of the outside rubber seal and the inside felt seal. All effect the setting place and ease of movement of the window.

The door glass is adjustable, forward, back, up, down and the rake angle by adjusting the front window channel.

There are two screws at the bottom of the channel that will let you angle the entire window. You'll need to remove the two screws on top inside and if you have the two small screws on the outside of the U-shaped piece, bottom of the vent window, screwed to the top of the door. Once the top screws and the two bottom screws are removed, and you've removed the L-bracket that stops the window from going up, you can move the window forward, back, up/down and angle the window to meet the wood. You'll roll the window up or down, move the front window track forward or back and rake it too. Once you've found the sweet spot, screw everything in place.

I know, sounds simple on paper.
Roger
 
OP
B

bob hughes

Luke Skywalker
Country flag
Offline
Thanks Roger,

Just the sort of detail I needed, sounds like a piece of cake ( loud coughing noise) I think that if I shim up the front of the mounting plate the gap will undoubtedly get worse. However shifting the glass gives me some hope, and all this as a temporary fix just to visit one show, still good practice for the real thing!

I have had a brainstorm on fitting the hood and I am going to try a trick with string off the top bow back down to the drain channel, saw it done in Rawles as the trimmer was making a new hood. It looks as if you temporary fit the sewing line of the hood to the top bow, and throw the back of the hood on top of the rest, temporarily pin the front of the hood to the front bow and use a series of strings from that top bow back down to the drain channel and the retaining bow there. Then reference everything dimension wise, this can then be transferred to the hood to mark it once it is off the car and the retaing bow and clips can then be fitted to the rear of the hood. Sounds good in practice but the doing will tell. I have filed the grips off a number of the clips so that ajustment will be easier and not damage the hood so much, if it is required, they can then be substituted for the correct ones once a fit is achieved.

Bob
 

AUSMHLY

Obi Wan
Country flag
Offline
Legal Bill said:
Just curious, how does shimming the mounting bracket effect how the wood pieces line up?

We're refering to the two pieces of wood, above the window and the curved wood in back of the window. The wood is screwed in place on the frame. Shimming the frame affects the gap above the window and in back of the window, by slightly angling the frame. Depending on how many shims and where you put them, affects the gap of the frame, thereby affecting how the wood now lines up with each other, being they are screwed into the frame. And your end result is to get the gap betweent the wood and the window where you want it.

That being said, you can of course, remove the wood, fill in the screw holes and repostion the wood. There is not a lot of movement of the wood though, for it's made like a puzzle to fit the frame rails.

Cheers,
Roger
 

chicken

Jedi Trainee
Country flag
Offline
Roger

You mention the outside rubber seal and inside felt seal to help guide the window. I was curious as to which way round these went, how is the rubber fixed to the outside of the door ? my seal has small holes along it's length is it screwed on ?
Ref the felt seal is this just fixed from the top with the grip clips.

Rob
 

AUSMHLY

Obi Wan
Country flag
Offline
Legal Bill said:
SO you are shimming between the wood and the frame? I thought you meant you were shimming the frame mount to the car.

Sorry if I'm unclear.
The shims go under top frame mounting plate, that gets bolted to the car.
 

AUSMHLY

Obi Wan
Country flag
Offline
chicken said:
Roger You mention the outside rubber seal and inside felt seal to help guide the window. I was curious as to which way round these went, how is the rubber fixed to the outside of the door ? my seal has small holes along it's length is it screwed on ? Ref the felt seal is this just fixed from the top with the grip clips. Rob

Hi Rob,

The outer rubber strip is attached to the long chrome finisher on the top of the door (BJ8) with clips. If I remember correctly, those clips (which look like an "S") do double duty. One end of the clip attaches the rubber strip to the chrome finisher and the other end of the clip attaches to the top of the door edge.

The furflex/felt...what ever it's called, inner seal gets attached with clips, to the top inside edge of the door metal, just as you described.

Cheers,
Roger
 

AUSMHLY

Obi Wan
Country flag
Offline
I've been working on my top frame fit for over 4 months now. I finally figured things out, buttoned everything up, and devlived my car to the shop. It's now in line to have the professional install the Robbins Sunfast top.

I went over there today, to take some photos for you guys, to help explain what I've been referring to. These photos show the gap I ended up with, between the window and the wood. As we have been discussing here, the frame may or may not need to be adjusted (by shims) as does possible adjusting of the window. Going back and forth between the fame and the window, you should be able to get a uniform gap. Some movement of the wood and in my case, adding a little at the end of the wood to close the gap between the two wood pieces, may be needed to get what you want.

The final gap between the window and rubber seal you'll be pressing on the cantrail seal retainer is what's it's all about. Different brands of rubber seals have different size rubber bulbs, different levels of softness/compression. One needs to press the seal on the cantrail seal retainer to see how the window relates to it. Patience and persistance will reward you with a water tight fit.

Roger
 

Legal Bill

Jedi Knight
Country flag
Offline
Thanks Roger. I have gone through some of this myself. My top operates a bit better now, but I still need to pull the front rail forward with one hand while pushing up at the point where the two window frame sections meet to get them to line up. I have to go back and forth to each side of the car to do this extra exercise. I would like to find a way to adjust the frame so that those sections line up without that extra effort. But for the life of me, I can't see how putting shims under the frame to chassis mounting plate helps to align the two sections of wood shown in your photos, relative to eachother. I would think the shims would simply tilt the entire assembly.
 
OP
B

bob hughes

Luke Skywalker
Country flag
Offline
Bill

I have now got my frame to the point where I just need to push it forward a tad as I close up to make the wooden rail line up.
However, the glass is an absolute nightmare, the left side nearly hits the wood frame at the back and the right side has about 5mm clearance at the back and both sides do not reach the top frame by varying amounts up to 10mm. Roger has got his sweet.

My guess is that my glass is not correct! too big in the length and too small in the height. I have made a call to see if one of our major parts suppliers could contact their window man to see if 'specials' can be made as we are talking about a 10mm variation in each direction.
Roger's method of altering the glass could work but I have reservations as I have realised that this would tilt the quarter lights, if I am reading him correctly, and they do not need to be adjusted as they fit the windscreen nicely.

:cheers:

Bob
 

AUSMHLY

Obi Wan
Country flag
Offline
Bob, are we having fun yet?

I doubt the glass is wrong, but maybe.
My guess is the side glass alignment is off.

And....maybe your windscreen angle is off too?

You brought up a good point I forgot to mention.
When adjusting the side windows, the quarter light angle may not follow the angle of the windscreen post when done. Are you ahead of me yet?

Yup, you'll have to make an adjustment to the windscreen too, to now mirror the quarter light. To adjust the windshield posts, you'll see the bolts (usually 4) on the outside of the windscreen post. You'll need to remove the inner side panel under the dash to get to the nuts. There is also one nut in the center of the windscreen, under the dash pad. You'll need to loosen that up. Then you'll be able to make adjustments to the windscreen angle.

Maybe the angle is off now and that's why you can't get the latch to the windscreen?
 
OP
B

bob hughes

Luke Skywalker
Country flag
Offline
:wall:

Ahgg, I was probably slightly ahead of you as that was my thoughts as well. Then I thought it through further, rightly or wrongly. To bring the glass to where it should be, the quarter lights will need to rotate towards the front of the car, the top of the windcreen would then need to follow to suit, but then the top of the screen will be further away from the fixing plate for the hood frame, would it then reach? and that is where I stopped.

Thinking it through further, a small movement forward, on the top of the screen would yield a larger movement at the back of the window, where it needs to be. OK the windcreen will need to come off anyway at some point as the rubber seal is adrift at the ends, so maybe I can do two jobs in one here.

Now what was the original purpose of the exercise? Oh yes I remember, I want to refix the hood - temporarily. :crazyeyes:

Bob
 
OP
B

bob hughes

Luke Skywalker
Country flag
Offline
june23034b.jpg


june23033b.jpg


:yesnod: 
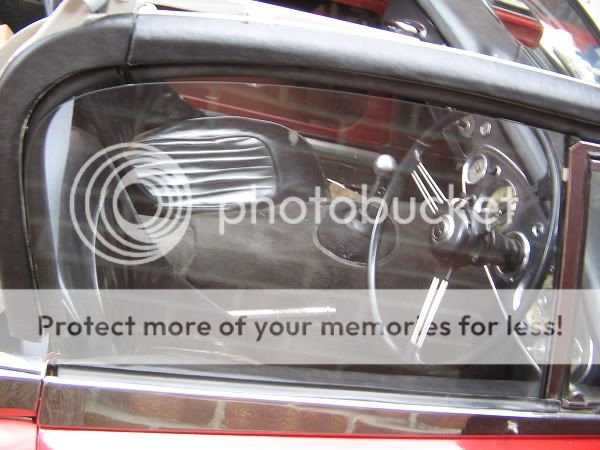
We are getting there! but slowly, there is not enough movement on the windscreen so I think that I will cheat a little and file the fixing holes out in the body to improve things, also may elongate the holes in the hood frame fixing plate a little, but there is not a lot of scope in the metal there. I doubt that I will be able to get it spot on there is still a lot to make up. You can see how tight things are at the rear of the windows and the left hand side quarter light is hard up against the relocated windscreen.

Roger : - L bracket? where is that did not see it on my car though I see it mentioned in the parts manual. Where abouts should I be able to locate it?

:cheers:

Bob
 

AUSMHLY

Obi Wan
Country flag
Offline
Bob Hughes said:
Roger : - L bracket? where is that did not see it on my car though I see it mentioned in the parts manual. Where abouts should I be able to locate it :cheers:Bob

Hi Bob,

The L bracket is known as the door glass bracket. Moss motors part diagram number 93. (first photo) Next photo shows it in my car.
Cheers,
Roger
 

Patrick67BJ8

Obi Wan
Silver
Country flag
Online
Bob Hughes said:
:wall:

Ahgg, I was probably slightly ahead of you as that was my thoughts as well. Then I thought it through further, rightly or wrongly. To bring the glass to where it should be, the quarter lights will need to rotate towards the front of the car, the top of the windcreen would then need to follow to suit, but then the top of the screen will be further away from the fixing plate for the hood frame, would it then reach? and that is where I stopped.

Thinking it through further, a small movement forward, on the top of the screen would yield a larger movement at the back of the window, where it needs to be. OK the windcreen will need to come off anyway at some point as the rubber seal is adrift at the ends, so maybe I can do two jobs in one here.

Now what was the original purpose of the exercise? Oh yes I remember, I want to refix the hood - temporarily. :crazyeyes:

Bob
You got to think that the people on the "assembly line" had these adjustments down to a science or they would have never finished building the cars??!! Has anyone thought of trying to contact former assembly line workers?
Patrick
 
OP
B

bob hughes

Luke Skywalker
Country flag
Offline
In fairness Patrick, they were working on a chassis that had been 'jigged', over the years my car has produced a little bit of a sag in the chassis which does not help.

Bob
 

Patrick67BJ8

Obi Wan
Silver
Country flag
Online
Bob Hughes said:
In fairness Patrick, they were working on a chassis that had been 'jigged', over the years my car has produced a little bit of a sag in the chassis which does not help.

Bob
Mine has a heck of a sag until I got a new frame.
 
Similar threads
Thread starter Title Forum Replies Date
57 Healey For Sale Original top (hood) frame for BT7 Austin Healey Classifieds 8
TomMull Wanted Herald Hood Frame Triumph Classifieds 9
TomMull Convertible hood frame Other British Cars 3
D BJ7 Hood frame mounting plate Austin Healey 7
4tecdog Modify frog hood frame Spridgets 12
P TR2/3/3A Convertible Top Frame Missing Hood stick advice needed. Triumph 4
T Question regars 'frame assembly-hood' for various spridget models Spridgets 7
M Hood Frame Austin Healey 2
P AH BJ8 hood frame spring where I got hooked Austin Healey 3
P BJ 8 broken hood frame screw Austin Healey 6
nissanite TR4/4A TR-4A with Rat-co frame, Hood hits engine! Triumph 18
CJD TR2/3/3A TR3 Hood Frame Triumph 2
B BJ7 hood frame dimensions Austin Healey 0
B Best screws for woodwork to BJ7/8 hood frame Austin Healey 5
chicken Hood frame mounting brackets position Austin Healey 12
M Hood Main Frame Bag Spridgets 3
smaceng BE hood and frame stowage Spridgets 5
aeronca65t MGB MGB top [hood] frame suggestions. MG 12
G Painting hood frame MG 5
chicken Mounting position for hood frame brackets Austin Healey 2
R TR4/4A 1963 TR4 soft hood cover with attached plastic stiffeners Triumph 2
oldbagpipe For Sale 1961-1962 Triumph TR4 Short Bubble Bonnet (hood) Triumph Classifieds 0
S TR2/3/3A 59 TR 3 hood emblem Triumph 2
J Wanted Hood (Bonnet) for a 1960 BT7 Austin Healey Classifieds 0
mctriumph For Sale hood for early Tr4 Triumph Classifieds 0
T TR2/3/3A Would like a paper pattern for TR3A hood stick cover Triumph 0
R New Hood for BJ7 Austin Healey 3
KVH General Tech Fitting the Hood (Bonnet) Triumph 7
D Wanted Bugeye bonnet (hood) fiberglass or steel Austin Healey Classifieds 0
S TR2/3/3A Hood Stick Cover Triumph 3
dripdripdrip TR2/3/3A Best place for tonneau & hood stick covers? Triumph 2
B BJ8 Hood Bow and Seal Austin Healey 5
B Hood Woodwork Austin Healey 2
Papajack TR2/3/3A TR3 Hood and Sidescreen Colors Triumph 6
R TR6 Stronger hood release? Triumph 4
MGTF1250Dave T-Series Hood Sticks MG 4
J TR2/3/3A Need help with pivot and body bracket for hood Triumph 2
S Forward opening hood / bonnet Spridgets 10
S TR2/3/3A Tr2 hood Triumph 8
oldbagpipe SOLD!! Early TR4 Short Bubble [Bulge] Bonnet/Hood Triumph Classifieds 5
steveg TR6 Hood release pictures needed Triumph 22
HealeyPassion Hood scope chrome gap fix ... Austin Healey 0
Gliderman8 TR6 It finally HAPPENED... Hood cable broke but HAPPY ending. Triumph 44
D 1962 3000 Hood/Bonnet Grille Austin Healey 5
S Pre-War my hood problem got worse! Triumph 6
S TR2/3/3A The chrome beading is rubbing on the hood Triumph 5
G Wanted WTB TR3 Hood Hardware Triumph Classifieds 0
B TR6 TR6 Hood Release Cable Triumph 7
A TR2/3/3A how do i fix this hood line? Triumph 5
Z For Sale 1956 Austin Healey BN2 Factory hood Austin Healey Classifieds 0

Similar threads

Top