• The Roadster Factory Recovery Fund - Friends, as you may have heard, The Roadster Factory, a respected British Car Parts business in PA, suffered a total loss in a fire on Christmas Day. Read about it, discuss or ask questions >> HERE. The Triumph Register of America is sponsoring a fund raiser to help TRF get back on their feet. If you can help, vist >> their GoFundMe page.
  • Hey there Guest!
    If you enjoy BCF and find our forum a useful resource, if you appreciate not having ads pop up all over the place and you want to ensure we can stay online - Please consider supporting with an "optional" low-cost annual subscription.
    **Upgrade Now**
    (PS: Subscribers don't see this UGLY banner)
Tips
Tips

SU Throttle shaft Bushings

ralph_s

Jedi Trainee
Offline
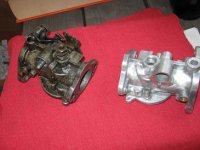
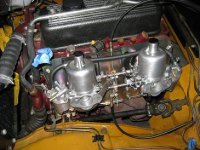
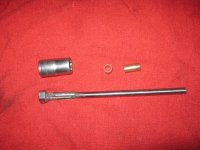
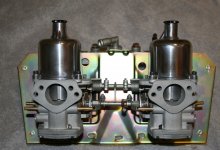
Found a great article at the Chicago Land MG club web site on how to line ream throttle shaft bushings. The article is by Anne & Jake Snyder and provides all the details. I did the job this past weekend in about an hour and cost me $15 including the shipping cost for the reamer. Bought all the stuff from McMaster Carr. The key is the shank OD on the reamer is the same as the bearing ID. This keep everything in line as you ream out the old bushings. I used my variable speed hand drill to speed up the process and then lapped the new throttle shafts to match the new installed bushings. I did coat the outside of the bushings with high strength thread lock prior to installing. I used the 3/4" bushings and trimmed the inside bushing flush to the carb body. Also used JB Weld to attach the nut to the front of the reamer as my driver. I've attached some pixs on the set up, but the article details the process. The good news is after the rebuild, the car started up on the 1st try, just need to dial em' in today.
 

Attachments

  • 21127.jpg
    21127.jpg
    25.8 KB · Views: 1,122
  • 21128.jpg
    21128.jpg
    38 KB · Views: 1,097
  • 21129.jpg
    21129.jpg
    22.9 KB · Views: 1,121

Mickey Richaud

Moderator
Staff member
Gold
Country flag
Offline
Very nice work, Ralph! And thanks for the heads-up on the article.

Mickey
 

billspit

Jedi Knight
Country flag
Offline
I have tried this for my Spitfire carbs and I am not having as much good luck.

How did you back cut the reamer?

I also just chickened out. The shaft on one carb had already been reamed oversize and I had a bit of wobble with the reamer. It just didn't seem to want to cut very well either, which I attributed to not filing down the cutting head correctly. I may have to man up and try again.
 
OP
R

ralph_s

Jedi Trainee
Offline
The wobble is not a good thing but the shank should provide plenty of stability as it runs through the opposite (guide) bushing. Looking from the nut end toward the shank, I cut a 30 deg angle on each blade. I took it to my bench grinder and had at it!! Initially I was cutting by hand, but then hooked up the hand drill and it went very quickly. To get the final fit between the new bushing and the new throttle shaft I chucked the throttle shaft into my drill and ran it in and out of the bushings several times. That got the final clearance and a really nice fit.
I have to admit reaming the 1st bushing caused some "pucker" but I'm naive enough to keep going. Fortunately it had a happy ending. Just finished fine tuning the carbs and there is a major difference.
Note.....don't ream completely through the carb body. You should leave some material to seat the bushing into the carb body.
Good luck and keep at it!
 

billspit

Jedi Knight
Country flag
Offline
Well I got down and dirty with the carb this weekend. Made a bit of a mes as I figured I would. I just put the reamer in a drill and pulled it through. First side went OK, but I went too deep and almost went all the way through. Thats not as bad as it sounds because the carb had already been reamed oversize anyway and there was going to be a bit a leak if I had left it short. The second size I stopped well short, but got the reamer a bit off center and cut through the side of the old bushing. That side had already been re-bushed with a thicker OD bushing than I had bought. I ended up having to pull the old bushing out and the hole was bigger than my bushing. So I whipped up some JB weld and am trying that. We'll see how this works out. Hopefully this will break my log jamb and I can move on.
 
Offline
Joe Curto make special reamers for this, some folks have fiquired out ways to do this without special piloted remaers, but you leave alot of room for error. I done this job without the use of the special reamer from time to time, but much car has to be taken, normally did this on the mill where I could insure straightness. The best path on a HS4 with standard shaft is to use the special piloted reamer and go to the .010" oversize shafts, wit the special reamer, this takes all of 5 minutes to do 2 carbs. I never bother with going back to standard shaft in a set of carbs with standard shafts, the OD shaft works great is better repair overall then repalcing the bushing, as the original HS4 shaft bushings were cast into the body of the carb not pressed in, so much can go wrong using the replacment bushings, as for air gaps near ID of the body causing air leaks around the throttle plate.

Bill if you need some more carbs, come see me.
 
Offline
Joe Curto make special reamers for this, some folks have fiquired out ways to do this without special piloted reamers, but you leave alot of room for error. I done this job without the use of the special reamers from time to time, but much car has to be taken, normally did this on the mill where I could insure straightness. The best path on a HS4 with standard shaft is to use the special piloted reamer and go to the .010" oversize shafts, with the special reamers, this takes all of 5 minutes to do 2 carbs, and you know they are straight. I never bother with going back to standard shaft in a set of carbs with standard shafts, the OD shaft works great is better repair overall then repalcing the bushing, as the original HS4 shaft bushings were cast into the body of the carb not pressed in, so much can go wrong using the replacment push in bushings, as for air gaps near ID of the body causing air leaks around the throttle plate.

Bill if you need some more carbs, come see me.
 

billspit

Jedi Knight
Country flag
Offline
Hap
I knew if I screwed it up I could get snother carb. That's why I tried. It may still work, but I haven't looked at it for a couple of days. The real problem with this carb was it had already been reamed oversize and had a wobbley shaft even with a new throttle shaft. I had stopped by your shop a couple of times to see if we could do it on your mill, but you were out. Shoulda called ahead.
 
OP
R

ralph_s

Jedi Trainee
Offline
I guess it's always better to be lucky then good!! My rebushing went w/o a hitch BUT mine were original and not O/S bushings. The reamer shank kept everything in line as I did the reaming. I did locktite the bushings in place.
Hap, I'll keep you in mind for carb bodies when I screw up my next set and my luck runs out!!!!
 

DrEntropy

Great Pumpkin
Platinum
Country flag
Offline
Hap said:
so much can go wrong using the replacment push in bushings, as for air gaps near ID of the body causing air leaks around the throttle plate.

That li'l issue can drive ya to drink. ----------------- :madder:

First encounter was waaay back, on a set of DCOE Webers on a Lotus Cortina. NO amount of fettling made it idle properly. On the *second* R&R of the carbs it was discovered the throttle shaft on one had been over-torqued and the slot for the plate became an "added" air passage... DPO apparently "replaced" the bearings and must have used a pipe wrench to tighten the nut. Same effect as the SU push-in bushes not being carefully fitted.
 

DrEntropy

Great Pumpkin
Platinum
Country flag
Offline
Original shafts mic out at a 'heavy' 0.310". 0.3104" actually. No oversized ones handy here to check.

HTH
 

billspit

Jedi Knight
Country flag
Offline
Hap,
Are you going to be at your shop tommorrow or Monday? I need to get the carb I got from you reamed for the oversize shaft. I have two sites in Pickens County and will be passing through.

Bill
 

fogliner

Senior Member
Offline
Ralph s ;
Love what you've done with your carbs!! I am about to embark on a carb project myself.(hif4 to Hs4 conversion)
They look like the carb on the left now and I need to know how to clean the body's and float bowls so they gleam like yours :yesnod:.
I think I may get lucky on the shafts as there is just barely any slop now and I took 1 out and there is slight indentations in the brass so I'm hoping just the new standard sized shafts that come in the rebuild kit will be enough....I can always order some OS shafts if there is still some slop i guess and I have a buddy who is a machinist so getting them line reamed if I need to won't be a problem. I want them to Gleam though and standard carb cleaner and Lacquer thinner just don't cut it.
I have a buffing wheel on my grinder and some different rouges etc but is there an aluminium cleaner that takes the black out of the metal before you buff?
Thanks

Mark
 

Keoke

Great Pumpkin
Country flag
Offline
but is there an aluminium cleaner that takes the black out of the metal before you buff?

Just get any good Mag or Aluminum paste polish such as Mothers and you will do fine cleaning the bodies up. However, be very careful with the buffing wheel it can cause problems.---Fwiw--Keoke
 
Offline
I do my rebuilds with a glass beaded carb body, float chamber and lid, the hand and chemically clean the piston dashpot, then polish the outer portion of the dashpot with a buffing wheel. Here's an example.

Bill sorry I see this in time, give me call, reaming your carb body will take about 5 minute tops.
 

Attachments

  • 23535.jpg
    23535.jpg
    153.5 KB · Views: 244

DrEntropy

Great Pumpkin
Platinum
Country flag
Offline
Who did ya get that heat shield from, Hap?
 
OP
R

ralph_s

Jedi Trainee
Offline
I'm a hand polishnig guy. Start w/ a good cleaning and brushing and do my polishing w/ a dremmel and finish w/ steel wool. Not the most efficient way, but works for me and produces a nice result.
ps I'm retired so time is a luxury I can afford........
 
Similar threads
Thread starter Title Forum Replies Date
glemon General TR Those Darn Throttle Shaft Bushings [TR4-6] Triumph 8
glemon Rebuilding stromberg Carbs Throttle Shaft Bushings Triumph 6
M_Pied_Lourd TR2/3/3A TR3A Throttle Shaft Bushings Triumph 15
tomshobby throttle shaft bushings Triumph 15
Brosky TR6 Replacement throttle shaft bushings for TR6 Triumph 24
John Loftus throttle shaft bushings Austin Healey 12
S TR4/4A TR4-Stromberg throttle shaft play Triumph 3
K TR2/3/3A Sending out SU's for throttle shaft rebushing........ Triumph 4
warwick-steve Throttle shaft bearing/bush on bulkhead Austin Healey 9
J TR2/3/3A TR3A Throttle shaft bushing retainer plates, Correct color? Triumph 2
J TR2/3/3A Need a part for the throttle shaft. Triumph 4
B Pics of throttle shaft reaming Austin Healey 6
C TR6 Broken Throttle Shaft Triumph 4
Got_All_4 TR2/3/3A Throttle shaft assemble does this look correct Triumph 5
E TR4/4A TR4 Throttle shaft position Triumph 1
A SU throttle shaft and bush dilemma - advice? Triumph 41
M Throttle shaft problem!! Austin Healey 5
J Test for wobbly throttle shaft? Triumph 9
luke44 TR2/3/3A TR3 - Re-assembly of Throttle Shaft Triumph 8
T ZS throttle shaft - how to determine excess wear Triumph 15
eschneider anyone have a throttle shaft reamer for sale? Restoration & Tools 6
F TR2/3/3A TR3 Carb Throttle shaft Triumph 10
Harry_Ward TR2/3/3A TR3A throttle shaft bearings Triumph 23
Lin Freeing throttle shaft levers Austin Healey 11
B MGB while driving engine cuts out if I let off or push more throttle it comes right back on MG 5
Walter74 BJ7 Throttle Linkage "Support Panel" Austin Healey 5
Popeye TR4/4A Throttle Linkage Triumph 5
CARSINC Throttle linkage question Spridgets 1
S Overdrive Throttle Switch Austin Healey 4
Celtic 77 MGB Looking for best info regarding throttle cable replacement. MG 16
L 1994 XJ12 Throttle Position Sensor unavailable, alternatives ? Jaguar 1
rgfrey 1959 BN7 Throttle Control Linkage Austin Healey 2
R TR6 Throttle/Carb issues 73 TR-6 Triumph 40
Healey Nut Tri-Carb Throttle Controls Austin Healey 4
D TR2/3/3A TR3 throttle linkage bell crank. Triumph 22
Walter74 Throttle Cable Conversion Austin Healey 6
J Throttle Controls Identification Austin Healey 4
B RHD BJ8 Throttle Control Rods Austin Healey 9
C Jammed Throttle Linkage Austin Healey 3
R TR2/3/3A Throttle rod spring location Triumph 3
T BT7 throttle relay levers short and long Austin Healey 2
R TR2/3/3A Carb throttle return spring tension Triumph 2
Michael Oritt 100 throttle linkage--help needed Austin Healey 3
D TR4/4A SU HS6 throttle spindle size Triumph 20
F TR2/3/3A Throttle linkage cross rod Triumph 4
C TR6 Carburetor Throttle Linkage Triumph 10
Talon TR2/3/3A Throttle rod link to carburetor; basic questions Triumph 4
Lukens TR2/3/3A Installing a throttle. Triumph 2
K TR2/3/3A Kangarooing on light throttle Triumph 14
ckeithjordan TR2/3/3A H6 Throttle Linkage Triumph 13

Similar threads

Top