• The Roadster Factory Recovery Fund - Friends, as you may have heard, The Roadster Factory, a respected British Car Parts business in PA, suffered a total loss in a fire on Christmas Day. Read about it, discuss or ask questions >> HERE. The Triumph Register of America is sponsoring a fund raiser to help TRF get back on their feet. If you can help, vist >> their GoFundMe page.
  • Hey there Guest!
    If you enjoy BCF and find our forum a useful resource, if you appreciate not having ads pop up all over the place and you want to ensure we can stay online - Please consider supporting with an "optional" low-cost annual subscription.
    **Upgrade Now**
    (PS: Subscribers don't see this UGLY banner)
Tips
Tips

TR2/3/3A TR3A Inner Sill Repair Question/Advice

M_Pied_Lourd

Darth Vader
Country flag
Offline
Hi Guys,

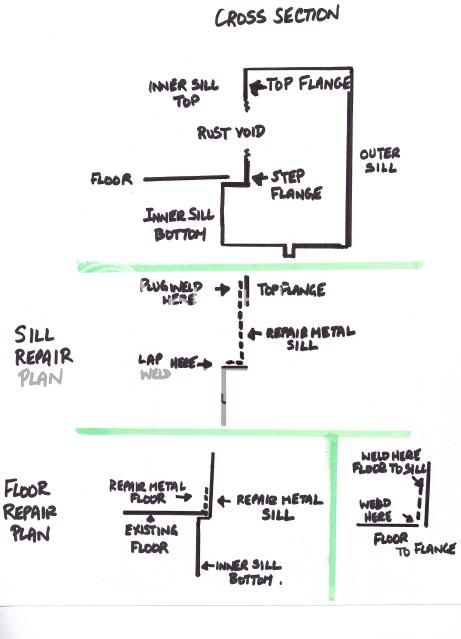
Well, this is probably the first of a few questions regarding some rust repairs on my 3A restoration as I have now moved 100 per cent effort in getting the body done.

Disclaimer....I am not a body guy and have previously farmed out the small amounts of metal work that were required on my TR6 resto. I have decided that I want to do this work myself and have purchased a MIG welder and have been learning how to weld by practicing on scrap/reading and watching videos etc. I am pretty confident that I can do the work.

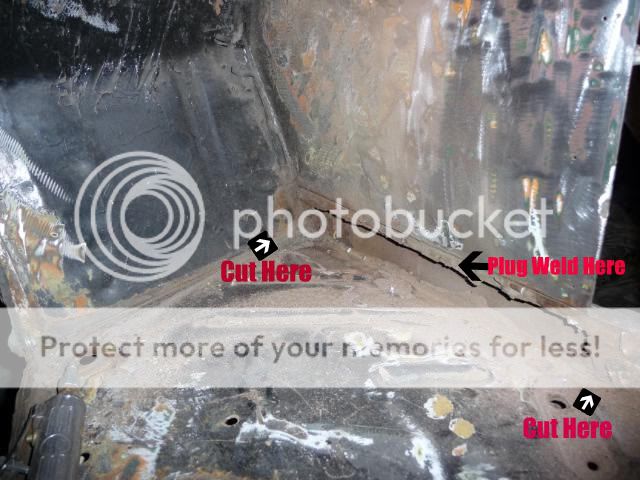
So, my first repair will be the passenger side floor kick panel/inner sill area. Looking for advice on the repair but I wanted to also tell you what I am thinking of doing.

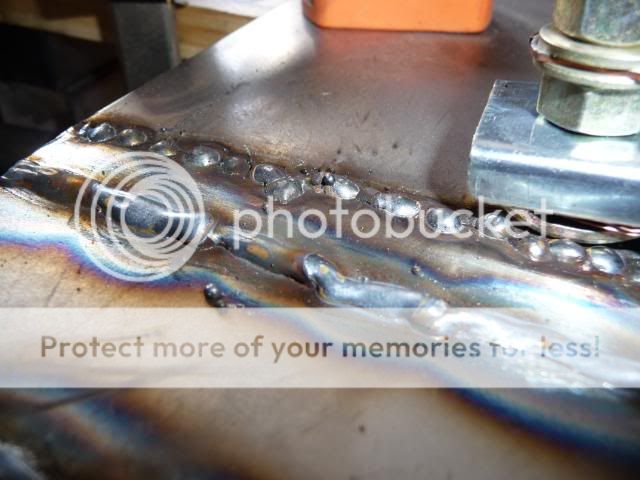
Last night, I managed to clean the area up a little better than what is shown in the photo below. I have good solid metal at the top of the sill and solid metal on the outer and bottom of the sill just below the floor line. I would like to do this repair in two stages.

1. Cut there floor where indicated and bend back or down slightly to access the sill area level with the floor and slightly lower. Clean and square off the repair section in the sill. Before closing in with metal I will be spray inside the sill cavity with rust converter and paint and used weld through primer on the back/inside of the patch panel. Plug weld the top of the new sheet metal to the sill flange just below where the verticle side piece begins. Finish welding in the repair piece to close in the sill. Clean up welds and prime.

2. Clean the outside edge of the floor pan. Weld a new 2 inch verticle piece (approx)on the side of the floor pan. Reposition the floor pan Plug weld the top of this verticle piece to the newly repaired inner sill metal. Repair the cuts in the floor.

sill2pic.jpg


Your input would be appreciated.

Cheers,
M. Pied Lourd
 

Don Elliott

Obi Wan
Offline
Sounds OK to me. The sides will be covered with the sidewall carpet and the floor with black rubber mats or carpet. Should look fine after it's all finished, painted and carpetted.

If your "A" post (s) have been cut off, are you planning to install new ones. If so, I have one for one side (I'll have to check) but they must be check fitted before you weld them into place, otherwise the door gaps may be out - in all dirctions. When I did my 1958 TR3A, I didn't remove the "A" posts but they were not quite right as the curve above the door gets wider as you look towards the top of the curved gap. This is hardly noticable on my black TR but with lighter colours, it can be easily detected. My front "clip" for the tub was too low at the front bumper end which left this gap open at the top just before I re-welded the bottom end of the "A" post to the top of my new inner sill.

See photo of mine.
 

Attachments

  • 20390.jpg
    20390.jpg
    24.1 KB · Views: 653

Tinkerman

Darth Vader
Offline
Looks like a good plan to me MP!

Tinkerman
 

ekamm

Jedi Warrior
Offline
Great to see some one take on the presumably daunting task of doing metal work. I too haven't but would love to learn to do it. I've welded things that looks aren't important on for years but not body work. Keep posting pics as you go and I might feel better about giving it a go.
 
OP
M_Pied_Lourd

M_Pied_Lourd

Darth Vader
Country flag
Offline
Hi Eric,

I will be sure to post some progress pics as I go along. Learning to weld has been on my list of things to do for a long time. Time to get it done!

Never learned to weld as I was always into woodworking when I was younger. My Dad was a former high school woodworking shop teacher and I learned alot from him over the years.

Learning to weld and buying a welder is a bit of a big investment. I bought a Licoln Easy Mig 140 a bottle of gas, self darkening helmet, gloves, brushes, clamps, magnets, Mig wire etc....I am in for over $1000 allready without even pulling the trigger.

Looking forward to making the first repair of many.

PS. Don, my A posts look ok.


Cheers,
M. Pied Lourd
 
OP
M_Pied_Lourd

M_Pied_Lourd

Darth Vader
Country flag
Offline
Ok,

Spent a little time out in the garage this evening and made some progress. Here are a few pics.

Cleaned up a little and ground the top flange of the sill to make sure there was good metal there and there was. This is where I plan to plug weld the top of the new metal to.

P1070004.jpg


Floor Cuts. I ended up making three cuts in order to be able to more easily bend the floor up.

P1070021.jpg


Floor Bent Up. The lower part of the sill is solid.

P1070025.jpg


I am going to trim the ragged edge on the bottom and use the natural edge to weld to on the bottom.

P1070031.jpg


Cheers,
M. Pied Lourd
 

tdskip

Yoda
Country flag
Offline
So the plan is to put a new metal strop in the gap on the bottom picture? If so you might want to flange the metal and do a lap weld rather than butt weld for your first going around. Now knowing the quality of your other work maybe you'll butt weld it and show us how it is done, but lap welding is easier and you won't see it with carpet/panels and fenders in place.

A continuous lap weld would also be strong than plug welds (assuming equal penetration on both).
 
OP
M_Pied_Lourd

M_Pied_Lourd

Darth Vader
Country flag
Offline
Hi Skip,

I think that I get you.

So you are suggesting on the bottom pieced that I do a __| as opposed to a straight |.

Weld on the horizontal plane vs the verticle when I connect the bottom piece.

Sound right?

Cheers,
M. Pied Lourd
 

ekamm

Jedi Warrior
Offline
By flange I assume he means to leave a short flap of the existing floor. Bending it up or down and then overlapping the repair and the existing a bit and welding it. I think?
 

tdskip

Yoda
Country flag
Offline
Here is an example of the tool ;

MTN7378_6.jpg


And here is an example of a lap weld;

f0575-03.png


The idea is to use the flanger to fit the metal together so it overlaps where you weld but is nice and "in-line" for the main part of the patch.
 
OP
M_Pied_Lourd

M_Pied_Lourd

Darth Vader
Country flag
Offline
Hi Guys,

I drew it out as I planned to do it.

See if it make sence

SCAN0001.jpg


All I know, is in the end whatever I do has got to be better than the fiberglass patch that was covering the area :smile:

Cheers,
M. Pied Lourd
 

tdskip

Yoda
Country flag
Offline
That should work fine. Clean the heck out of the area to be welded, then clean it again.

Are you using weld through primer such as;

upo768.jpg


Keep us posted - once you get the hang of using a MIG you'll wonder how you ever did without it!
 
OP
M_Pied_Lourd

M_Pied_Lourd

Darth Vader
Country flag
Offline
Hey Skip,

I bought the SEM brand weld thru primer.

Expensive stuff...16 bucks a can!

Made a slight change to the drawings above based on the patch repair metal that I picked up yesterday.

I am going with 16 guage metal for the sill repair and that is going to be a little hard to put a flange on the bottom as I don't have a metal brake and my little vice is not going to work. I made the patch piece last night and I am pretty confident that it will work out fine.

Hope to post some pics tonight as long as my welding doesn't look too bad :smile:

Cheers,
M.Pied Lourd
 

Don Elliott

Obi Wan
Offline
Dave - Looks OK to me. If you use those ideas with the "overlap" joints and the edges will be covered with carpets, etc. you could use tack welds along the joints to save the bother etc. with the "plug-welds" you referred to earlier. I assume you will use a seam sealer along those joints before final painting so no-one will ever be able to tell if you did it with plug-welds or overlap tack welds.
 

Rhodyspit75

Jedi Knight
Silver
Country flag
Offline
For sheet metal work, a little vise becomes a big vise with a couple of pieces of angle iron if you still want to flange the bottem. Just clamp the sheet metal in the vise with an angle iron on each side and slowly bend and gently hammer until you reach 90 degrees. Either use a C clamp to keep the ends tight or move it back and forth in the vise.
 
OP
M_Pied_Lourd

M_Pied_Lourd

Darth Vader
Country flag
Offline
Thanks for the Tip Rhody.

Ok, a few pics from this morning.

A couple of the patch panel I made last night

P1070034.jpg


P1070035.jpg


And some pics of my first ever attempts at welding. Feedback is welcome.

P1070039.jpg


P1070040.jpg

P1070043.jpg

P1070045.jpg

P1070049.jpg

P1070050.jpg

P1070052.jpg


Cheers,
M. Pied Lourd
 

tdskip

Yoda
Country flag
Offline
Hey - good start! Kind of cool to be welding, eh?

You need to get more weld penetration going. The metal needs to "soak" for the lack of a better term into the back side more.

Don't worry about trying to run a bead yet, work on getting the spot / tack welds to have good penetration. Once you get a sense of that it will make running continuous welds much easier, and of course you can always then tack weld all the way around instead. Sometimes on thin metal that is a much easier way to go and perfectly valid as an approach.

Here is a good link;

https://www.millerwelds.com/resources/tech_tips/MIG_tips/
 
OP
M_Pied_Lourd

M_Pied_Lourd

Darth Vader
Country flag
Offline
Hey Skip,

Yep, its a start.

Will keep practicing a playing around with the setting a little bit more just to see how the machine reacts and will work on getting better penetration in the welds.

Cheers,
M. Pied Lourd
 
Similar threads
Thread starter Title Forum Replies Date
M_Pied_Lourd TR2/3/3A TR3A Inner Sill Replacement Advice Triumph 7
M_Pied_Lourd TR2/3/3A TR3A Help with Resto Pics Please Front Inner Sill Triumph 19
ekamm welding tr3a inner sill Restoration & Tools 2
G 1962 TR3A inner plate # Triumph 8
S TR2/3/3A TR3A inner speedo cable too long at trans. Triumph 5
F TR2/3/3A TR3A lower inner front suspension Triumph 6
trglory TR2/3/3A TR3a spark plugs Triumph 1
P For Sale 61 TR3A Triumph Classifieds 1
D TR2/3/3A 59 TR3A Gearbox lever will not move. Triumph 11
Q TR2/3/3A 61 TR3A Fuel Pump Triumph 4
71TR6 TR2/3/3A TR3A Front Bumper Mount Triumph 11
mctriumph For Sale Project car 61 Tr3a Triumph Classifieds 0
71TR6 For Sale TR3A Nose Triumph Classifieds 0
71TR6 TR2/3/3A A TR3A wiring question Triumph 17
P TR2/3/3A 1958 TR3A missing on cyls 2 & 3 Triumph 8
mctriumph For Sale scrapping two 59 Tr3a's Triumph Classifieds 15
J TR2/3/3A TR3A Finally on the Road! Triumph 6
angelfj1 TR2/3/3A TR3A Boot Millboard Install Triumph 7
G TR2/3/3A TS37903F Is my engine a TR3A engine because my starter says no. Triumph 3
B TR2/3/3A TR3A Gearbox fluid capacity question Triumph 7
Hamish Racing TR2/3/3A Harewood hill climb Yorkshire TR3a Triumph 3
Hamish Racing Harewood Hill Climb Yorkshire TR3a Racing 0
J TR2/3/3A 58 TR3A Coil weak? 9KΩ on the secondary with a 1968 HA12 45208A non-ballasted coil. Triumph 4
J TR2/3/3A 58 TR3A Coil weak? 9KΩ on the secondary with a 1968 HA12 45208A non-ballasted coil. Triumph 1
T TR2/3/3A Looking for a TR3A front bumper Triumph 6
Hamish Racing General TR TR3a hillclimb Thumdrrstorm video uk Triumph 4
Hamish Racing General TR TR3a faster that a Lamborghini Huracan STO ?? Triumph 6
W For Sale 1960 TR3A for sale Triumph Classifieds 0
tr6nitjulius General TR 6/24/23 TRIUMPH TR6 (5) TR8 (2) Spitfire (1 RHD of 2) TR3A (1) Triumph 0
D TR2/3/3A tr3a occasional seat padding Triumph 10
G For Sale 1960 TR3A for sale $11,999 Triumph Classifieds 0
G For Sale NEW PHOTOS: Triumph TR3 Chassis Frame + Front Suspension, Fits TR2,TR3,TR3A,TR3B Triumph Classifieds 1
Hamish Racing TR2/3/3A Greenville TR3a V8 ? Triumph 8
T TR2/3/3A Would like a paper pattern for TR3A hood stick cover Triumph 0
W TR2/3/3A 1960 TR3A Radiator replacement recommendations Triumph 11
T TR2/3/3A TR3A Windshield Question Triumph 4
Hamish Racing TR2/3/3A Anglesey (Wales) TR3a track videos Triumph 3
RonC TR2/3/3A TR3A Hardtop Seals Triumph 7
T TR2/3/3A TR3A Disk Brake Question Triumph 10
G TR2/3/3A TR3A Front Sway Bars - Choice? Triumph 3
Hamish Racing TR2/3/3A TR3a British Hill Climb Shelsley Walsh Triumph 8
T Wanted Working Fuel Gauge for TR3A Triumph Classifieds 5
T For Sale TR3A Original Radiator Triumph Classifieds 3
Hamish Racing TR2/3/3A TR3a Faster Lap Times than a Ferrari F430 ?? Triumph 1
Hamish Racing UK hill climb TR3a Racing 0
Hamish Racing TR2/3/3A TR3a UK hill climb video Triumph 4
Hamish Racing TR2/3/3A 3 sisters fun in a TR3a ! Triumph 5
T TR2/3/3A TR3A Fuel Gauge problem Triumph 10
A SOLD!! TR3A Girling Type A brake caliper for right front Triumph Classifieds 0
M TR2/3/3A 1960 TR3A--intake manifold-to-SUH6 carbs studs Triumph 3

Similar threads

Top