• The Roadster Factory Recovery Fund - Friends, as you may have heard, The Roadster Factory, a respected British Car Parts business in PA, suffered a total loss in a fire on Christmas Day. Read about it, discuss or ask questions >> HERE. The Triumph Register of America is sponsoring a fund raiser to help TRF get back on their feet. If you can help, vist >> their GoFundMe page.
  • Hey there Guest!
    If you enjoy BCF and find our forum a useful resource, if you appreciate not having ads pop up all over the place and you want to ensure we can stay online - Please consider supporting with an "optional" low-cost annual subscription.
    **Upgrade Now**
    (PS: Subscribers don't see this UGLY banner)
Tips
Tips

TR6 TR6 front suspension rebuild suggestions

ichthos

Darth Vader
Country flag
Offline
I was able to use an article by Tinster, and information from other members to rebuild my rear suspension. Now it is on to the front suspension. I know the upper control arm bushings, inner and outer tie rod ends, and upper ball joints are bad (I brought my car in for a 4 way allignment today and was told these were bad.) I don't like to fix or spend money on things that don't need fixing, but I also don't like to do things twice.I have a number of questions I am hoping someone can help me with: 1)Is it foolish to just fix the above items, or am I wiser to do the whole front end suspension? 2)What is normally involved in a front end suspension rebuild? 3)Is this something someone who is not a mechanic can do? 4)Does anyone know of a good article online that would describe a front end rebuild? Answers to any of the above questions would greatly be appreciated.
Kevin
 

TR6BILL

Luke Skywalker
Offline
Kevin, it ain't all that difficult. If you cannot find an online guide, just use the Bentley manual. That is what I did. Just whatever you do, don't follow their instructions for removing the front road spring! Downright dangerous. The only safe way to accomplish this is to use a spring removal tool available at all the big vendors. I bought mine from TRF. If you are too frugal to buy one, I will "rent" you mine for the 10 or so bucks postage.
 

TR4nut

Yoda
Country flag
Offline
Kevin-

Just my opinion, but the inner tie rods may be the most difficult part of the operation. These are the rods that are part of the rack&pinion assembly. I think you will likely need to remove the rack&pinion to service them - and hopefully you can source the parts you need. It can get costly to the point of putting in a new rack, or you may be able to find a good used one cheap. Hard to say if how much work you need to do on it until you get in there and look at what they said was the problem. The rest of the parts are easily obtainable.

Randy
 

PeterK

Yoda
Offline
The suggestion that the entire front suspension is toast is suspect. With nearly "everything" bad, you would know it from the driver's seat. If it feels OK, steering is OK, no noises or sloppiness, etc., I would suggest that you first get a second opinion from another shop. No need to rebuild the entire front end if you don't need it.

How many miles on the car? Previous receipts for front-end work? It may indeed need freshening and as others said, it's not a hard process but requires a special spring compressor and at least novice-level mechanical skills.
 
OP
I

ichthos

Darth Vader
Country flag
Offline
Thanks for the suggestions and offer to rent the compressor, Bill, but if thing go like they normally do for me, it will takes me months to complete the job and I will have had to put the springs in a couple of time minimum.

Kevin
 
OP
I

ichthos

Darth Vader
Country flag
Offline
I am definately no mechanic. Not having a reference point to go from, I knew everything was a little loose, but didn't know it was that bad. Who ever had this car before me drove it into the ground and then let it sit in storage for 20 years. I did find Tinster's article on the front end rebuild, parts 2 and three, but I can not find part 1. I sent him a pm, so hopefully I can locate it. After spending $350 on the rear suspension, and promising my wife we would be taking a cross country trip to see my youngest son this summer, now it looks like I get to inform her that I will possibly be spending twice that for the front and a whole lot more time. After reading more posts and doing some more reading, hopefully I will be able to determine just how much I should do.

Kevin
 

tdskip

Yoda
Country flag
Offline
Hi Kevin - having just completed the suspension part of the rebuild you are looking at (one side back installed and working properly - or so I think anyway LOL) I might have some ideas for you.

First - it is one of these things that I stared at for a long time while I got my courage up to try it. At some point you just have to dive in and do it. Once I did that I was left with the thought "why the heck did I wait so long to do this". I'd say more than half the battle is working up the gumption to just jump in.

So if jumping in was 50%, the balance of the work was 25% taking notes and then doing test assembling to make sure I had it right, and the last 25% was fiddling with the final assembly. The last 25% when it going back together and doesn't quite line up - and I'd be willing to bet few will line perfectly up - might require some help or coaching. Expect it, expect the snags, and you'll have a good expectation of what you are looking at.

Just be aware that once it is disassembled you are committed - no rolling it on to a flatbed to have a mechanic do the work for you.


I've never rebuilt a rack, can't help you there.
 

bgbassplyr

Darth Vader
Offline
You can make a spring compressor for very few $. Just get a length of 1/2" thread rod, couple of nuts, thick washer to cover the top shock mount hole, 3/8" thick plate to cover the bottom shock mount hole. Install one nut on the rod and weld or pin it so that it cannot back off the rod.
Remove the shock, install the compressor and tighten the top nut until the spring begins to compress. Unbolt the spring plate from the lower control arms and when all bolts are off, unscrew the top nut until the spring plate and spring falls in the floor. You can the make the necessary repairs (bushings, ball joint, etc.). Reassembly is the reverse of disassembly.
 

TR3driver

Great Pumpkin - R.I.P
Offline
Kevin, I'll bet that not even all of those things are bad. Shops tend to want to replace everything in sight; which makes sense when they make money from selling you labor and parts. But when it's your labor, and your money, I feel it makes a lot more sense to only replace the things that are actually bad. And once you've been through the disassembly/reassembly process once, it will seem pretty easy.

The upper ball joint, for example, does almost nothing, so it's very unlikely it is worn out. But it's condition is hard to judge on the car when the upper bushings are bad, and they wear out very quickly (comparatively speaking). Also the inner tie rod ends actually have shims in them, that can be replaced to compensate for wear to some extent. Living inside the boots, they almost never need replacement. Also worth noting that one of my Stags came to me with an inner tie rod end assembled improperly, which resulted in a lot of play.

Less obvious, but more likely IMO would be wear in the lower outer bushings and the pin/bolt they ride on.

So to answer your question, what I would do is plan on replacing all of the bushings & the pin (TRF sells these components as kit BK2 ). If you are going to touch the inner tie rod ends (even to add shims), also replace the tab washers that lock the joint, and the boots that cover them. Everything else I would inspect and replace as needed.

Here's a (poor quality) shot of my home-made spring compressor. Having a healthy respect for the energy stored in that spring, I used 3/4" threaded rod. I would NOT tackle this job with a common "one size fits none" type compressor; only one purpose-made for Triumphs.
 

TR3driver

Great Pumpkin - R.I.P
Offline
Oh yeah, forgot to add : When turning the cap for the inner tie rod ends (the one locked by the tab washer), be sure to hold the rack against the torque with a second wrench. I'm not sure how the TR6 rack is, but on the Stag I had to grind down the sides of a (cheap) wrench to get on the flats. If you don't support the rack, the torque gets transmitted to the pinion gear and stands a very high chance of ruining both the gear and the rack.
 

TR3driver

Great Pumpkin - R.I.P
Offline
PPS if you may keep the upper ball joint & outer tie rod ends, I would have new boots on hand for them as well.
 

PeterK

Yoda
Offline
Tip: When you do it, do one side at a time. It will take longer but, you can always check the other side to see how things go together.

The forum is always here to help too, as you see.

Also look for a car club in your area.
 
OP
I

ichthos

Darth Vader
Country flag
Offline
Thanks for the tips and advice everyone. I learned the hard way to only do one side at a time. I also have the advantage of being able to take pictures and look at them quickly on the computer. Of course having people on the forum also helps greatly too. After all the suggestions, I think I will just dismantle one side and see what looks worn out. After closer inspection I already know I will need to replace the upper and lower bushings. I will also be removing the steering rack and go through it.

Kevin
 

BabsinCA

Freshman Member
Offline
Was anyone able to locate the Tinster article Part 1? Part 2 has great step y step, but Ican't find Part 1 or 3.
 

hondo402000

Darth Vader
Offline
did anyone mention possibly changing the Lower trunions?
would be a good Idea since they are I believe bronze.

Just a reminder the upper A Arms come off in singles and can be mixed up so mark front and rear with tape and a sharpie, I got mine mixed up and reversed and took me a while to figure out what I did wrong.

Hondo
 

Gliderman8

Great Pumpkin
Country flag
Offline
Hondo... I believe the upper arms are marked from the factory. It's been a while since I had them out, but if I remember, they are stamped "F" and "R"...
 

pacotaco

Member
Offline
Elliot - Just put my front suspension back on. The upper arms on my car were not marked that I could see(And I looked). Kevin - It is easy to forget which parts go where and which way, do one side at a time and mark parts front, back etc. I had not rebuilt the front suspension and it's like someone said above 50% is just getting the courage to give it a go - so just do it it's not that hard. It's a great opportunity to fix it right where maybe you don't have to fool with it for a long time (that was my thinking so I did all new nylatron bushings, upper ball joints, shocks, outer ball joints and welded in the needed reinforcing plates on the lower A frame attachment points (highly recommended)). I made a spring compressor that looks identical to Randall's, works fine.
 

Gliderman8

Great Pumpkin
Country flag
Offline
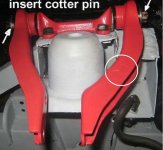
Bruce- I don't know if you're talking about a TR4, but on the TR6 they were marked on mine.
Here's a photo that I got off "Tinsters" how-to re-do the front suspension. I placed a white circle around the Rear upper A-arm and it shows a "R" stamped into the A-arm. It might be hard to see in this photo, but it's there.
 

Attachments

  • 29393.jpg
    29393.jpg
    57.2 KB · Views: 213

steveg

Yoda
Gold
Country flag
Offline
This is what I use for spring removal on my Healey. Each pan has 4 bolts so these are fitted diagonally. I'd think it would work on the Triumph for one of the center and one of the outer bolts.

Has anyone used this type on a Triumph?

screenshot.2357.jpg
 
Similar threads
Thread starter Title Forum Replies Date
G TR2/3/3A TR6 Front Suspension A-Arms on a TR3A? Triumph 5
R TR6 Front TR6 Suspension Question... Triumph 7
L TR6 TR6 Front Suspension Resto Project Part One Triumph 11
I TR6 This can't be good. TR6 front suspension rebuild Triumph 25
I TR6 Tinster's TR6 front suspension restoration part 1? Triumph 7
T TR6 Tr6 front suspension ? & downside of Cali cars Triumph 1
T TR6 TR6 front suspension re-bushing question Triumph 18
E TR6 TR6 Front Suspension... Is there a trick? Triumph 8
John_Mc TR6 Front Suspension Rebuild TR6 Triumph 16
G TR6 TR6 front suspension in a TR3 Triumph 3
L Wanted right front turn signal 1975 TR6 Triumph Classifieds 2
C TR4/4A Advice for grafting TR6 frame front to TR4A frame rear Triumph 15
M Wanted WTB Late model TR6 Front Brake Caliper Brackets Triumph Classifieds 0
R Wanted 75/76 TR6 front licence holder Triumph Classifieds 1
J Wanted TR6 Chrome Front License Plate Holder Triumph Classifieds 0
A TR6 '73 tr6 passenger front brake dragging Triumph 2
M TR6 TR6 Gas Leak From Front Carb Triumph 5
D TR6 1976 TR6 Front Brakes & Shocks Triumph 3
hondo402000 TR6 TR6 Heavy duty front Stub axles Triumph 12
K TR6 TR6 front end Triumph 2
W TR6 TR6 front wheels Triumph 7
hondo402000 TR6 TR6 front end alignment and wheel balancing Triumph 4
Coyote1 TR6 74 TR6 Front Turn Signal Alternative Triumph 9
davidk TR6 Information for front crank seal - TR6 Triumph 11
hondo402000 TR6 TR6 Front Wiring harness on its way Triumph 0
B TR6 TR6 Front Oil Seal Sleeve Triumph 3
charlie74 TR6 TR6 front bearing cap Triumph 4
T TR6 TR6 front wheel bearing ? Triumph 5
N TR6 How to check TR6 front wheel bearings Triumph 1
hondo402000 TR6 TR6 Lower front valance section replacement Triumph 2
I TR6 TR6 - how to pack front wheel bearings? Triumph 8
R TR6 Late TR6 Front Fender Removal Triumph 5
I TR6 TR6 front shock help Triumph 2
T TR6 Question on TR6 lower front inner wishbone bracket Triumph 1
hondo402000 TR6 TR6 rebuilt the Front Calipers, second time Triumph 2
hondo402000 TR6 Front Brake issues TR6 Triumph 2
A TR6 TR6 Front lower wishbone mount [rear] broken Triumph 1
N TR6 TR6 Front Spring Height?? Triumph 3
T TR6 tr6 front wheel bearings Triumph 15
jjbunn TR6 TR6 Front Hood Seal Triumph 6
zekjet TR6 Longer Front Wheel Studs for a TR6? Triumph 3
N TR6 Clip wires on front brakes for TR6 Triumph 9
SCguy TR6 TR6 front sway bar on a TR4 Triumph 1
T TR6 Decided to repair TR6 front valance rather than... Triumph 4
C TR6 Proper way to adjust front hubs, TR6? Triumph 13
hondo402000 TR6 TR6 front glass question Triumph 4
2wrench TR6 Pictures of TR6 dash refinished front + back Triumph 22
A TR6 Motor mount position--front/back?? TR6 Triumph 2
E TR6 TR6 front engine seal leak Triumph 11
R TR6 Lowering TR6 front end Triumph 15

Similar threads

Top