• The Roadster Factory Recovery Fund - Friends, as you may have heard, The Roadster Factory, a respected British Car Parts business in PA, suffered a total loss in a fire on Christmas Day. Read about it, discuss or ask questions >> HERE. The Triumph Register of America is sponsoring a fund raiser to help TRF get back on their feet. If you can help, vist >> their GoFundMe page.
  • Hey there Guest!
    If you enjoy BCF and find our forum a useful resource, if you appreciate not having ads pop up all over the place and you want to ensure we can stay online - Please consider supporting with an "optional" low-cost annual subscription.
    **Upgrade Now**
    (PS: Subscribers don't see this UGLY banner)
Tips
Tips

TR2/3/3A TR3A Upper Wishbone - Bush R&R

bigjones

Jedi Warrior
Bronze
Country flag
Offline
UpperWishbone.jpg


Hi Folks,

I'd like to replace the perished bushes on the upper wishbone. Haynes details this procedure but references the TR2 diagram and the TR2 has a different wishbone. The Haynes procedure includes separating the upper ball-joint from the vertical link.

Looking at the TR3 diagram above, is this necessary? Couldn't I just remove nuts(#7) and bolts(#8) and separate the wishbone.

Please bear in mind this is new territory for me - are there any safety concerns?

Cheers,
Adrian
TS58324
 

prb51

Luke Skywalker
Country flag
Offline
Big,
Yea, the uppers are under tension from the spring, if you removed the nuts and could pry the ind arms off you'd have a serious wreck.
You need a tool to secure the spring..someone will show you a picture..but you remove the shock (damper) and it is placed in its stead and tightened to encase the spring (hold it in tension).
Then you can remove the nut from the upper ball joint (different than your photo copy as it is a single bolt thru both arms-that is a TR4a) and then remove each arm and replace the bushings.
I'd suggest a poly bush replacement with poly lube as they will last a great deal longer than rubber.
 
T

Tinster

Guest
Guest
Offline
Ask Paul Rego for some help.

He recently installed a 100% new front suspension and
he is the site guru when it comes to these things. Randall
is also very knowledgable about such things.

I'm a non-mechanic TR6 owner but I know where to look
for help. I am ususally wrong, but it seems to me you
might get injured if you do not use a coil spring conpressor
on the front suspension.

I used this method AFTER I had removed the coil spring.
It worked fine for me but the concept was incorrect, I'm told..

https://www.scribd.com/doc/522465/Upper-a-Arms

The site experts will correct my mistakes, I am sure.

good luxk.
 
OP
bigjones

bigjones

Jedi Warrior
Bronze
Country flag
Offline
PRB and Tinster,
Many thanks for the reply.
Methinks I'll take into the British car mechanic to do!

Yeah, major blunder on the diagram. As you point out, thats for a TR4A. I blame Haynes for mislabelling.

Cheers,
Adrian
TS58324
 

TR3driver

Great Pumpkin - R.I.P
Offline
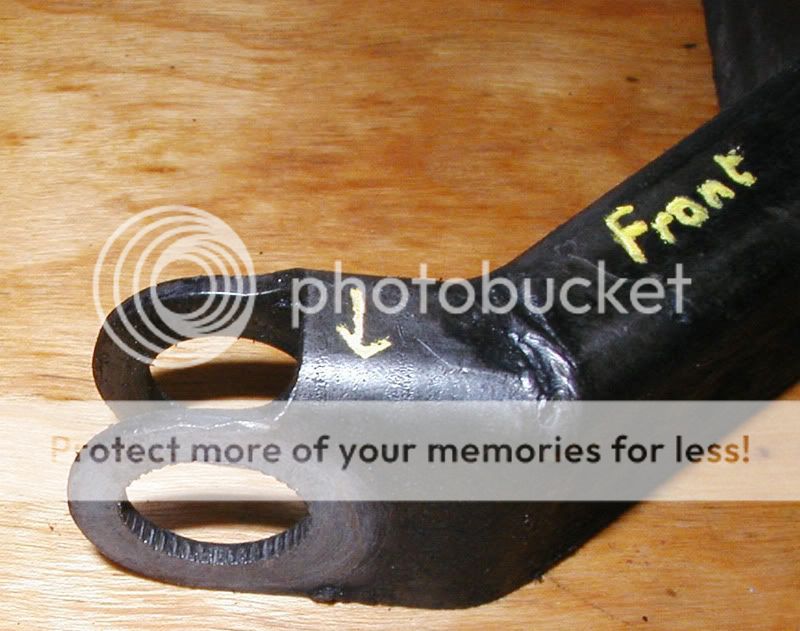
The diagram above is for a later TR4-4A (with 3 degrees caster); the TR3 uses the same zero caster wishbones as the TR2 (although some later ones were apparently reinforced for more strength).

But in either case, there actually isn't any tension from the spring, assuming your rebound stops are in good shape. I've done the upper bushings numerous times without touching the spring.

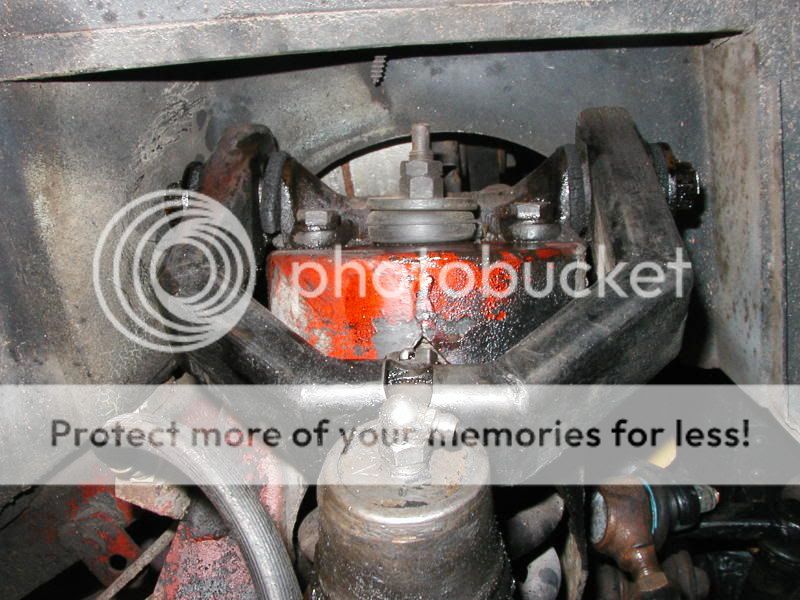
With the earlier style wishbones, if your rebound stops have sagged a bit, the end of the ball joint may touch the spring tower where it protrudes through the wishbones, making it difficult to remove that nut. If so, just stick a jack & chunk of 2x4 under the spring pan, just inboard of the trunnion, and lift it up a bit. As long as you don't jack against the trunnion itself, there still won't be any force on the upper wishbones.

I eventually got tired of having to replace those dang rubber bushings every few years, and converted to Nylatron. You might want to consider that, or polyurethane. It's possible that current supply rubber bushings last longer, but the ones I got in the 80s & 90s sure didn't last. In one case, I could see one of them starting to split less than a month after it was installed !

Don't forget that if you stick with rubber bushings, the suspension should be loaded when you tighten the nuts. The 2x4 under the spring pan works for that, too.
 

prb51

Luke Skywalker
Country flag
Offline
My mistake, TR3 is correct, the upper spring is enclosed by bodywork and will keep everything in place as long as you have the lower stop or something to keep the lowers in place.
Try it yourself, even a total front end rebuild is easy enough when you follow the manual and get the help you need on this site.
The more you do yourself the better you know your car.
Luck,
Pat
 

TR3driver

Great Pumpkin - R.I.P
Offline
bigjones said:
The Haynes procedure includes separating the upper ball-joint from the vertical link.
Forgot to mention, that isn't necessary either. You can just loosen the nut 13 in the diagram below (cribbed from the Moss catalog), then tap and pry on the ball joint to pull it outwards from the wishbones; continuing to undo the nut as it comes out. Once the nut is off the threads, pull the BJ all the way out. You'll want to have some baling wire handy to support the vertical link, so it doesn't strain the brake hose.

Assembly is the reverse. Pay attention to which arm goes closest to the BJ. It's usually best to leave the other side assembled, so you can refer to it if you have any questions about where something goes.
 

tdskip

Yoda
Country flag
Offline
TR3driver said:
Assembly is the reverse. Pay attention to which arm goes closest to the BJ. It's usually best to leave the other side assembled, so you can refer to it if you have any questions about where something goes.

Nah, just rip into it with abandon! Makes for good conversation here.

Lots of great advice here, and doing one side at a time is very good coaching. Consider giving it a try, it is easier than it looks. 90% of it is working up the nerve. Really

Strongly consider poly bushings - I'm doing a rolling upgrade to poly across the board. You'll be happy with the result and longevity.
 
OP
bigjones

bigjones

Jedi Warrior
Bronze
Country flag
Offline
Wow, I'm very pleased!

Thanks for the advice - it certainly looks do-able now.
I'd just given my poor CBSU the "we gotta tighten our belts" speech so taking the ole TR3 to the LBC shop would not have gone down too well!

I'll post pics when I get into it.

Cheers!
Adrian
TS58325
 

angelfj1

Yoda
Country flag
Offline
bigjones said:
Wow, I'm very pleased!

I'd just given my poor CBSU the "we gotta tighten our belts" speech
Cheers!
Adrian
TS58325

"CBSU" ???

Adrian: you now have some great advice from our friends. Also, thought you'd like to know that your 3A and mine were built within the same week. Mine was Tuesday, September 1, 1959. Yours was probably Thursday or Friday, August 27 or 28. That's based on the production rate at that time which was approx. 100 cars per day.

Cheers, Frank
 
OP
bigjones

bigjones

Jedi Warrior
Bronze
Country flag
Offline
Frank!

Many thanks for the post. I've been meaning to find out the TR3 birthday. You know why - it is going to be the big 50 this year!! Party time and presents!

Look at the smile on its face!!

P1010009.jpg


I sometimes ponder that, as I was trundling along in the rain, on my way to primary school in England, that unbeknown to me, my TR3 was being meticulously assembled by the good folks at Triumph.

Now it sems that I was on summer holiday when it first saw the light of day. Ha!

CBSU = Carbon-based spousal unit. (ie my long suffering wife)

Cheers,
Adrian TS 58324
 
OP
bigjones

bigjones

Jedi Warrior
Bronze
Country flag
Offline
Hi Folks,
Here is a "before" picture:
Before.jpg


Disassembly was fairly easy, though I do have a question. The A arm does have grooves in it corresponding to splines on the ball joint end. Do I need worry about trying to line these up on assembly?
AArmSplines.jpg


BallJointSplinescopy.jpg


Cheers,
Adrian
TS58324
 

TR3driver

Great Pumpkin - R.I.P
Offline
bigjones said:
The A arm does have grooves in it corresponding to splines on the ball joint end. Do I need worry about trying to line these up on assembly?
IMO, no need to worry about that. What's important is that the body of the ball joint be more or less level with the A-arms, as it may bind otherwise. The splines will want to drop back into their old grooves anyway, so just be sure it winds up level.

Someone, I forget who offhand, reported that his new ball joints had the splines located differently than the old ones, and had to be held so the splines would cut new grooves. But I assume you are putting back the old ball joints, so that shouldn't be an issue.

PS, don't forget the spacer & the flat washer when you put it back together.
 
OP
bigjones

bigjones

Jedi Warrior
Bronze
Country flag
Offline
Cheers Randall,

Something to note - last week I done the upper trunnion bushings on the Midget.
CotterPin.jpg

The replacement "polyurethane" bushes (red) from VB were still in their manufacturers blister pack (www.prothane.com) In the blister pack was a small sachet of grease. This was something like vaseline only very sticky!

Anyway, the TR3 "poly" bushes (black), also from VB, just came in a ziplock bag. No grease.

Fortunately, I still have some grease left in the sachet so I'll use that unless someone chimes in.

Adrian (quite pleased with the progress so far)
TS58324
 

TR3driver

Great Pumpkin - R.I.P
Offline
AFAIK, any sort of grease should do. But lots of folks have reported that poly tends to squeak annoyingly if it's dry, so using the grease was definitely a good idea.

"Like Vaseline only very sticky" might be silicone grease, which IMO would be the best for this application.
 
R

RonMacPherson

Guest
Guest
Offline
Use a silicone grease, especially in the center of the bushing.... Be liberal in application.
 
OP
bigjones

bigjones

Jedi Warrior
Bronze
Country flag
Offline
Ron,

Thanks for the post.

The job is now done. The second wheel went a lot faster!

The end of the ball joint was touching the shock tower but I used Randall's method for jacking up (see post above) to give a sufficient gap to remove the nut securing the ball joint end to the A-Arm.

I also used a piece of 2x4 on top of a jack stand to hold the weight of the hub, as well as a bit of coat hanger wire from the ball joint nipple to the stud on top of the shock tower. On re-assembly, I twisted this 2x4 around 90 degrees and used it to lever the hub up so the ball joint end would go through the hole in the A-Arm. Worked a treat.

Next up - see new thread entitled "Play in Front Wheels".

Thanks again for all the help in replacing the bushings. I can cross that item off the list. Onward and upward!

Cheers,
Adrian
TS58324
 
Similar threads
Thread starter Title Forum Replies Date
M TR2/3/3A Upper Fulcrum Orientation On TR3A with Late TR4 Upper Control Arms Triumph 6
T TR2/3/3A TR3A upper windshield seal Triumph 12
PeterK TR2/3/3A TR3A upper fulcrum bushings Triumph 12
trglory TR2/3/3A TR3a spark plugs Triumph 1
P For Sale 61 TR3A Triumph Classifieds 1
D TR2/3/3A 59 TR3A Gearbox lever will not move. Triumph 11
Q TR2/3/3A 61 TR3A Fuel Pump Triumph 4
71TR6 TR2/3/3A TR3A Front Bumper Mount Triumph 11
mctriumph For Sale Project car 61 Tr3a Triumph Classifieds 0
71TR6 For Sale TR3A Nose Triumph Classifieds 0
71TR6 TR2/3/3A A TR3A wiring question Triumph 17
P TR2/3/3A 1958 TR3A missing on cyls 2 & 3 Triumph 8
mctriumph For Sale scrapping two 59 Tr3a's Triumph Classifieds 15
J TR2/3/3A TR3A Finally on the Road! Triumph 6
angelfj1 TR2/3/3A TR3A Boot Millboard Install Triumph 7
G TR2/3/3A TS37903F Is my engine a TR3A engine because my starter says no. Triumph 3
B TR2/3/3A TR3A Gearbox fluid capacity question Triumph 7
Hamish Racing TR2/3/3A Harewood hill climb Yorkshire TR3a Triumph 3
Hamish Racing Harewood Hill Climb Yorkshire TR3a Racing 0
J TR2/3/3A 58 TR3A Coil weak? 9KΩ on the secondary with a 1968 HA12 45208A non-ballasted coil. Triumph 4
J TR2/3/3A 58 TR3A Coil weak? 9KΩ on the secondary with a 1968 HA12 45208A non-ballasted coil. Triumph 1
T TR2/3/3A Looking for a TR3A front bumper Triumph 6
Hamish Racing General TR TR3a hillclimb Thumdrrstorm video uk Triumph 4
Hamish Racing General TR TR3a faster that a Lamborghini Huracan STO ?? Triumph 6
W For Sale 1960 TR3A for sale Triumph Classifieds 0
tr6nitjulius General TR 6/24/23 TRIUMPH TR6 (5) TR8 (2) Spitfire (1 RHD of 2) TR3A (1) Triumph 0
D TR2/3/3A tr3a occasional seat padding Triumph 10
G For Sale 1960 TR3A for sale $11,999 Triumph Classifieds 0
G For Sale NEW PHOTOS: Triumph TR3 Chassis Frame + Front Suspension, Fits TR2,TR3,TR3A,TR3B Triumph Classifieds 1
Hamish Racing TR2/3/3A Greenville TR3a V8 ? Triumph 8
T TR2/3/3A Would like a paper pattern for TR3A hood stick cover Triumph 0
W TR2/3/3A 1960 TR3A Radiator replacement recommendations Triumph 11
T TR2/3/3A TR3A Windshield Question Triumph 4
Hamish Racing TR2/3/3A Anglesey (Wales) TR3a track videos Triumph 3
RonC TR2/3/3A TR3A Hardtop Seals Triumph 7
T TR2/3/3A TR3A Disk Brake Question Triumph 10
G TR2/3/3A TR3A Front Sway Bars - Choice? Triumph 3
Hamish Racing TR2/3/3A TR3a British Hill Climb Shelsley Walsh Triumph 8
T Wanted Working Fuel Gauge for TR3A Triumph Classifieds 5
T For Sale TR3A Original Radiator Triumph Classifieds 3
Hamish Racing TR2/3/3A TR3a Faster Lap Times than a Ferrari F430 ?? Triumph 1
Hamish Racing UK hill climb TR3a Racing 0
Hamish Racing TR2/3/3A TR3a UK hill climb video Triumph 4
Hamish Racing TR2/3/3A 3 sisters fun in a TR3a ! Triumph 5
T TR2/3/3A TR3A Fuel Gauge problem Triumph 10
A SOLD!! TR3A Girling Type A brake caliper for right front Triumph Classifieds 0
M TR2/3/3A 1960 TR3A--intake manifold-to-SUH6 carbs studs Triumph 3
Hamish Racing General TR TR3a and TR7V8 Shelsley Walsh Hill climb action Triumph 0
Hamish Racing TR2/3/3A Fast and wet TR3a Triumph 0
Hamish Racing TR2/3/3A TR3a video Triumph 3

Similar threads

Top