• The Roadster Factory Recovery Fund - Friends, as you may have heard, The Roadster Factory, a respected British Car Parts business in PA, suffered a total loss in a fire on Christmas Day. Read about it, discuss or ask questions >> HERE. The Triumph Register of America is sponsoring a fund raiser to help TRF get back on their feet. If you can help, vist >> their GoFundMe page.
  • Hey there Guest!
    If you enjoy BCF and find our forum a useful resource, if you appreciate not having ads pop up all over the place and you want to ensure we can stay online - Please consider supporting with an "optional" low-cost annual subscription.
    **Upgrade Now**
    (PS: Subscribers don't see this UGLY banner)
Tips
Tips

Hardtop Restoration 101

tony barnhill

Great Pumpkin - R.I.P
Offline
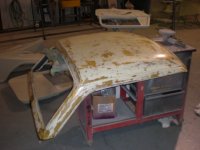
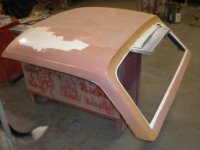
A few weeks ago I bought an old factory hardtop that was in sad shape...it had been poorly painted - several times - by PO's, the fiberglass was cracking, the weatherstripping was shot, the side windows were glazed & cracking and a PO somewhere in the past had painted the headliner black.

It was a hard choice whether to sell it 'as is' or restore it...as I only paid $100 for it, I decided to go through it & paint it Old English White in the event I ever come up with an Iris Blue pull handle car!

The first thing we had to do was get down to the gelcoat. That meant removing 2 layers of PO black paint & associated primer & then the factory paint & its thick, red oxide primer, which we did with chemicals (aircraft stripper). We also found one corner that had been cracked & repaired with obndo; we'll 'stitch' it back together & properly fiberglass the repair.

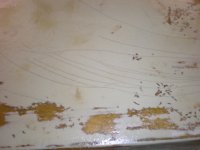
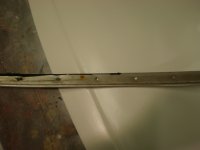
As we were getting to the white gelcoat, we ran through places where PO's had used bondo to 'fix' problems. When we finally got down to the gelcoat, we found lots of spider cracks, some places where PO's had gouged the gelcoat, & places where the gelcoat itself was beginning to separate and flake off (all those tan spots in the photos are where the gelcoat was either separating/flaking due to age or where PO's had gouged it).

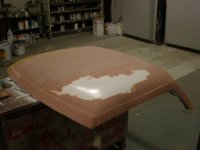
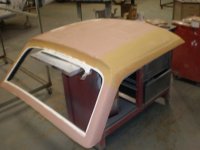
I didn't take any photos through that process but, instead, started today as we begin the repair process. In the photos below, you'll see some of the spider cracks in the gelcoat; then, you'll see where we rolled a new layer of fiberglass resin over the entire top, repairing flaking or gouged fiberglass as we went; and, finally, you'll see the black headliner.

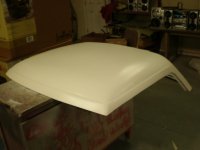
Next, we'll sand the entire top to get a smooth surface, identifying any possible remaining problems in the gelcoat itself. After achieving a smooth surface, we'll primer with white epoxy primer.

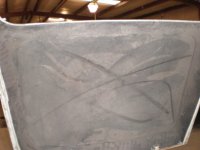
Next, we'll turn it over & clean the black paint off the headliner without damaging the grain itself. We'll check all the places where bolts have to go into the top for hold downs & then primer & spray the headliner with the correct factory interior color.

Flipping the top back over, we'll again smooth it and spray at least 1 coat of gray primer. After we ensure that the top is smooth, we'll paint it the original Old English White color that some of the early tops came in.

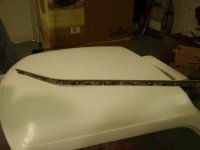
Then, new weatherstripping, new rear glass window, new Lexan side windows, and new clamps/hold downs and, finally, storage in bubble wrap awaiting a car to go on.

I'll keep you guys appraised of our progress through this thread - with photos as we move along. We'll be slow but steady in our progress....but, I thought it might be of some help to somebody to do this.

I've gotta say, this is the worst hardtop I've ever attempted to restore &, were it not for my initial low outlay, I wouldn't have attempted it; I'd have left that to someone who needed just 1 top.
 

Attachments

  • 14399.jpg
    14399.jpg
    73.4 KB · Views: 1,018
  • 14400.jpg
    14400.jpg
    92 KB · Views: 1,010
  • 14401.jpg
    14401.jpg
    78.8 KB · Views: 998
Offline
Hey Tony...how easy is the chrome strip to replace in the Works hardtop?

I have a new one ready to go in...but I'm also of the mind of "if it ain't broke, don't fix it". (The existing one has lost only its luster.

Thx in advance...
 
OP
tony barnhill

tony barnhill

Great Pumpkin - R.I.P
Offline
Rick - we'll find out soon!! Usually I leave them one & tape them off while I'm redoing a hardtop - not this time though...I'm looking for new gutter trim as we speak.
 

vping

Yoda
Bronze
Country flag
Offline
I've got two tops, a decent enough Black one I currently use but needing refinising. It's got a crack/break by the front latch. The other is a shell and looks similar to what is pictured. I have replacement side glass and a replacemnt rear glass. All aluminum should be removed and reanodized. I'll also need to source out rubber. The inner layer is dipping down in the back by the rear window from not having one in so long but there are no breaks in the top.

What do you use for minor/major fiberglass repair and when you have cracks like the one pictured, why can't you just sand them, prime and paint?

I'll be keeping an eye on this thread
 

apbos

Jedi Knight
Country flag
Offline
I'll throw in my 2 cents as Tony & Doc helped me with my restoration. https://www.britishcarforum.com/bcforum/ubbthreads.php/topics/474304/1/Hardtop_Restoration

This is how I restored my gel coat after grinding of the bad and laying down a new bed of fiberglass for support. Remember you must repair the structure of the top before you do any repair to the gel coat.
6SFUdpg" type="application/x-shockwave-flash" wmode="transparent" width="425" height="350"> </embed></object>


Paul
 
OP
tony barnhill

tony barnhill

Great Pumpkin - R.I.P
Offline
:iagree: Good series of video's....my bodyman does lots of fiberglass work &, though his technique is somewhat modified from the video, he pretty much follows the same procedures...funny, the little tool he was using on the cracks looks sorta like a beer can/bottle opener...& where there were larger areas that were flaking, he uses a dremel tool.

vping said:
What do you use for minor/major fiberglass repair and when you have cracks like the one pictured, why can't you just sand them, prime and paint?
Believe the video's answer that question...but, my bodyman told me that he has to get rid of all the problems to make a solid foundation upon which to work....there are places where he did large repairs, places where they're so small you almost can't see them...then, when he thinks he has all the problems solved, he rolls a layer of fiberglass resin over the entire top, lets it cure & sands the top smooth to see if he's missed anything.

vping said:
It's got a crack/break by the front latch.
One of the rear corners of my top was broken so that there were 2 pieces, the part under the window & the part running up alongside the window, & the break had been repaired with bondo by a PO...my bodyman cut all the bondo out, en he thgot back to a place where all the fiberglass was solid, & he reglassed it with cloth & resin...he told me the next thing he will do there is to "stitch" the repair to the top....I'm not sure what 'stitch' means but I'll get more info on it.

vping said:
I'll also need to source out rubber
VB has some & MacGregor has most everything.
 

DrEntropy

Great Pumpkin
Platinum
Country flag
Offline
I got all the rubber bits and seals from MacGregor. Everything fit correctly and seems to be of good quality so far. And the conversation is worth the call, too. :wink:
 

vping

Yoda
Bronze
Country flag
Offline
I have not looked at my in some time. Is there only like 3 pcs of rubber to it?

If anyone has detailed pictures of a Factory top, finished, I'd love to see them.
 
OP
tony barnhill

tony barnhill

Great Pumpkin - R.I.P
Offline
You mean like this (though it doesn't show the weatherstripping around the back window):

0050.jpg
 
Offline
Tony...don't you have a thread re:your last hardtop resoration with some great pictures?
 
OP
tony barnhill

tony barnhill

Great Pumpkin - R.I.P
Offline
Don't know if it was my thread or I just posted the photos in another thread...I have the photos on my other computer if you'd like me to post them.
 

vping

Yoda
Bronze
Country flag
Offline
$75 for a quarter window. I'm making them cheaper than that. I should invest in some proper rubber though.
 
OP
tony barnhill

tony barnhill

Great Pumpkin - R.I.P
Offline
vping said:
$75 for a quarter window. I'm making them cheaper than that. I should invest in some proper rubber though.
No-no-no...that's not the price....in their catalog they're $59.95...but, that's before my price rollback.

Make sure what you're cutting them out of is the same thickness as the originals...I know I found Lexan was a little thin - & you don't want to use Plexi.
 
OP
tony barnhill

tony barnhill

Great Pumpkin - R.I.P
Offline
rick ingram said:
Tony...don't you have a thread re:your last hardtop resoration with some great pictures?
tony barnhill said:
Don't know if it was my thread or I just posted the photos in another thread...I have the photos on my other computer if you'd like me to post them.
rick ingram said:
I think they would be helpful!
I found the photos & will post them here....remember:<span style="font-weight: bold">THESE ARE PHOTOS OF ANOTHER HARDTOP I RESTORED, NOT THE ONE WHO'S RESTORATION THIS THREAD IS FOLLOWING.</span>

<span style="font-weight: bold">Looking up underneath at the new paint on the inside:</span>
hd03.JPG


<span style="font-weight: bold">Couple of views of the finished paint:</span>
hd01.JPG
hd02.JPG


<span style="font-weight: bold">Finished hardtop on the car:</span>
79btop.JPG


I hope these help......more to come on my hardtop that's being restored Monday!
 
OP
tony barnhill

tony barnhill

Great Pumpkin - R.I.P
Offline
Re: Hardtop Restoration 101 - Next Step

<span style="font-weight: bold">NEXT STEP:</span>

So, after all the flaking fiberglass, cracks and gouges were properly repaired, a layer of fiberglass resin was brushed over the entire top. That was sanded and 3 coats of white epoxy primer were sprayed on the top (you can see some of the white epoxy in the photos below).

After the primer dryed, it was lightly sanded so the top was a smooth as possible. Next, to ensure the top is perfectly smooth, a thin coat of body filler was spread over it (photos below show it being applied). That will be extensively sanded so that the only filler that remains is that which is needed to fill any tiny imperfections in the coat of fiberglass which was brushed over the entire top (air bubbles, etc.)

When the body filler is sanded smooth, we expect to see more white epoxy than filler. One of the photos shows 2 different colors of filler...we did that to show what happens when you use different types of hardner in filler; the majority of the top was covered with body filler mixed with red hardner and a small portion was filler mixed with blue hardner.

Anyway, when the body filler is sanded to make the top perfectly smooth, another coat of white epoxy will be sprayed followed by the color primer. That color primer will be sanded and any high or low places will show up with the contrast of the white epoxy underneath.

More to come.
 

Attachments

  • 14506.jpg
    14506.jpg
    72.4 KB · Views: 748
  • 14507.jpg
    14507.jpg
    84.7 KB · Views: 739
  • 14508.jpg
    14508.jpg
    77.8 KB · Views: 742

jlaird

Great Pumpkin
Country flag
Offline
Re: Hardtop Restoration 101 - Next Step

The guys down at the cross roads really get into these little projects. They just love it when an intresting job shows up.
 
OP
tony barnhill

tony barnhill

Great Pumpkin - R.I.P
Offline
Re: Hardtop Restoration 101 - Next Step

<span style="font-weight: bold">NEXT STEP:</span>

The top is now covered with white epoxy primer. As expected, the majority of the body filler we put on the top in the previous step ended up on the shop floor. Next we'll spray the top with 2-part buildable primer in a very light gray color. That will build up so we can do our final sanding before paint and will show us if we still have any small imperfections that need additional work.

Before we apply the Old English White final color, we'll turn the top over to refinish the interior. A PO painted it flat black so we have to remove all that color without damaging the grain of the interior.

rick_ingram said:
Hey Tony...how easy is the chrome strip to replace in the Works hardtop?
Rick, the last 2 photos are of the long pieces of trim that we removed from my top. We'll polish them and reinstall with screws after all the paint work is completed.
 

Attachments

  • 14521.jpg
    14521.jpg
    69.3 KB · Views: 705
  • 14522.jpg
    14522.jpg
    68 KB · Views: 710
  • 14523.jpg
    14523.jpg
    62 KB · Views: 700
  • 14524.jpg
    14524.jpg
    56.8 KB · Views: 721
Offline
Re: Hardtop Restoration 101 - Next Step

Thanks...also curious about the chrome finisher strip in the rear window.
 
OP
tony barnhill

tony barnhill

Great Pumpkin - R.I.P
Offline
Re: Hardtop Restoration 101 - Next Step

rick_ingram said:
Thanks...also curious about the chrome finisher strip in the rear window.
That's really just a piece of flexible material that goes inside the weatherstripping to lock the window in place....I use a little wire tool we made that looks like a bottle opener to get it in place - but I think someone sells one.
 
Similar threads
Thread starter Title Forum Replies Date
T BT7 Hardtop Restoration Austin Healey 6
R Factory Hardtop Restoration Advice Spridgets 2
W TR2/3/3A hardtop restoration Triumph 4
I Bugeye hardtop restoration help please Spridgets 7
Jim_Newman Hardtop Restoration Austin Healey 2
apbos Hardtop Restoration Restoration & Tools 15
apbos Hardtop Restoration Spridgets 2
Lin Hardtop Restoration Austin Healey 8
tony barnhill Hardtop Restoration - FINALE! MG 28
M Hardtop restoration Austin Healey 1
EMGEBE Hardtop restoration MG 16
dougie Healey Hardtop on BAT Austin Healey 8
L SOLD!! For Sale MGB Hardtop MG Classifieds 3
W For Sale Selling 1958 100-6 w/ hardtop Austin Healey Classifieds 4
Celtic 77 For Sale MG B hardtop for sale MG Classifieds 15
S For Sale FREE HARDTOP.. top is in Palm Springs, Cal. Call Bob ,562 400 5983 MG Classifieds 1
R TR2/3/3A Hardtop hardware- Triumph 4
J BT7 Hardtop Crosspiece Wanted Austin Healey 5
T Wanted TR4A hardtop Triumph Classifieds 2
M Wanted WANTED: Hardtop (Factory) for BT7 Austin Healey Classifieds 6
P For Sale 1958 sunbeam rapier convertible and hardtop (coastside/pescadero) Other British Classifieds 0
Patrick67BJ8 Hardtop Vents Austin Healey 10
P For Sale MGA factory hardtop for sale. MG Classifieds 0
Patrick67BJ8 BJ8 Factory Hardtop Rear Window Austin Healey 6
R Wanted Looking For A Rear Glass For A Bugeye Hardtop Spridgets Classified 0
Celtic 77 MGB factory hardtop question... MG 10
prb51 Hardtop Indentification Austin Healey 13
prb51 Wanted Wanted...hardtop for 100-6 BN 6 2 seater Austin Healey Classifieds 1
RonC TR2/3/3A TR3A Hardtop Seals Triumph 7
D Wanted TR6 hardtop fraud/scam ALERT Triumph Classifieds 5
B Wood Braces, Hardtop Austin Healey 3
apbos BT7 Hardtop For Sale Austin Healey 0
Jim_Stevens TR2/3/3A Hardtop bracket Triumph 4
H Wanted Wanted TR6 Hardtop Triumph Classifieds 3
R TR2/3/3A TR-2 Hardtop Hardware Triumph 9
AUSMHLY BJ8 Factory Hardtop Headliner Austin Healey 2
B Wanted TR3 Hardtop Rear Stiffener Brackets Triumph Classifieds 0
tr6nitjulius General TR TR6 Hardtop Time! Triumph 0
Healey Nut Hardtop-to-Shroud Seal Austin Healey 12
maxwedge5281 Hardtop Security Austin Healey 10
B Roof vent position on BN7 hardtop. Austin Healey 15
C Also hardtop troubles. Austin Healey 5
J TR6 Hardtop/Soft Top Installation Triumph 2
J For Sale TR6 hardtop glass Other British Classifieds 0
Lin Hardtop Wall Storage Rack Austin Healey 11
maxwedge5281 Replacing Factory Hardtop Rear Window Austin Healey 24
M TR4/4A Honeybourne "Racing" Hardtop. Triumph 3
J TR6 TR6 Hardtop Hoist Triumph 2
J Wanted TR6 Hardtop Hoist Triumph Classifieds 1
JPSmit Interesting project - and a twist on the hardtop. Restoration & Tools 12

Similar threads

Top