• The Roadster Factory Recovery Fund - Friends, as you may have heard, The Roadster Factory, a respected British Car Parts business in PA, suffered a total loss in a fire on Christmas Day. Read about it, discuss or ask questions >> HERE. The Triumph Register of America is sponsoring a fund raiser to help TRF get back on their feet. If you can help, vist >> their GoFundMe page.
  • Hey there Guest!
    If you enjoy BCF and find our forum a useful resource, if you appreciate not having ads pop up all over the place and you want to ensure we can stay online - Please consider supporting with an "optional" low-cost annual subscription.
    **Upgrade Now**
    (PS: Subscribers don't see this UGLY banner)
Tips
Tips

worm gear pressed off

sp53

Yoda
Country flag
Offline
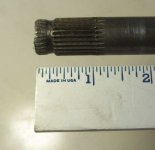
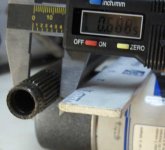
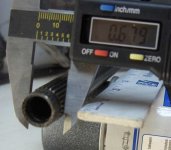
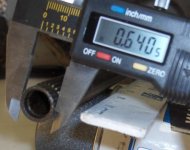
Does anyone have any recommendation for the reinstallation of a worm gear to the short shaft on a tr3a? I had the worm gear pressed off one shaft and onto another at machine shop. It was the Nappa shop in Tacoma and they where helpful and did not charge me. At the tr factory they let the end of the rod run long and then pinned it over somehow, creating this bell capped fit on the end that holds the gear tight. However, when I had the worm gear pressed onto the new shaft. I am finding that recreating this penned end is not easy. I have used a ball peen hammer to get it going somewhat, but to get it tight is another issue. In fact, twice now as I have been peening the end over the worm gear has loosened up on the shaft. I am guessing because of the harmonic vibration. I took it back to the shop and they pressed it down again, but when I tried to finish the end, the worm gear starts to loosen. Now I wish I would have dropped it off and just paid them. I am confused on what to do. The last time I took it out we tried to create a flare/bell on the end by putting a ball peen hammer on the end as we pressed it. But, it would not flare. I am thinking these guys would rather see someone else come through the door. Oh my feelings. I must have turned into a sensitive guy.
 

TR3driver

Great Pumpkin - R.I.P
Offline
I probably would have tried to use the press to swage the end back down. Perhaps with a series of punches with different tapers, to avoid having to make a die. Some Loctite would have helped, too.

But I'm not sure what to suggest from where you are now. I assume you've tried standing the shaft on a heavy piece of metal, and using a series of hammer blows around the rim of the shaft rather than trying to hit the center. If the worm is walking up the shaft from the hammer blows, it should go back the other way when you get the lip of the shaft against it.

The other solution is another trip to Tacoma, and this time pay them to fully install the worm, including the peening.
 

TexasKnucklehead

Jedi Knight
Country flag
Offline
Did they heat the worm before putting it back on? I haven't tried putting one back on, but from what I've read, the worm needs to be put in an oven and heated to something like 350 degrees, then it just slides onto the shaft. When it cools it's tight. But it's still supposed to have the end 'peened', and I don't know how to go about doing that. -I don't suppose this is much help, but I think pressing it back on the shaft without expanding it first is not a good idea.

I did notice as I pulled 3 worms off, some were peened much more than others. All were tight.

Please let me know what you end up doing and how it works out.
Jer
 

PeterK

Yoda
Offline
Use a dull(-ish) chisel or similar and hammer to create an asterisk-type pattern on the end of the shaft. The use your largest ball pein to smooth over the peen. Just a suggestion; I've never done one before. But I have used this technique on my lug studs and it worked fine.
 

AweMan

Jedi Knight
Offline
Don Elliott said:
If you have a MIG welder, access to one, or a friend who has one, you could weld a spot to lock it together.
Take my word for it, DO NOT try to spot weld or otherwise, that hardened worm gear to the shaft!
It will only eventually break loose and sooner than later at that!
It should be a very tight pressed fit and if hammer blows are moving it on the shaft I would think it is not a near tight enough fit to ensure it not coming loose while driving the car.
Were it me, I would take it to someone that knows for sure the fitment requirements and proper replacement procedures. A few $ are not worth your safety in my opinion.
Welding a hardened material to a softer one or even two hardened materials together takes specific procedures to be done correctly without risk of failure.
{requires both materials and equipment you do not have at home}
 
T

Tinster

Guest
Guest
Offline
PeterK said:
Use a dull(-ish) chisel or similar and hammer to create an asterisk-type pattern on the end of the shaft. The use your largest ball pein to smooth over the peen. Just a suggestion; I've never done one before. But I have used this technique on my lug studs and it worked fine.

<span style="color: #990000">PeterK- I am real curious what this technique
is used on lug studs? What circumstances, why? Interesting.

thanks,

dale</span>
 

martx-5

Yoda
Country flag
Offline
Tinster said:
PeterK said:
Use a dull(-ish) chisel or similar and hammer to create an asterisk-type pattern on the end of the shaft. The use your largest ball pein to smooth over the peen. Just a suggestion; I've never done one before. But I have used this technique on my lug studs and it worked fine.

<span style="color: #990000">PeterK- I am real curious what this technique
is used on lug studs? What circumstances, why? Interesting.

thanks,

dale</span>

On the TR3-4, the rear lug studs are screwed into the hub from the outside and then peened over in the back. I believe the TR6 has regular type lugs that get pressed in from the back of the hub.
 

TexasKnucklehead

Jedi Knight
Country flag
Offline
I was unable to get a good picture of the 'peen' on the end of the steering shaft. It is clear that the shaft has a splined end, that is tapered close to what the worm also has on the inside. Please look at the attached pictures. Only the last 1" or so is splined, and the shaft is smaller in diameter than the inside of the worm (where the non-splined worm end will fit). Only the splines hold the worm on the shaft. If you look, the first 1/4" is what is being 'peened' to hold the splines tight inside the worm. The bearing race and/or worm end are not peened, only the shaft. The shaft is not peened in a bunch of places, it is peened uniformly as with a tapered round drift that stretches out the last 1/4" to hold the worm tight to the spline. The shaft is also hard steel, but not as hard as the worm. It must take a lot of force to peen it -or a press of some sort. This is only my observation, and like anything related to safety, if you're not comfortable with these ideas, seek professional help. -and I don't mean that exactly the way it sounds.
 

Attachments

  • 13859.jpg
    13859.jpg
    19.1 KB · Views: 203
  • 13860.jpg
    13860.jpg
    22.9 KB · Views: 204
  • 13861.jpg
    13861.jpg
    37 KB · Views: 206
  • 13862.jpg
    13862.jpg
    24.3 KB · Views: 209

Got_All_4

Luke Skywalker
Country flag
Offline
I'm going to agree with TexasKnucklehead. In machining classes we called that a sweat fit. As the worm gear cools down and shrinks onto the shaft the shaft heats ups and expands from the transfer of heat from the gear. It will produce such a tight fit it would be hard to press off. Also what else will happen is the hole in the worm gear will also expand and the gear will slid back farther onto the shaft getting the full advantage of the taper fit. Which is probably why when cold pressing it on it wants to walk back off. I would also have a pipe ready the same diameter as the shaft to give the gear a good whack after setting onto the shaft. Let it air cool or stick it into a bucket of sand to slow the cooling process down. The longer it cools the tighter the fit. After the sweat fit it should be tight enough to peen over the edges. What ever you do don't go over the 350 degrees. I seem to remember at 400 degrees the temper or hardness starts to change. You can do this in your oven at home. Just make sure your oven temperature is accurate.
 

TR3driver

Great Pumpkin - R.I.P
Offline
Well, I can't prove it, but I doubt the factory bothered with a sweat fit here. The locking taper and peened end seem plenty adequate to me. After all, it's only the driver pushing/pulling on the steering wheel that tries to move the worm on the splines. The splines themselves take whatever force is needed to turn the car.

I believe the original setup was swaged in a press (using a die to spread the end of the shaft). My suggestion of peening in a bunch of places was intended as an alternate solution, when no press/die is available.
 

Twosheds

Darth Vader
Offline
TR3driver said:
After all, it's only the driver pushing/pulling on the steering wheel that tries to move the worm on the splines. The splines themselves take whatever force is needed to turn the car.

Disclaimer: I haven't had my coffee yet, so may very well be off base here.

When the driver turns the steering wheel and thus the worm, wouldn't the rocker shaft peg pushing back on the spiral groove in the worm (reaction force to worm pushing on peg) cause a force vector that would try to move the worm along the shaft?
 

Twosheds

Darth Vader
Offline
I just answered my own question.

Yes, the force would try to move the worm, but it can't go anywhere because of the ball bearings in front and behind.

I'll never pre-coffee post again.
 

TR3driver

Great Pumpkin - R.I.P
Offline
Twosheds said:
I'll never pre-coffee post again.
No worries; it's a good question (and a good answer).
 
OP
S

sp53

Yoda
Country flag
Offline
Well thanks all for your comments and the dialectic you shared. I learned a lot. Where I am at now is I have the end peened some and would have to stretch that out again if the worm was pull off to heat it. In addition, I would probably have to pay them to heat and press it back on and what fun is that. (Cheap)
Don’s idea of welding it a little on the back sounds good especially since Randall cleared up the force and torque problem I had. I could not wrap my mind around where the force would go. I also thought the peg would pull on the unit and try and separate the two. But, now I can see that the worm would be trapped between the bearings and the only force would be the driver and if it is a spilt column the collar connecter would act as a safety stop anyway. I mean if something odd did happen. So, a couple of good tacks should hold everything fine. However, I am talking to guy who has a nice one for sale. My problem is I have purchased two of these shafts with the gear and both times they were not cherry.
 

AweMan

Jedi Knight
Offline
Again:
F.W.I.W.
I would advise against relying on any type of weld on those parts.

But then .... I`m just a Welder/Fabricator & Aircraft Engine maintenance Welder with 30+ years total experience and 10 of that in Aircraft Engine reclamation and repair, what do I know!

Were they my parts, I would not do it!

But ...... To each .... His/Her own.
 

TR3driver

Great Pumpkin - R.I.P
Offline
I'm with you, Kerry, even though I just barely know which end of the torch to pick up!
 
OP
S

sp53

Yoda
Country flag
Offline
I am not a welder either; heck, yesterday I could not say welllder. However, I bought one of those self-darkening welding helmets and I sure find that helpful, kinda like sliced bread. Anyways, I trust your expertise Awe- Man and will now come up with a different plan. I am curious, however, why earlier you maintained that you could build up the worm gear with weld. It was after reading that that I figured welding would be ok. Perhaps it is the joining of the two different hardened steels? Anyways, one of the guys I play poker with owns a donut shop, and I will take those guys at the machine shop in a box off donuts and see what happens. I am cheap and for me part of fixing one of these cars is the networking. Yes, networking what a nice way to say parsimonious.
 

AweMan

Jedi Knight
Offline
I did mention that I PROBABLY could build it up with weld, I also mentioned machining would present a whole different set of problems eg. getting the correct angels and curvature on the worm gear. Building it up by Welding would significantly change the hardness of the gear itself, therefore it would need to be heat treated in order to bring it back to the specific hardness required. As I mentioned in this post 4/10/07 reply to Don Elliot, that welding hardened materials to one another require specific procedures and equipment that WE do not have at home.
Eg. the heat treat oven and the correct weld filler material.
I would only try welding such an item as a last resort and even then it would require further work by both machinist and heat treating. And would very well be cost prohibitive.
Having said all of that, if it was THE ONLY WAY to produce the part needed ..... then and only then I would attempt a weld repair.
I would not try to "Spot Weld" these pieces together because as I mentioned unless you have the correct filler material to produce this "Spot Weld" with, the weld will merely break under the slightest of stress loads.
In order for a spot weld to fuse both pieces together, Although in a localized area, would require heat in the 2,000+ degree range { mild steel becomes liquid at nearly 2,800 degrees} { somewhat less for hardened steel Eg. around 2,500} the cooling rates are somewhat different also. The 300 degree difference is enough to cause a stress riser which in turn equals cracking. Not to mention changing the physical properties of the hardened material in the localized spot welded area. So without the correct filler material for the spot weld and heat treating after to normalize the area ....
I hope you can see what i`m getting at here.
I hope this clarifys what I was refering to with out going into a bunch of terminology.
 
Similar threads
Thread starter Title Forum Replies Date
M TR2/3/3A Steering Worm Gear Wear Evaluation Triumph 6
J TR2/3/3A Steering Worm Gear Runout Triumph 6
K TR2/3/3A TR-3 steering column worm gear removal. Triumph 4
R T-Series TC Steering Box Worm Gear MG 1
Got_All_4 TR2/3/3A Removal of Steering Box Worm Gear In Car TR3A Triumph 3
TomMull TR2/3/3A Steering Box Cam or Worm Triumph 18
S TR4/4A Worm in gas tank? Triumph 7
K TR2/3/3A Rebuilt steering has creative fix for NA worm bearing! Triumph 4
Jim_Gruber Tired of the tin worm,good Spridget body for sale NFI Spridgets 0
angelfj1 TR2/3/3A TR3A Steering Worm - Can this be Restored? Triumph 15
L T-Series Gear box servicing cap. MG 5
Got_All_4 General Tech TR6 Transmission Troubles Pops Out of 3rd gear Triumph 2
S TR2/3/3A Rebuilding a tr3 transmission and second gear, Triumph 57
S TR2/3/3A getting the circlip off 3rd gear Triumph 9
Todd78d Sprit MK1 gear box filler Spridgets 2
K TR2/3/3A The TR6 gearbox Ist gear.... Triumph 1
scottkilpatrick TR4/4A Gear oil and choke question Triumph 4
tr6nitjulius For Sale TR6 tail light assemby & Resurfaced/New Ring Gear Flywheel Triumph Classifieds 0
B Transmission Gear Lockouts Austin Healey 8
S Gear Shift Lever Travel Austin Healey 13
mezy mazda MX5 / Miata gear stick relocation Other Cars 2
luke44 TR2/3/3A TR3 not engaging 2nd gear Triumph 24
tr6nitjulius General Tech Visual/audible Fix no 1st/2nd gear Triumph 0
tr6nitjulius General TR Final solution to no 1st/2nd gear issues Triumph 2
LD-Ordie Series II gear lube question Rover / Land Rover 3
S For Sale Differentail gear sets available. Spridget, Morris Spridgets Classified 12
Writer2022 GT6 GT6 Stiff Gear Selection Triumph 4
C Spitfire gear selection Triumph 10
JPSmit Gear reduction starters anyone? Restoration & Tools 5
Got_All_4 TR6 2nd Gear Bush Problem TR6 Looking at Steel Triumph 12
AUSMHLY Remanufactured Laygear with welded 1st gear Austin Healey 20
K TR2/3/3A Gear shift pops out of 2nd gear sometimes? Triumph 5
TR3MT TR2/3/3A Hot Gear Shift Lever Triumph 12
K TR2/3/3A Problem with the gear lever "anti rattle fix"..... Triumph 10
T BJ7 Hard to find First Gear when G/Box is hot Austin Healey 3
AUSMHLY BJ8 transmission 3rd gear chipping Austin Healey 0
AUSMHLY First Gear Sliding Hub Endplay Austin Healey 1
N Ribcase transmission won’t engage 3rd or 4th gear Spridgets 19
DocDup1 TR4/4A Second Gear Bushing Triumph 6
AUSMHLY 2nd gear should I file it? Do gears have a hard coating? Austin Healey 7
S TR2/3/3A Gear shift knob Triumph 8
AUSMHLY BJ8 Second Gear Needed Austin Healey 16
S TR2/3/3A tack drive on the distributor must have caused those cuts in the gear Triumph 4
M TR6 Gear Oil Type and how to add 1973 TR6 Triumph 9
AUSMHLY BJ8 Gear Shifting Austin Healey 5
R Bugeye reverse gear Spridgets 6
TomMull TR2/3/3A 1st gear again Triumph 3
K TR2/3/3A Anyone remember the "rattling gear shift" fix? Triumph 8
KVH General Tech Gear Shift Sticks Triumph 6
K TR2/3/3A Rebuilding an Engine?..New Cam Sprocket & Gear...1/2 Price Triumph 0

Similar threads

Top