• The Roadster Factory Recovery Fund - Friends, as you may have heard, The Roadster Factory, a respected British Car Parts business in PA, suffered a total loss in a fire on Christmas Day. Read about it, discuss or ask questions >> HERE. The Triumph Register of America is sponsoring a fund raiser to help TRF get back on their feet. If you can help, vist >> their GoFundMe page.
  • Hey there Guest!
    If you enjoy BCF and find our forum a useful resource, if you appreciate not having ads pop up all over the place and you want to ensure we can stay online - Please consider supporting with an "optional" low-cost annual subscription.
    **Upgrade Now**
    (PS: Subscribers don't see this UGLY banner)
Tips
Tips

Check out my transmission pics

2wrench

Luke Skywalker
Country flag
Offline
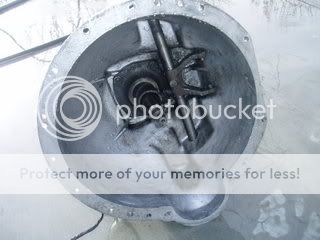
Here are some before (oily) and after (pretty clean)
pictures of my transmission.

My car was built in April of '74.

The transmission was built 2-21-74.

Looks to be the factory original. C-O-O-L.

https://i169.photobucket.com/albums/u222/2wrench/P1010019-3.jpg

and then after...
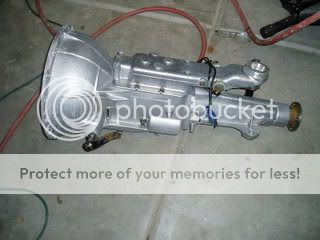
P1010030-2.jpg


and one more, the inside:

P1010026-3.jpg


Engine degreaser; a little Island Girl, cause I ran out
of or couldn't find what I wanted to use; then found
what I really wanted to use and finished with
Marine Clean....pressure washed at 2600 pounds.

So far I'm pleased. Hope I didn't get water where it
shouldn't be.
 

Norton47

Jedi Warrior
Offline
2wrench
Looks great. As long as you did not direct the spray at the seals you are most likely ok, in regards to water getting inside.
Make sure you change the transmission front seal while you have it apart. It's behind the cap with 4 bolts.
 
T

Tinster

Guest
Guest
Offline
Hey 2 !

What Norton said is important and easy. Make sure you order
the correct mounting hardware for the cover plate as well.

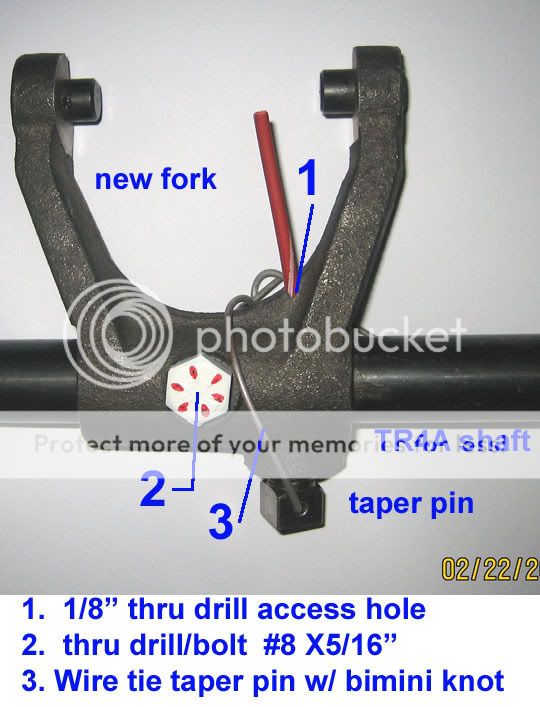
I couldn't tell from your photo if you have installed a fork reinforcing bolt/pin. If not, here is what you need to install. And remember, you want no threads inside the steel bar. I used greade #8

clutchbarmods.jpg
 
OP
2wrench

2wrench

Luke Skywalker
Country flag
Offline
Dale, what does all this do? I have to drill a hole?

Maybe I need to look at the tranny and it will become more
clear.
 

TR3driver

Great Pumpkin - R.I.P
Offline
The taper pin that locates the fork to the shaft is a known weak spot. Adding the bolt reinforces it. Might not be absolutely necessary, but is cheap insurance IMO against having to pull the entire #@$ gearbox again just because you happened to get one of the weak pins.

Basically you assemble the fork to the shaft (being sure to get it the right way round) outside the box, snug down the taper pin, then drill a hole through both fork and shaft. Disassemble then reassemble with the gearbox. Double-check that the new bolt cannot foul on the front cover.

The #1 hole in Dale's photo is not needed unless you have to remove a broken pin.

IMO the safety wire is overkill; I used Loctite since the pin I got wasn't drilled. Grade 8 is probably overkill as well, but since I had one on hand, that's what I used too.

I've only broken one taper pin in 30 years, but I've seen lots of broken ones on other's cars ... kinda makes me wonder if this isn't mostly another side effect of those heavy "wrong" TR6 clutches. But once was plenty, so I installed the fix on all my gearboxes (except the one Herman did for me).
 

Norton47

Jedi Warrior
Offline
Hey 2
I just did this repair on a friends car, except I used a 1/4 inch roll pin. I think it's easier. I am going to do it on mine and I do it tomorrow and take photo's. It's like they say drill a 1/4 inch hole through both the pieces and then with a roll pin, once it is assembled in the trans housing you drive (tap) the roll pin home. The pin keeps it's own tension. Either of these mods makes the 2 pieces mechanical solid, thus keeping stress off the hardened square head pin. Which can loosen and shear part way or all the way through requiring drilling or cutting to get apart.
 
OP
2wrench

2wrench

Luke Skywalker
Country flag
Offline
I'll be looking for your post as well, Norton.

Tinster, great pics. It's 3:09 a.m. at this
time and it is somewhat common for me to wake up
and go to the Forum till I tire out.

I will take a closer look at my tranny tommorrow.
Thanks all,
 
T

Tinster

Guest
Guest
Offline
Hey 2-

The taper pin was sheared off in my TR6 when we purchased
it. The clutch was "sticky" and "lurched" into gear as a
esult. We were told that was a normal TR6 clutch. NOT!!

I never, ever want to experience the ordeal of gutting my
car interior, pulling the tranny, buying all those
expensive clutch replacement systems because of a sheared
taper pin. (BYW- it's NOT really tapered)

I installed the the 1/8 pin access hole because DPO Pedro's
broken pin was stuck inside the cross bar and the fork
could not be removed. I had to take the tranny to a garage
and have the cross bar torch cut of out the bell housing.
Then purchase two new cross bars.

I am replacing all the Pedro-ized K-mart metric Chinese
steel bolts and nuts with American made UNF #8s. I am more
than willing to pay the premium for American made steel.

keep us posted,

dale
 

TR3driver

Great Pumpkin - R.I.P
Offline
Tinster said:
(BYW- it's NOT really tapered)
Well, it's supposed to be; and both my originals and the replacements I bought were. It's not a real steep taper, but if you insert the pin into the shaft from either side, it only goes partway through.<div class="ubbcode-block"><div class="ubbcode-header">Quote:]I installed the the 1/8 pin access hole because DPO Pedro's broken pin was stuck inside the cross bar and the fork could not be removed. I had to take the tranny to a garage and have the cross bar torch cut of out the bell housing.[/QUOTE]Ok, I'm missing something here. The access hole is to remove the broken end of the taper pin ... so with the hole there was no reason to have the shaft cut. And it's certainly easy enough to add the hole after the pin shears (BTDT). Besides, with the reinforcement, the pin will never shear again.
 
Similar threads
Thread starter Title Forum Replies Date
I How do you check transmission fluid? Spridgets 8
drooartz Transmission check Spridgets 3
TRnorwegian Easiest way to check refill oil in transmission? Triumph 20
K TR2/3/3A New head gasket is installed.....did a compression check motor cold. Triumph 4
AngliaGT In Check,VA Today Spotted 2
Joel Lester TR2/3/3A Finished my TR3! Thanks to you guys... check it out! Triumph 22
Rob Glasgow Check Strap Assembly Austin Healey 5
B BJ7/BJ8 Door Check Straps Austin Healey 10
F TR2/3/3A Check strap alignment Triumph 11
T General Tech Once again, check the easy stuff Triumph 2
AngliaGT Got Lucky Today - CHECK THOSE BOLTS! Spridgets 6
S Price check on TR3A valve cover Triumph Classifieds 0
Twit TR4/4A early tr4 check straps Triumph 4
F Check for matching nrs Austin Healey MK2 Austin Healey 3
Lukens For Sale Check out this tr3 project for sale... A real treasure trove Triumph Classifieds 0
V TR2/3/3A Vertical link check Triumph 2
R TR4/4A Door check straps Triumph 7
68_sprite Check the August Oprah Magazine Austin Healey 5
M TR2/3/3A TR-3A Compresson check hot vs cold Triumph 5
HighAltitudeTR3 TR2/3/3A Door Check Assembly Triumph 19
S Door Check Strap Austin Healey 5
AngliaGT Why You Should Double - Check Your Parts When You Receive them. Spridgets 2
T TR2/3/3A Where is best spot to check temp with infrared thermometer? Triumph 17
AngliaGT Anyone in Charlotte,NC That Could Check Out a Truck for Me? Other Cars 0
C Rough Idle - What to check? Austin Healey 12
KVH TR4/4A Door Check Straps Triumph 11
S Overdrive Wiring Check Austin Healey 12
Michael Oritt Door check installation Austin Healey 7
P TR2/3/3A TR3 turn signal and horn control wiring check Triumph 4
warwick-steve Brake drum check and lubrication Austin Healey 9
Rut Sanity check! Spridgets 2
1 Price check on an original 1957 100-6 BN4? Austin Healey 29
Mickey Richaud General Tech Always Check the Fundamentals MG 10
F Check out this new restoration diary - BT7 - very brave! Austin Healey 7
D TR2/3/3A Door check bracket? Triumph 7
C Brake issue on my 1969 XKE - what to check first? Jaguar 14
Martinld123 Compression check 1956 BN2 Austin Healey 7
M BN1 door check replacement Austin Healey 9
R Last minute check before engine install Austin Healey 26
Boink Check out some Sprite shots at the Portland ABFM... Spridgets 1
Rut TR4/4A Get out your check books! Triumph 10
Gerald_Gordon TR4/4A Failure of new door-check strap on an early 1961 TR4 Triumph 6
S How to check Dwell on a MK I 3000? Austin Healey 27
K TR2/3/3A Re: TR3 Bump stops and check straps. Triumph 18
PatGalvin TR2/3/3A vacuum leaks? How to check Triumph 9
jlaird Check Spam folder Spridgets 3
I TR6 Got in a wreck - need some help on who to take it to and what to check Triumph 48
HealeyDave Door Check Friction Adjustment Austin Healey 12
RedTR3 TR2/3/3A How to check for cylinder-to-cylinder head gasket leak Triumph 7
sundown TR6 1973 TR6 door check straps Triumph 3

Similar threads

Top