• The Roadster Factory Recovery Fund - Friends, as you may have heard, The Roadster Factory, a respected British Car Parts business in PA, suffered a total loss in a fire on Christmas Day. Read about it, discuss or ask questions >> HERE. The Triumph Register of America is sponsoring a fund raiser to help TRF get back on their feet. If you can help, vist >> their GoFundMe page.
  • Hey there Guest!
    If you enjoy BCF and find our forum a useful resource, if you appreciate not having ads pop up all over the place and you want to ensure we can stay online - Please consider supporting with an "optional" low-cost annual subscription.
    **Upgrade Now**
    (PS: Subscribers don't see this UGLY banner)
Tips
Tips

Rear Deck Rust Repair assistance

TR6oldtimer

Darth Vader
Offline
Attached is a picture of the right rear side of the rear deck on a TR6. Whilst I have been able to effect similar repairs by gas butt welding in a patch and the use of a body hammer and dolly to smooth out, this area is inaccessible to a suitable dolly or other tool to allow hammering the repaired area. So any welding, I fear would cause warping and other distortions that I could not correct.

My alternative plan is to remove the rusted area and insert a fabricated repair piece under the existing good sheet metal and braze in, or perhaps use a high tin solder to minimize heat caused distortion, then fill to smooth with body filler or lead.

Comments or other ideas please.
 

Attachments

  • 240863-rust.jpg
    240863-rust.jpg
    102.4 KB · Views: 133
D

DougF

Guest
Guest
Offline
Have you looked into any of the adhesives on the market? Many are going in that direction. It would eliminate any concern with heat.
 

martx-5

Yoda
Country flag
Offline
I'm having a little trouble exactly visualizing where this piece is. Maybe you can point out the body panel number in this breakdown from Moss Motors. Anyway, I'd think nothing of cutting out all that rust and welding in a fabricated or new piece using a MIG welder. The heat is very localized, and if you're careful, there should be no undue distortion or warping.
 
OP
TR6oldtimer

TR6oldtimer

Darth Vader
Offline
Attached is a photo of the rear deck trunk area. The white arrow points to the damaged area seen in the first photo. The problem in this area is that under the deck is the reinforcing for the deck and the trunk which precludes dolly access. Also, as you see, this is at the end of a flat area with a slight flair down from the fender in toward the center. Any metal distortion would be very obvious. The yellow arrow points to an area also needing repair. The difference here is one can get a dolly under the metal to work the repair.

In response to the other post, I will look into the use of adhesives as an alternative to welding or brazing. But I am not confident they are the solution here.

Perhaps my problem is lack of skills or confidence or both. I just really do not want to replace the entire rear deck if it can be avoided.
 

Attachments

  • 241087-rust.JPG
    241087-rust.JPG
    80.8 KB · Views: 100

Alan_Myers

Luke Skywalker
Offline
Hi,

That area can be a bit tricky to work on.

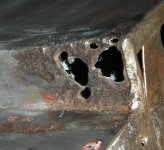
Have you confirmed that it's rusted from the outside in, not from the inside out? I ask only because the latter is more typical and in that area any visible rust bubbles usually signal more problems down on the flange where the fender bolts up. I'm just concerned that the full extent of the rust problem is fixed, so it doesn't come back in a relatively short time.

But, back to your question....

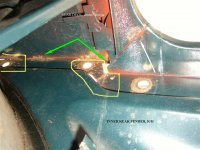
Looking at the area on my TR4 (which is similar, but not exactly the same, and I don't have access to my TR6 catalogues and reference books right now), I could get a dolly in there without too much trouble, either from inside the cockpit or from the trunk area.

Maybe you can't get a the more typical large one in there on a TR6, but you might be able to get a flat "spoon" dolly behind the panel. Might help to remove the gas tank, too (which would be awfully close to any welding, anyway).

It think I'd be tempted to weld in a patch panel (gas or MIG), dress it and then finishing it all off with a bit of lead (body solder). That way the underlying welded repair needn't be absolutely perfect and I don't really need to do much hammer welding, just get it close.

This is just the sort of place you'll often find lead used. Traditionally it has held up better than Bondo, what with opening and closing the trunk lid. (Doors and hood are other areas it's most useful, for the same reason.)

In fact, right from the factory a lot of Jags from the 50s and 60s have a small patch of lead at each of those corners. With a thin coat of lead blended in properly (worked by hand, never a power sander that throws particles into the air where they can be breathed in!) it will look great. A very thin, skim coat of Bondo might be needed for final blending. The panel is going to at least need localized painting inside and out, any way you approach it.

In fact, I've used brass and then lead to fill in the seams located right there and a couple other places nearby on my TR4, for a somewhat bit cleaner look. (It has more small panels around the trunk opening than the TR6.) That work was done in 1979 and still looks fine. (It's the rest of the lacquer top coats that's degraded in the past 27 years and is now getting taken off and redone). If I have the car media blasted, I'll need to replace any lead. But, if the blaster stays clear of that area I would have no concerns about painting right over the old lead and brass work that was done.

Call me old-fashioned! But I tend to trust the stuff that's been proven over the past 50-100 years, and am just not yet comfortable with some of the modern adhesive bonding methods. The new stuff might work fine, I dunno. But, hey, they can't even keep tiles on the space shuttle and I bet the adhesives NASA uses are a lot better than anything you or I can buy at the local auto body supply.

Let us know what you do.

/ubbthreads/images/graemlins/cheers.gif
 
T

Tinster

Guest
Guest
Offline
I have a similar looking rust area in the trunk over a wheel well . My TR is dead in my garage with zero access for welding etc. So it's either bolts, pop rivets or adhesive for me.

Here is an adhesive I specify on my industrial construction projects and that personally use at home for a multitude of needs. Rezi-Weld twin cartridge gel paste epoxy. It has 10,000 psi sheer strength. Sets up in about 20-30 minutes. It can be sanded after 4 hours. Costs me $22 for the twin cartridge-they are the size of regular calk tubes. I have seen them at Ace hardward store locally.

I am going to fabricate a 22 gauge steel patch and install it with the Rezi-Weld. Then sand and file the edges to blend it in.

https://www.atlasconstructionspecialties.com/productline/div3/epoxies-adhesives/5-16.html

Hope this helps.

I am
 
OP
TR6oldtimer

TR6oldtimer

Darth Vader
Offline
Alan,
Thanks for the helpful information and support. I had decided to weld and braze in repair piece and use body filler to smooth out. Although it has been decades since I used body soldier (and not very well), I agree it is better then bondo. When the time comes I well give it a try.

After reading your post, I looked more closely at the underside of the rear deck (see attachment). The two areas I planned to repair were obvious (outlined in yellow), however, it now appears there is more rust then previously noted. I may have to replace metal all along the deck's lip over the inner fender. While the left side is in considerably better condition, the same trunk lip corner area will need repairing. More worrisome is the condition of the welded joints connecting the rear and front deck. The connecting tabs are severely corroded, with 25% of the metal gone. While it has not rusted through the top, it is only a matter of time

Tinster, the extent of the damage I am dealing with was not very apparent until I removed the rear fenders. There were five areas of massive corrosion on the fender tabs, which I cut out and replaced. Corresponding to the fender damage areas, rust and rot were found on the inner fender and deck. Most of the damage started by water intrusion between the fender and body, some was caused by condensation and capillary action. If you have rust holes in the corner where the deck, fender, and trunk come together, there is probably more there then you know. However, I am not suggesting you remove your fenders. It can be a Pandora's box. It all depends on how far you want to go.

Anyway, for now, I am moving on to other body work, and at some point return to the deck areas to see the full extent of needed repair and if it can be reasonably accomplished. Otherwise I will reluctantly look to replacement of all three panels.

Thanks again for your comments
 

Attachments

  • 241488-TrunkRust.JPG
    241488-TrunkRust.JPG
    64.5 KB · Views: 64
Similar threads
Thread starter Title Forum Replies Date
T Wanted Wanted : MGA rear deck cover MG Classifieds 0
A Mk1 rear deck restoration Spridgets 0
toysrrus TR6 Rear deck panel Triumph 4
B Is there a CORRECT rear deck seal for 57? Triumph 12
longbridgehealey sprite emblem on rear deck Spridgets 21
T GT6 Looking for GT6 rear deck carpet Triumph 4
B TR6 Removal and Replacement of TR6 rear deck Triumph 3
TR6oldtimer TR6 TR6 rear wing to rear deck fit. Triumph 4
K MGB First stupid question. rear deck hardware 71 mgb MG 17
tr6web Rear deck and front section installation Triumph 2
B BE Rear Deck Ripples. Help Spridgets 3
petnatcar Rear View Mirror Relocation Austin Healey 0
Carlbanan56 MGB Rear axel torque? MG 4
petnatcar Rear View Mirror Relocation Austin Healey 0
trbby2 TR4/4A TR4A Intermittent rear wheel locking? Triumph 19
Carlbanan56 MGB Rear wheelbearing clicking MG 8
Carlbanan56 MGB MGB rear break rebuild MG 6
B BJ8 Rear Backrest Hinges Austin Healey 4
F For Sale E Type Series II front and rear bumpers good condition Jaguar Classifieds 0
bigjones TR2/3/3A Rear tail light not budging Triumph 5
5 Wanted Wanted 1966 mgb banjo type axle rear hub MG Classifieds 0
scottkilpatrick TR4/4A TR4 Rear Brake Drum Removal - Basic Question Triumph 16
J TR2/3/3A TR2 Fitting/mounting rear wing Triumph 11
Michael Oritt Rear Crank Seal Kit Austin Healey 7
BT7 Owner Rear Crankshaft Bearing Cap Austin Healey 4
O Jaguar rear window trim repair Jaguar 1
Joel Lester TR2/3/3A Is "later" style rear view mirror taller than the "early" style? Triumph 6
S Leaking HD6 Rear Carb Austin Healey 10
B Rear Brake Cylinders Austin Healey 4
WHT BJ8 Rear Seat Surround Drain Tube Grommets Austin Healey 0
Joel Lester TR2/3/3A Do rear leaf springs wear out? Triumph 11
J TR2/3/3A Rear Fuel Line Clips Triumph 3
apbos New long term project. Sprite powered rear engined race car. Spridgets 9
60BN7 Rear Wheel Opening Austin Healey 9
glemon TR5/TR250 Answering My Own Question Rear Tube Shock Conversion Numbers TR4a-TR6 Triumph 0
S TR2/3/3A rear wheel cylinder Triumph 1
K TR2/3/3A Rear tire pressure when there is an anti roll bar at the front of the car? Triumph 1
T Rear/Differential "Clunk" Austin Healey 2
AUSMHLY BJ8 Rear Seat Squab Austin Healey 0
jfarris For Sale TR3 Rear Sway Bar Triumph Classifieds 0
J 3000 Rear Seats Austin Healey 6
KVH General TR Rear Brake Shoe Orientation Triumph 12
Popeye TR4/4A Rear fender attachment: wing to lamp housing clip? Triumph 7
KVH General Tech Rear Brakes and Solid Axle Triumph 2
P Rear Springs Austin Healey 2
K TR2/3/3A Rear leaf spring brass and Delrin bushings ? Triumph 4
KVH General Tech Jacking Up The Rear of TR4 Triumph 5
J Rear Main Seal Kit Austin Healey 1
af3683 TR2/3/3A TR-2 / TR-3 Rear Bumper Wrap Around Fender Guards Identification Triumph 0
Patrick67BJ8 BJ8 Factory Hardtop Rear Window Austin Healey 6

Similar threads

Top