• The Roadster Factory Recovery Fund - Friends, as you may have heard, The Roadster Factory, a respected British Car Parts business in PA, suffered a total loss in a fire on Christmas Day. Read about it, discuss or ask questions >> HERE. The Triumph Register of America is sponsoring a fund raiser to help TRF get back on their feet. If you can help, vist >> their GoFundMe page.
  • Hey there Guest!
    If you enjoy BCF and find our forum a useful resource, if you appreciate not having ads pop up all over the place and you want to ensure we can stay online - Please consider supporting with an "optional" low-cost annual subscription.
    **Upgrade Now**
    (PS: Subscribers don't see this UGLY banner)
Tips
Tips

Valve adjustment and easiest way set cam position

Goldie

Senior Member
Country flag
Offline
I haven't adjusted my BJ8 valves in a couple of years. In the past I have bumped the starter with the solenoid but that is really hit or miss. I have never been able to turn the crank on the front of the engine with a bar but also did not take out the plugs when I tried. Shall I take out the plugs, put the car in gear and move the car to find the cam position for each adjustment. I have never tried this method before. Suggestions please.
 
Country flag
Offline
I use the 'Rule of 13' for my BJ8 ('Rule of 9' for the BN2):

1) Bump the starter until valve# 12 is at 'rock' (on the nose of the lobe) as close as possible, then put the car in 4th and move a front wheel, if necessary to get closer (it's not absolutely critical, the cam lobe is on the heel for half its diameter: http://www.engineprofessional.com/articles/EPQ215_62-66.pdf )
2) 13-12 = 1; set lash on valve# 1
3) Repeat#1 until valve# 11 is at rock, set lash on valve# 2
4) Repeat #1-2 for the remaining valves
 
OP
G

Goldie

Senior Member
Country flag
Offline
Thanks. I want to adjust my carbs and decided I needed to check timing and valves before I did that.
 

red57

Jedi Knight
Country flag
Offline
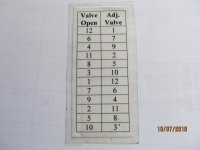
Bob is spot on and if you follow the sequence shown on this cheat-sheet, by doing them in this order, you can go thru all valves with the minimal turning of the engine (2 revolutions of the crank).
IMG_2504.jpg

I have a plastic (nylon?) fan and after pulling the plugs, I do all my turning with the fan - pushing simultaneously on the belt with my thumb to keep it from slipping.

Dave
 

roscoe

Jedi Knight
Silver
Country flag
Offline
I use the " no thought involved" method. Pull the plugs, turn the engine until you have a cylinder where you can wiggle both rockers ( i.e. you have some valve clearance on both which means you are on the heel and both valves are fully closed). Adjust both valve clearances. Since you know the firing order, turn until the next cylinder in order is on compression stroke and do those valves and so on until you are done. Sure there may be a bit more turning and if you watch, as soon as the rockers stop moving on a cylinder and the valves are closed, if you want TDC for OCD reasons you can put your thumb over the plug hole and turn until you get close to maximum compression.

If there is a reason for not doing it this way, I don't know what it is but we all have our favorite methods.
 
Country flag
Offline
I did it that way for years, but the 'Rule of 13' seems to give me more even clatter.

Not mentioned, yet, is the proper lash setting; the '0.12" Cold/Hot' on the valve cover may not apply to aftermarket cams (my DWR1 wants 0.015"). A previous aftermarket cam I had had different lash settings for exhaust and intake.
 

steveg

Yoda
Gold
Country flag
Offline
I like to use a paper timing disc divided into 1/6ths. Start with #1 at TDC on the compression stroke (both rockers loose) and plugs out. Set the disc to a mark on the distributor body, such as shown. Then rotate the fan or move the car in gear to go through the cylinders. I used a 30-60 triangle but circle-divided artwork is on Google.

TimingDisc.jpg
 
Last edited:

Patrick67BJ8

Obi Wan
Silver
Country flag
Offline
I have used the EOIC formula in the past. Exhaust Opening, Intake Closing.
 

BJ8Healeys

Jedi Warrior
Country flag
Offline
I have checked and adjusted my valves once a year before the driving season, after not checking them at all for 20 years and ending up with a burned valve about 20 years ago. My technique is to remove the radiator for access and use an open-end wrench on the dog nut to turn the engine (all plugs removed for easier turning). I found a wrench of the approximate size needed in an antique store, and filed the jaws a bit to make it fit the nut. Being an ex-engineer I tend to want to be as precise as possible. I have used a dial indicator when I had access to one. Not having one now, and following the "rule of 13", I turn the crank while watching the rocker arm nose go down until it can be seen to stop. This is "fully open" on that valve.

All good, but then I replaced the stock harmonic damper with a Pro/Race damper a couple years ago. It does not allow enough of the dog nut to protrude to use the wrench on it. I have a turning wrench made from a pipe and old timing belt than I plan to use as soon as I have the time to pull the radiator (I have a radiator shroud that prevents access with the radiator in place).
 

steveg

Yoda
Gold
Country flag
Offline
...My technique is to remove the radiator...

Removing the radiator sounds drastic!

When I had a generator, I used an offset box-end wrench that would fit the pulley nut. Pressing down on the fan belt, it was perfect for turning the engine over. With an alternator, now I have to put glove on and pull my fan blades.
 

John Turney

Yoda
Silver
Country flag
Offline
My car is such that pulling the radiator is absolutely out of the question unless it leaks.

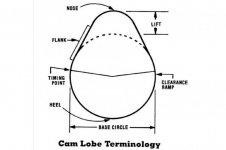
I use a remote starter switch. One thing to keep in mind is that when using the rule of 13, being precise about getting the one valve at it's maximum open position is not that necessary. The goal is to set the valve clearance when the lifter is on the base circle of the lobe. See this drawing:

camshaft lobe terminology.jpg

The lifter is on the base circle for at least half of the lobe rotation.

The only time one needs to have the lifter absolutely on the nose of the lobe is when measuring lift.

Also, if you take the plugs out, put the car in gear and roll the car forward/backward to rotate the engine, it's easier to push on the top of a tire. That way, you get a little leverage.
 

BJ8Healeys

Jedi Warrior
Country flag
Offline
Removing the radiator sounds drastic!

I've done it enough that it only takes about 10 minutes after draining it -- loosen the two screws at the top and remove four screws at the bottom, pull out the bottom and loosen the lower hose clamp enough to slide the hose off the radiator nipple, take out the two top screws, and Bob's your uncle!
 

BJ8Healeys

Jedi Warrior
Country flag
Offline
Yuk, yuk!:nana:

I'm not recommending any specific technique, Bob, just describing how I do it and it works for me. I have tried the "roll the wheel"
method and found that I cannot move the car that way and still monitor the rockers as they move. As I mentioned, I have a radiator shroud that won't allow access to the dog nut with the radiator in place. Out of necessity, I began removing the radiator (heck, it's only once a year!) and I've gotten pretty good at it.
 
Similar threads
Thread starter Title Forum Replies Date
K TR2/3/3A Cylinder head removal and valve adjustment Triumph 2
R TR2/3/3A Rule 9 Valve Adjustment Triumph 8
S TR2/3/3A All new valve train - no adjustment at rocker arms Triumph 12
K TR2/3/3A Valve Adjustment? Triumph 17
L TR6 Bypass valve adjustment Triumph 1
wangdango BJ8 valve adjustment? Austin Healey 3
Martinld123 Why too much valve clearance after adjustment? Austin Healey 2
Boggsy64 MGB Valve adjustment MG 6
Darwin GT6 GT6 Valve adjustment Triumph 6
nevets Valve adjustment intervals? Austin Healey 15
6 Valve adjustment stock 948 Spridgets 11
glemon Valve Adjustment/Wear Triumph 4
Rut 1275 valve adjustment Spridgets 10
Rut timing, cams, valve adjustment Spridgets 6
BOBBYR VALVE ADJUSTMENT Austin Healey 1
G MGB MGB valve adjustment MG 3
M 1275 valve lash adjustment "shade tree" Spridgets 10
Marvin Gruber Valve adjustment Part 2 Jaguar 11
Marvin Gruber Valve adjustment Jaguar 15
I Valve adjustment basics - help please Spridgets 21
M valve adjustment? Triumph 5
I TR6 TR6 valve adjustment help Triumph 3
Woodie valve adjustment Spridgets 5
66healey Valve adjustment Austin Healey 11
newmexTR3 valve adjustment q's Triumph 4
T Valve adjustment 'how-to- on YouTube? Triumph 3
R Valve Adjustment Question Austin Healey 12
malice Valve Adjustment Triumph 2
TRclassic3 TR2/3/3A TR3 Valve Adjustment Triumph 10
H Valve adjustment question MG 10
M TRactor Motor Valve Adjustment Sequence Triumph 5
sparkydave How sensitive is the valve adjustment? Spridgets 11
B valve adjustment Austin Healey 7
R Valve adjustment Austin Healey 6
S Valve Clearance Adjustment Austin Healey 17
M Valve adjustment MG 12
J Valve adjustment help. Triumph 5
tahoe healey valve adjustment Austin Healey 14
sim looking for 2 valve spring kippers for a 948 Spridgets 3
R Valve Drain Pipe Austin Healey 13
R T-Series Valve gap for an MGTD 1953. MG 5
6 Valve Oil Seals Spridgets 10
P TVR Big Valve 4.3 TVR 0
Erica General MG Oil Drain Valve -- mine is an MGB, but they have others MG 3
J MGB BRAKE VALVE ? MG 11
jehuie PCV valve explanation? British Motor Corp 5
R 3000 Heater Valve Austin Healey 4
T TR2/3/3A valve springs Triumph 15
kodpkd For Sale Alloy valve cover for AH 100-6 3000 PRICE DROP! Austin Healey Classifieds 1
T TR2/3/3A valve guides and piston clearance Triumph 6

Similar threads

Top