• The Roadster Factory Recovery Fund - Friends, as you may have heard, The Roadster Factory, a respected British Car Parts business in PA, suffered a total loss in a fire on Christmas Day. Read about it, discuss or ask questions >> HERE. The Triumph Register of America is sponsoring a fund raiser to help TRF get back on their feet. If you can help, vist >> their GoFundMe page.
  • Hey there Guest!
    If you enjoy BCF and find our forum a useful resource, if you appreciate not having ads pop up all over the place and you want to ensure we can stay online - Please consider supporting with an "optional" low-cost annual subscription.
    **Upgrade Now**
    (PS: Subscribers don't see this UGLY banner)
Tips
Tips

Front Suspension Rebuild

JDMTX

Freshman Member
Country flag
Offline
Hello Everyone,

I'm working on the front suspension of my 1960 Mark I and have run into a few issues (the suspension unit, upper and lower arms, hub, and brake unit have all been removed from the vehicle):

1. I am unable to remove the nut on the top of the kingpin. I have tried heating it and but with force this only turns the entire kingpin within the lower trunion;

2. I am unable to remove the nuts from the 5 bolts that hold the brake disk to the hub. The nuts appear to have some sort of locking washer on the top of the nut that holds the nut in place and I can't find a way to remove the lock washer; and

3. I do not have the tool to remove the dust cap inside the front hub. I'm thinking there has to be a way to do this without the special tool.

I appreciate any advice you all can offer on any or all of these items. Thanks,
 

HealeyRick

Yoda
Silver
Country flag
Offline

1. I am unable to remove the nut on the top of the kingpin. I have tried heating it and but with force this only turns the entire kingpin within the lower trunion;
These nuts are either castellated with a cotter pin inside or nylock. If castellated, did you remove the cotter? If pin removed or nylock, apply plenty of heat until cherry red and use a long breaker bar while holding the kingpin in one position. It should come off.

2. I am unable to remove the nuts from the 5 bolts that hold the brake disk to the hub. The nuts appear to have some sort of locking washer on the top of the nut that holds the nut in place and I can't find a way to remove the lock washer; and

Not sure about lock washer, might help if you posted a picture. Otherwise, same thing heat and a big breaker bar

3. I do not have the tool to remove the dust cap inside the front hub. I'm thinking there has to be a way to do this without the special tool.
A 5/16 = 24 coupling nut will fit on the bolt end of the dustcap. Thread a long 5/16=24 bolt in the other end and use a pair of vise grips or a claw hammer to yank it out. May help to squirt some penetrating oil inside the hub first.


Best of Luck


Keoke

Great Pumpkin
Country flag
Offline
AN impact wrench might help
 

steveg

Yoda
Gold
Country flag
Offline
Sounds like you need a penetrating agent like Kroil or PBblaster.

3. Using the coupling per Healey Rick above, you can make a slide hammer with a large socket:

DustCapSlideHammer.jpg


Modify slightly for installer. Combo of washer and socket holds cap straight when tapping in with hammer:

DustCapInstaller.jpg
 
Last edited:

Keoke

Great Pumpkin
Country flag
Offline
Alternatively:

I just added a large fender washer to mine then a nut which you tighten down and it will pull the cap off.


I could not find my picture but it is similar to the one shown above
 

Guffy60

Freshman Member
Country flag
Offline
Having just had the fun of doing mine.
when you remove the hub unit with the disc, you will find there are nuts on the back.
i wondered until I removed the hub from the king pin.
 

Guffy60

Freshman Member
Country flag
Offline
Another tip, when doing the bushing for the bearings, try the dry build of the car, easier to fit the thin spacers than when on the car working from the side.
 
OP
J

JDMTX

Freshman Member
Country flag
Offline
Thanks everyone for your insight; it is greatly appreciated.

HealeyRick, the nut on the top of the kingpin is castellated and I have removed the pin. I'll try to heat it up to a higher temp. I have a 24 inch breaker bar but so far it has not moved.

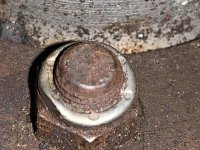
Here is a picture of the lock washer on top of the nut holding the disk to the hub. As you can see, one side has a small flat area but the other side doesn't so I have not been able to get a good grasp on it; plus it's a tight work area. I think once I'm able to get the lock washer off I'll be able to break the nut loose and remove the disk.

IMG_0553.jpg
 

red57

Jedi Knight
Country flag
Offline
Here is a picture of the lock washer on top of the nut holding the disk to the hub. As you can see, one side has a small flat area but the other side doesn't so I have not been able to get a good grasp on it; plus it's a tight work area. I think once I'm able to get the lock washer off I'll be able to break the nut loose and remove the disk.

View attachment 64758

JDMTX, that silvery ring is permanently attached to the nut and holds nylon or some other material designed to grip the threads, commonly referred to as a nylock nut - it is not a separate part. The silvery ring is small enough diameter for a socket that fits the nut to go right on over it. Just ignore it and grip the nut below (probably 9/16") and remove.

Dave
 

HealeyRick

Yoda
Silver
Country flag
Offline
JDMTX, that silvery ring is permanently attached to the nut and holds nylon or some other material designed to grip the threads, commonly referred to as a nylock nut - it is not a separate part. The silvery ring is small enough diameter for a socket that fits the nut to go right on over it. Just ignore it and grip the nut below (probably 9/16") and remove.

Dave

Yes, it's a Nyloc. Looks like it's pretty rusted on as well. I'd first soak it with a penetrant for a couple of days and then apply plenty of heat to cherry red to melt the nylon and loosen the rust. Slip a long length of pipe over that 24" breaker bar for both the wheel and kingpin nuts. Leverage is your friend.
 

pkmh

Jedi Warrior
Country flag
Offline
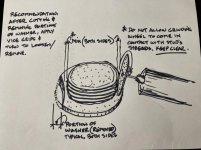
This is another approach I would do if washer was too stubborn to remove. If worse comes to worse, those little dremels work wonders. You will need to exercise care to protect yourself and avoid scarring/damaging stud threads, etc, in the process. Further, articulation is the key. You want to remove as much of the washer at the stud without cutting into the stud threads, thereby creating adequate weak points to the washer, only.

I have used this method in the past with success. I also suggested cutting into the washer and close to the stud threads in order to create two weak points opposite each other (on the washer). What has happened for me is the washer (or nut, etc.) will fail (break apart) upon twisting/turning of the *vice grips.

*no need to over tighten.

Washer removal at stud (800x600).jpg
 

HealeyRick

Yoda
Silver
Country flag
Offline
This is another approach I would do if washer was too stubborn to remove. If worse comes to worse, those little dremels work wonders. You will need to exercise care to protect yourself and avoid scarring/damaging stud threads, etc, in the process.

I have used this method in the past with success. I also suggested cutting into the washer and close to the stud threads in order to create two weak points opposite each other (on the washer). What has happened for me is the washer (or nut, etc.) will fail (break apart) upon twisting/turning of the *vice grips.


*no need to over tighten.

View attachment 64771

Your hand must be steadier than mine. I have difficulty doing this without munging up the threads on the stud. Maybe you could run a die on them afterwards to restore, but I'd only try it as a last resort.
 

pkmh

Jedi Warrior
Country flag
Offline
Ok, Healey Rick, fair enough.

Guess I have used this approach and the use of a dremel so many times, I forget how steady a hand is needed.

I only need to worry about eye protection (first and foremost) when working away!
 

HealeyRick

Yoda
Silver
Country flag
Offline
Ok, Healey Rick, fair enough.

Guess I have used this approach and the use of a dremel so many times, I forget how steady a hand is needed.

I only need to worry about eye protection (first and foremost) when working away!

At least we'll give JDMTX a couple of options to try and see what works best for him.
 
Similar threads
Thread starter Title Forum Replies Date
drooartz MGB Front suspension rebuild is next MG 57
M front suspension rebuild parts list Spridgets 22
M TR2/3/3A TR-3B front suspension rebuild Triumph 0
Kleykamp TR2/3/3A TR3 Front Suspension rebuild????? Triumph 12
bugedd About to rebuild my front suspension Spridgets 1
boxfullofyertoys Front suspension rebuild issues Spridgets 11
R Front Suspension rebuild MG 12
Stinger TR4/4A TR4A Front Suspension Rebuild Triumph 26
jbowlby MGA MGA Front suspension rebuild MG 1
T Front suspension rebuild - TRF kit or piece parts? Triumph 5
T Correct/best order for front suspension rebuild Spridgets 8
I TR2/3/3A TR3, front suspension rebuild qustions Triumph 13
I TR6 This can't be good. TR6 front suspension rebuild Triumph 25
I Front suspension rebuild help for bugeye Spridgets 6
I TR6 TR6 front suspension rebuild suggestions Triumph 19
K TR2/3/3A TR3 Front suspension rebuild question...... Triumph 5
K TR2/3/3A Another TR3 Front Suspension Rebuild Question Triumph 5
K TR2/3/3A TR3 Front Suspension Rebuild Pics....Lost the link Triumph 0
Jayrz Front Suspension rebuild sequence MG 41
M Front Suspension Rebuild Triumph 21
1 front suspension rebuild, parts? Austin Healey 2
M TR4/4A TR4 Front Suspension Rebuild Triumph 6
T TR2/3/3A TR3 question - front suspension rebuild access Triumph 7
John_Mc Front suspension rebuild revisited Triumph 21
John_Mc Front suspension rebuild Triumph 23
John_Mc TR6 Front Suspension Rebuild TR6 Triumph 16
TR4nut TR4/4A TR4 front suspension rebuild advice Triumph 13
jcatnite Front suspension rebuild Spridgets 8
Bill Redd Front Suspension rebuild Triumph 8
77MidgetMkIV front suspension rebuild [spring refit specificall MG 9
mctriumph TR2/3/3A Front Suspension upgrades for the 59 Triumph 10
G For Sale NEW PHOTOS: Triumph TR3 Chassis Frame + Front Suspension, Fits TR2,TR3,TR3A,TR3B Triumph Classifieds 1
Joel Lester TR2/3/3A What final front suspension torque settings needed? Triumph 7
HealeyPassion Kilmartin Front Suspension Gussets Austin Healey 4
Endoscaper TR2/3/3A Lower Front Suspension Overhaul Triumph 2
Dnickels Spitfire Spitfire mk2 front suspension too soft Triumph 2
crispy BJ8 Front Suspension Austin Healey 9
R TR6 Front suspension fulcrum pins Triumph 6
Upland Mark IV front suspension Spridgets 3
S TR2/3/3A Front Suspension Triumph 6
71TR6 TR2/3/3A Right Front Suspension Damage Repair? Triumph 50
Jayplum TR2/3/3A Front suspension / springs Triumph 5
TRclassic3 TR4/4A Help with deciphering front suspension problem Triumph 11
F TR4/4A Front Suspension Triumph 3
warwick-steve Front suspension rubber trunnion bearing question Austin Healey 4
K TR2/3/3A Front suspension inner Lower wishbone bush area? Triumph 3
T TR2/3/3A Is there a reason for this large pointed piece on front suspension? Triumph 14
R TR2/3/3A Replace Rubber bushings in front suspension Triumph 11
DrEntropy MGB Results of renewing front suspension MG 7
Gerald_Gordon TR4/4A Preferred front springs and suspension bushings for mild driving in a TR4 Triumph 3

Similar threads

Top