 Hey there Guest!
 Hey - did you know if you click on the title of a thread it will take you to the first unread post since you last visited that thread?
 but were afraid to ask:
  STOP!! Never post your email address in open forums. Bots can "harvest" your email! If you must share your email use a Private Message or use the
  smilie in place of the real @
 Pretty Please - add it to our Events forum(s) and add to the calendar! >>
ripvanwinkel
Freshman Member
Offline
Good Day to All,
After many long years of rebuilding my BN4 LongbridgeHealey, I finally got to the unique little windscreen washer pump that was notworking after 30 years of stagnation. On stripping the unit, I discovered, asmany before me also have, that the diaphragm had hardened and was completelyperished. Many nights were spent contemplating a fix for this as I wished toretain originality in looks and functionality, i.e. a mechanical pump utilisingthe same body and external features.
My first thought was to replace the diaphragm with the cutoff middle finger of a latex glove, stretched over the brass end plate andcomplete with the small internal spring, which was still in good condition.This trial worked reasonably well, but I was concerned that the stretched areawould soon perish and not last the distance. Back to regular contemplation overmany nights!
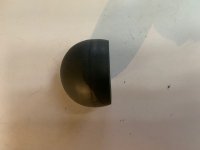
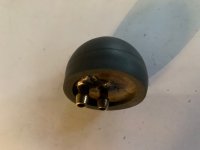
I then had a Eureka! moment and decided to try the humblelittle squash ball! See pics attached.
This is the procedure I used:
I hope this helps those who wish to retain mechanicalfunctionality of this unique little windscreen washer pump.
After many long years of rebuilding my BN4 LongbridgeHealey, I finally got to the unique little windscreen washer pump that was notworking after 30 years of stagnation. On stripping the unit, I discovered, asmany before me also have, that the diaphragm had hardened and was completelyperished. Many nights were spent contemplating a fix for this as I wished toretain originality in looks and functionality, i.e. a mechanical pump utilisingthe same body and external features.
My first thought was to replace the diaphragm with the cutoff middle finger of a latex glove, stretched over the brass end plate andcomplete with the small internal spring, which was still in good condition.This trial worked reasonably well, but I was concerned that the stretched areawould soon perish and not last the distance. Back to regular contemplation overmany nights!
I then had a Eureka! moment and decided to try the humblelittle squash ball! See pics attached.
This is the procedure I used:
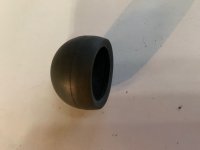
- Cut off approximately one quarter of the balland trim/grind the edge as flat as possible.
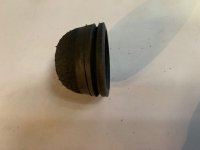
- Turn the ball inside out and place over amandrel to allow a 1mm wide groove to be machined/ground into the inside faceof the ball, approximately 1.5mm deep and 3mm from the cut edge.
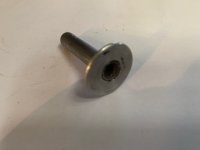
- Reduce the diameter of the brass end plate to36mm.
- Reduce the diameter of the aluminium Plungerplate that makes contact with the diaphragm, by about 1mm.
- The use of the internal spring is optional asthe squash ball alone works a treat, but if you use the spring, reduce thediameter of the largest two coils of the spring to allow it to fit inside thesquash ball.
- Assemble the diaphragm onto the brass end plateusing silicone sealant in the groove.
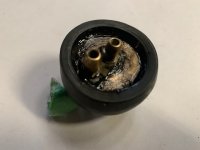
- Insert the Plunger shaft into the body, followedby the squash ball assembly into the aluminium body.
- Seal the squash ball assembly into the bodyusing silicone sealant and bend over the aluminium edge of the body to hold inplace.
I hope this helps those who wish to retain mechanicalfunctionality of this unique little windscreen washer pump.
Attachments
-
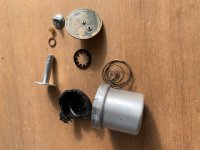 1. Dismantled.jpg87.9 KB · Views: 174
 -
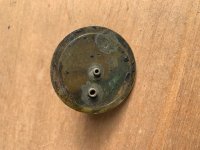
 2. Old Diaphragm.jpg88.9 KB · Views: 174
 -
 3. End Plate.jpg98.4 KB · Views: 167
 -
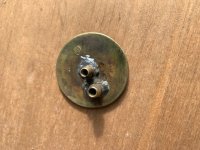 4. End Plate Reduced Diameter.jpg112.4 KB · Views: 172
 -
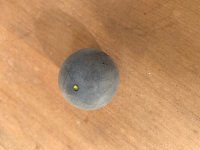 5. Squash Ball.jpg68.5 KB · Views: 171
 -
 6. Squash Ball Trimmed.jpg31.7 KB · Views: 165
 -
 7 Squash Ball Trimmed.jpg33.6 KB · Views: 166
 -
 8. Squash Ball Inside Out with Machined Groove.jpg39 KB · Views: 134
 -
 9. Plunger Diameter Reduced.jpg30.9 KB · Views: 173
 -
 10. EndPlate Inserted into Squash Ball.jpg37.4 KB · Views: 128
 -
 11. Silicone Sealed.jpg48.7 KB · Views: 166


 A friendly reminder - be careful what links you click on here. If a link is posted by someone you don't know, or the URL looks fishy, DON'T CLICK. Spammers sometimes post links that lead to sites that can infect your computer, so be mindful what you click.