• The Roadster Factory Recovery Fund - Friends, as you may have heard, The Roadster Factory, a respected British Car Parts business in PA, suffered a total loss in a fire on Christmas Day. Read about it, discuss or ask questions >> HERE. The Triumph Register of America is sponsoring a fund raiser to help TRF get back on their feet. If you can help, vist >> their GoFundMe page.
  • Hey there Guest!
    If you enjoy BCF and find our forum a useful resource, if you appreciate not having ads pop up all over the place and you want to ensure we can stay online - Please consider supporting with an "optional" low-cost annual subscription.
    **Upgrade Now**
    (PS: Subscribers don't see this UGLY banner)
Tips
Tips

TR6 74 tr6 rear bumper removal

suzi6

Freshman Member
Offline
I am trying to remove the rear bumper before painting the car. I soaked the nuts inside the body with pblaster. When attempting to remove these the whole bolt turns. Seems the weld on the outside has given way. Cant get a good look because of the rubber bumpers. If these nuts are cut off with a torch I would think I could then weld a new bolt back for reattachment. Any thoughts?
 

Brosky

Great Pumpkin
Offline
Paul,

Welcome to the Forum. Which bolts are you speaking of?

There are nuts welded in to the side bumpers at the front and there are studs that hold the rear section on to the body. If you turn them long enough and if you have enough room, eventually the bumper will drop.

Please be careful that someone is helping you to hold it, so that it doesn't come loose and hurt you or scratch the quarters, or bend them where the bolts go through.
 
OP
S

suzi6

Freshman Member
Offline
Paul
The bolts in question are the ones thru the rear of the car.I will give your method a try next week.
Thanks for your reply.
 

Brosky

Great Pumpkin
Offline
Paul,

This is what the car looks like where they mount and what the bumper looks like removed. The studs go into the body and then the nuts are on the bumper side.

I would recommend getting some new studs and nuts from one of the big three.
 
OP
S

suzi6

Freshman Member
Offline
The nuts on mine are on the inside of the valance. They are very hard to get to. The stud seems to be just welded from the outside which is what has broken loose allowing it to spin. Can the rubbers be removed before the bumper is removed? This would allow for an easier access I think.
 

2wrench

Luke Skywalker
Country flag
Offline
I appreciate your concern. Been there, done that.

I said the same exact thing you're saying, though once
apart, I think you will discern more clearly what is
going on, and probably not at all what you think.

With that said, may I suggest the following
approach:

Ratchet; socket to size; long 'ole extension(s). I mean
your socket seated on the bolt will have your ratchet
right about at or within very close proximity to your
rear wheel, with proper lenght extensions.

Get comfortable under the car to wrist the ratchet
and with a rather larger than standard size
screwdriver...think big...you can try to wedge the
bolt into static as you turn the nut off.

Keep trying. What you'll likely find is screwdriver
or not, she'll lock and you can turn that bolt off.

Tried this with and without swivel on end; but worked
better without swivel, once extensions took my ratchet
back far enough toward the rear wheel.
 

2wrench

Luke Skywalker
Country flag
Offline
Back to expound: These bolts will find a catch
to their installed location. If they turn, could
well be because we apply pressure to the nut, pushing
the bolt head from its seated position; hence the
spinning. I really do not think it is welded.

Therefore, the wedge to the bolt with the screwdriver should try to be done to the bolt head, pushing it towards the nut you are trying to remove. If you acheive a "lock" to turn, be delicate in your forward thrust against the nut
with your ratchet/socket as you turn it so as not to lose the "lock". Hope you can understand me.

Also, once the nuts are removed, the bolts are long
enough that the bumper will likely loosen, flop down
and hang without actually falling off.....but, to be
safe, what I did that worked was to use a small jack
with a four-by-four piece of lumber jacked up just to
barely support the weight of the bumper, once the
nuts are removed.

Oh, and I think it's easier to do this than to try
to remove the rubber bumpers.
Whew!
 
OP
S

suzi6

Freshman Member
Offline
2wrench
Thanks for your time and advice. I will try this next week.Seems the rear bumper is about all that has not been removed. Since the engine is out why not rebuild front suspension. Cant rebuild front and not rebuild back. Cant rebuild engine and not do gearbox. Cant do gearbox and not do diff. Rebuilt complete brakes including new pipes & hoses. Might as well paint and I'll have a new car.Bought it new 6/12/74 and put 130k miles on it with nothing but normal repairs, nothing major. Guess she deserves some attention now.
 

2wrench

Luke Skywalker
Country flag
Offline
Wow, what a good luck story. Had a visit from a
Fellow Forum Member Doug from Eureka while he
travelled into my area. We met, had dinner and he
told me the same thing: Like considerably over
100K.....maybe enven 125,000, something like that.....
on the same original engine...never taken his car apart.

His retort came as I commented my reeling and
lament over "thrust washer" concerns.

I think his point was that the OEM thrust washers can
obviously last a respectable amount of time.

So noted.
 

mrv8q

Luke Skywalker
Country flag
Offline
I've been following this thread w/ interest. I see the nuts that have to come off; of course, the one under the valance is seemingly unapproachable, (soaking in PB Blaster):

IMG_0737.jpg


I'll try 2wrench's long extension theory, but I don't see how it's a straight shot....

My intent here is to pull off the rubber bumpers, and reattach the chrome. It looks like I'll pull off this plate:

IMG_0739.jpg


Once the rubber pieces are removed, the plate comes off, and all is reattached.... or so I suppose...
 

Brosky

Great Pumpkin
Offline
Once you get rid of those rubber bumpers, you'll never want them back on again.
 

2wrench

Luke Skywalker
Country flag
Offline
Bumper if you want it off is six bolts. Two at the
underside/inside fender (one for the left fender, and
one for the right. Very accessible, very easy removal.

Each rubber bumper has a bracket with a bolt, one one
each side. Remove those two bolts, left and right side.

Finally, place the socket; extension and ratchet
hertofore described one left; then one right removing the
bolt and take off your bumper. Six bolts.

Over all extension with socket lenght is 17 inches or slightly shorter.

Socket Size: 9/16 deep recommended.

Ratchet size I used was 3/8.

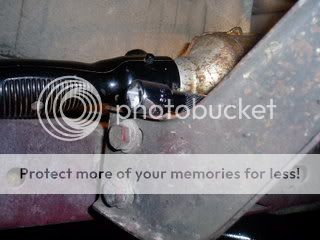
Now check the pic:

P1010011-8.jpg


The above shot shows the extension end towards the
back tire on the driver's side. The extension end
may be hard to see. But the other end is on the nut
that needs to be turned. You can attach a wrench and
go to work. Notice the extension is over the bracket
that attaches to the fender.

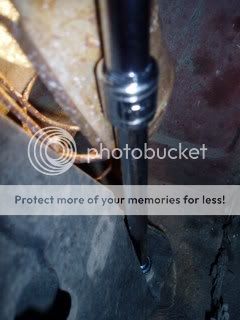
Now see the forward end of the very same extension
that is shown attached in place to the nut you want
to turn....

P1010010-8.jpg


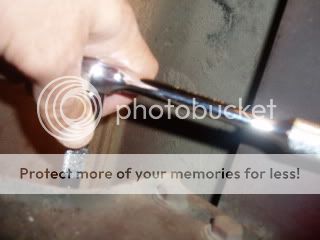
This shot shows the same setup on the right passenger
side of the car.....

P1010013-7.jpg


Hope this helps. This worked for me. Can't tell you
why, something nags me about taking the rubber off
first...I just can't tell you why now. If your setup
is different and rubber is easier, then by all means
go for it.

Don't want to sound indignant, I just want to be
helpful
 

2wrench

Luke Skywalker
Country flag
Offline
Can't leave it alone. Try turning, of course, without
the screwdriver thing. If she still spins, you gotta
get the screwdriver wedged onto the bolt to stop it
from spinning.

Best of luck,
 

AngliaGT

Great Pumpkin
Country flag
Offline
Paul,

Again - Nice Car!I've got to get some color photos of
it (mine's Yellow too).
It's been so long since I had the back bumper off....
how (or what do you need to) remove the rear overriders?
Had a nice visit with Dennis.He's doing an excellent
job on his car.

- Doug
 

Brosky

Great Pumpkin
Offline
Doug,

On my 74, when you remove the rear overriders, there is a "notch" that is left from the mounting bracket that I had to have filled and welded over when the bumpers were rechromed. https://www.74tr6.com/bumperrechroming.htm

That also occurs with the two holes on each side of the front bumper, but those can easily be filled with chrome headed bolts.

Now as I understand it, this problem on the rear is only on certain years (perhaps my 74?).

Thank you for the compliments. I'd love to see pictures of your yellow TR6 as well. Not many of us left, you know!

You can see the notches on either side of the rear center section here:
 

Popeye

Darth Vader
Bronze
Country flag
Offline
Heat works to remove frozen bolts - I just removed the front and rear bumpers on my 4A (one year into a full restoration).

I use a propane torch (the kind you get at the hardware store). I put the flame to the nut for maybe a minute or so... things start to smoke - presumably all the old cobwebs and bugs. Then I let it cool a few minutes, and the nut is usually free.

Obviously pay attention to safety - I have a fire extinguisher at hand, and the garage door open for a quick exit if needed. Do not do this near fuel lines or anything else combustable.

Good luck,
mike
 

mrv8q

Luke Skywalker
Country flag
Offline
2wrench, thanks for posting the pix. For whatever reason, I was unable to use 3/8 wrenches and sockets; either the socket was too short or too long, the extension too wide, and I couldn't get a straight shot at it.

Strangely enough, I was able to loosen the first side I attempted w/ a 1/4 inch wrench, 3 inch extension. and a 9/16 socket. I backed out the nut quite a bit, but didn't pull it off in case I couldn't get the other side off.

Of course, the other side was quite a bit more determined; as I mentioned, no 3/8 inch hardware I cobbled together was going to work. After a quick dash to Sears, I wound up using the following 1/4 inch hardware: 1/4 inch wrench, 3 inch extension, 12 inch extension, 1/4 inch "U-joint" #4280, (or whatever it's called), and a 6-point 9/16 1/4 inch socket. That added up to your "magic" 17 inches. I added a small metal pipe over the wrench, for extra leverage. After a couple grunts, the nut broke free....

Luckily, I never had to use the screwdriver. If the stud were turning, that would complicate the job... There's so much undercoating there, I'd have hated to torch it.

Happily, I found that the DPO had replaced the trailing arm bushings w/ new ones from Moss. One still had it's sticker attached! Woohoo!

Hopefully, I'll finish pulling the bumper off tomorrow; the Packers call...
 

2wrench

Luke Skywalker
Country flag
Offline
Congrats, Kevin. Way to hang and get the result.
Good to note if 3/8 is too big, that the 1/4 gets
the job done. Cool.

Watching the game as I read, actually.
And by the way, after it's off, tell me if you
think it would have worked removing the rubber
bumpers first. I just don't know what the reluctance
is on my part, but seems like something.

Probably a good note for the thread. I mean, I'll
bet others will have the same question at some time.
 

AngliaGT

Great Pumpkin
Country flag
Offline
Paul,

I had to laugh when you said that you wanted pictures
of my car.Mine is a decent driver - nothing even close to
yours.I guess that you could use the pictures as a dartboard,or tell people that it's the "before" picture.

- Doug
 

Brosky

Great Pumpkin
Offline
Doug,

I love my TR6, but I also love everyones British cars. I'm not a car snob and I never look down at other cars, just because I've had time to do all of the work to mine. I help a lot of local guys with all types of cars, just because I like to tinker.

Don't forget, it wasn't that long ago that mine didn't look like it does today.

Besides, if I don't have any other pictures of yellow TR6's, no one will ever believe that it was a factory color and not just some crazy idea of mine!!!

We all start somewhere.

May of 2006 before engine compartment paint and tri-carbs/head swap:
 
Similar threads
Thread starter Title Forum Replies Date
T TR6 TR6 Rear Bumper Bar Triumph 1
Got_All_4 TR6 Rear Bumper removal 1970 TR6 Triumph 3
M TR6 TR6 rear bumper Triumph 0
cmacmillan TR6 Rear bumper removal - TR6 Triumph 10
J TR6 Rear bumper on TR6 Triumph 4
roofman TR6 Good deal on TR6 rear bumper Triumph 1
glemon TR5/TR250 Answering My Own Question Rear Tube Shock Conversion Numbers TR4a-TR6 Triumph 0
S TR6 1974 TR6 Rear Brakes w/o hydr. press. Triumph 6
R For Sale TR6 REAR AXLE HUBS Triumph Classifieds 0
R For Sale TR6 REAR DIFFERENTIAL Triumph Classifieds 3
edkap2002 TR6 TR6 rear pinion seal Triumph 3
C TR4/4A Advice for grafting TR6 frame front to TR4A frame rear Triumph 15
mctriumph For sale rear wings Tr6 Triumph Classifieds 3
mctriumph Have a pair of tr6 rear wings Triumph Classifieds 0
EWD TR6 74 TR6 - Rear and windshield frame color Triumph 2
EWD TR6 Rear Transmission Seal 74 TR6 Triumph 4
Got_All_4 TR6 drill and tap for a grease fitting tr6 rear hub assembly Triumph 4
J TR6 1973 TR6 Rear Brake Operation Questions Triumph 4
T Wanted TR6 rear trailing arms Triumph Classifieds 1
GBRandy TR6 1973 TR6 Rear Frame / Body Bushings Triumph 3
T TR4/4A Under the been there - done that school of learning: TR6 rear springs on a TR4a Triumph 12
T TR6 TR6 aftermarket rear shocks Triumph 35
W TR6 tr6 rear hubs Triumph 3
F TR6 TR6 HARDTOP GLASS [rear] Triumph 7
D TR6 76 TR6 Rear Brake Installation Triumph 17
hondo402000 TR6 New rear wheel cylinder leaking, TR6 Triumph 0
D TR6 76 TR6 Rear Right Brake Line Triumph 8
J TR6 rebuilding tr6 rear hubs Triumph 13
T TR6 Passenger side TR6 rear clunk? Triumph 9
W TR6 broken bleeder on rear brakes tr6 Triumph 12
S TR6 tr6 rear shock part number ??? Triumph 5
Coyote1 TR6 TR6 Rear Springs ? Triumph 11
Pete_Chadwell TR6 TR6 Rear Hub question, plus gearbox vibe Triumph 8
O TR6 TR6 Rear Valance ID Triumph 1
TR6oldtimer TR6 TR6 windscreen and rear flat black Triumph 4
SherpaPilot TR6 TR6 Rear Axle Bearing Question Triumph 10
B TR6 TR6 rear axle oil change Triumph 21
T TR6 Anyone use TR6 rear springs in their TR4a IRS? Triumph 8
glemon TR6 TR250 TR6 Rear Springs Triumph 13
S TR6 Rear suspension TR6 Triumph 8
hondo402000 TR6 NEEDED rear light socket TR6 for reverse lamp Triumph 10
hondo402000 TR6 TR6 Rear Paint, Satin Black Triumph 8
hondo402000 TR6 TR6 rear body Black paint help Triumph 9
B TR6 Rear-ended today and my beautiful TR6 is smashed.. Triumph 18
T TR6 TR6 rear sway bar question Triumph 6
I TR6 TR6 rear hub and trailing arm spares advice Triumph 2
T TR6 Is this a TR6 rear sway bar? Triumph 10
B TR6 Removal and Replacement of TR6 rear deck Triumph 3
T TR6 tr6 rear noise Triumph 8
I TR6 Rear brake drum temperature TR6 Triumph 13

Similar threads

Top