• The Roadster Factory Recovery Fund - Friends, as you may have heard, The Roadster Factory, a respected British Car Parts business in PA, suffered a total loss in a fire on Christmas Day. Read about it, discuss or ask questions >> HERE. The Triumph Register of America is sponsoring a fund raiser to help TRF get back on their feet. If you can help, vist >> their GoFundMe page.
  • Hey there Guest!
    If you enjoy BCF and find our forum a useful resource, if you appreciate not having ads pop up all over the place and you want to ensure we can stay online - Please consider supporting with an "optional" low-cost annual subscription.
    **Upgrade Now**
    (PS: Subscribers don't see this UGLY banner)
Tips
Tips

Mounting rear shroud rain gutter

RestoreThemAll

Jedi Warrior
Country flag
Offline
I'm installing the rear shroud tomorrow. Is there any benefit to riveting in the rain gutter before installing the shroud or can I just lay the rain gutter in place and hang it on the shroud afterward? As long as the gutter is under the shroud ahead of time its fine, correct? The rain gutter doesn't touch any other point than the shroud, correct?

Painting and installing. Nice holiday break!

Dale
 

Griz

Jedi Hopeful
Offline
Dale, my rain gutter was fastened to the rear shroud before the shroud was installed. This was done by the gentleman who did all my body and paint work. He specializes in British sports cars, and especially Austin Healeys so I suspect this is the correct way to do it.

Griz
 
OP
R

RestoreThemAll

Jedi Warrior
Country flag
Offline
Then I'll do it that way. Thanks Griz.

Dale
 

bob hughes

Luke Skywalker
Country flag
Offline
Right answer - have you checked that the gutter fits properly? I have yet to replace mine and all the information I have been receiving from the specialist restorers is that the replacement gutters need some modification to make them fit properly.

:cheers:

Bob
 
OP
R

RestoreThemAll

Jedi Warrior
Country flag
Offline
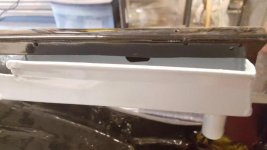
My gutter fit nice. Just one question. There are rivet holes in the front of the shroud by the gutter. I've figured out what most are for like to attach chrome but the one on top of the shroud seems to have no purpose. See pic. Maybe it really has no use?
 

Attachments

  • Rear Shroud rivet holes by front gutter.jpg
    Rear Shroud rivet holes by front gutter.jpg
    33.3 KB · Views: 134

healeyblue

Jedi Warrior
Gold
Country flag
Offline
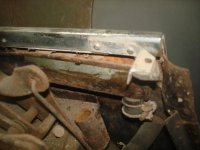
Maybe this pic can help. My BJ-7 has some small angle brackets there.
 

Attachments

  • DSC09212.jpg
    DSC09212.jpg
    46.8 KB · Views: 123

vette

Darth Vader
Country flag
Offline
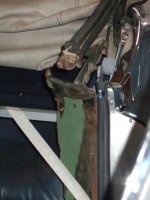
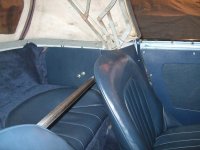
Dale, I don't have much on this but I'll attach 3 pics of the area that might help. Mine is also a BJ7.
I believe your pic is showing a hole in the top of the chrome strip. I don't think that is suppose to be there. In on of my pics you can see the chrome strip and it has no hole.
 

Attachments

  • DSCF2711.jpg
    DSCF2711.jpg
    48.8 KB · Views: 122
  • DSCF2758.jpg
    DSCF2758.jpg
    54.3 KB · Views: 116
  • DSCF2757.jpg
    DSCF2757.jpg
    56.2 KB · Views: 118
OP
R

RestoreThemAll

Jedi Warrior
Country flag
Offline
Thanks guys. Those pics are very helpful.
Dale
 

RAC68

Darth Vader
Offline
Hi Dale,

Sorry for not responding sooner.

I too installed my rain gutter before replacing my rear shroud. I initially temporarily fixed the gutter to the shroud and fit the combination in place to check the fit and note the placement of misfits that could need pre-attention. As I remember, there no major issues found during the pre-fit of the shroud and therefore
permanently
installed the gutter to the shroud and fixing the combination in place.

I found most of my shroud installation modifications were to the inner fender, as I had straightened those bends found when dismantling, thinking they were incorrect (no one to talk to in the mid 1980s. When fitting the shroud, I learned that the dents and bends were what was done at the factory to make body parts fit (the use of a hammer for fine body panels fitment was a common approach).

Keep in mind that your pride in your completed Healey will be anchored in the many issues you have overcome with your own creativity and imagination. Although many have generally followed similar approaches in addressing components of their Healey build, most have had to extend on these accepted approaches with their own ingenuity.

Enjoy your Build,
Ray(64BJ8P1)
 
OP
R

RestoreThemAll

Jedi Warrior
Country flag
Offline
Thanks for the tips Ray. I may have straightened a few bends that I should not have. So far no worries.

I know that many guys recommend against caulk between the shroud and outer fender. I'm guessing inner fender to shroud is a different story. I should body caulk the shroud, correct?

Dle
 

RAC68

Darth Vader
Offline
Hi Dale,

Yes, I would apply the seam sealer between the inner-fender/shroud and boot-floor/shroud joints.

After fitting the shroud and temporarily fitting the outer fender with bead, adjusting to where I was satisfied, I then removed the outer fenders and beads, I then seam sealed the inner fender to the rear shroud. Since I painted all under and interior metal Black, not retaining the original OEW color in these areas (I never liked the OEW showing through under the fenders or my black interior), and further sealed the rear inner fenders with a non-petroleum undercoating. To date, I have had no water penetrate into the interior from these areas.

RayI(64BJ8P1)
 

bob hughes

Luke Skywalker
Country flag
Offline
Maybe this pic can help. My BJ-7 has some small angle brackets there.

That bracket should have a piece of rubber attached that closes everything off at that location. Mine is of aluminium and keeps bending, I think that it should be screwed to the metal return to which the general door seal is attached. That would keep it in place.

:cheers:

Bob
 

RAC68

Darth Vader
Offline
Vette/Bob,

The top of my BJ8 Phase 1 is secured to the rear gutter surround with clips and the surround is screwed onto the gutter channel. A flap extends from the bottom of the top on each side and falls into the gutters on each side to drain any collected rain. The door weather strip extends around and is fixed to the top front of each the rear interior panel and finished with the silver metal clip shown in your picture.

Although my BJ8 P1 has some differences with the BJ7, I have had no difficulty with water intrusion at that area. I am presently researching how to properly sew in a new rear window, with zipper, on my replacement top installed in 1971 purchased from Sears as my first attempt at sewing in a new zipper looked good but too often separated.

Hope this provides some help,
Ray(64BJ8P1)
 

BOBBYR

Jedi Trainee
Country flag
Offline
Hey Ray , I see your location is the Jersey shore . Years ago there was a canvas shop on Long Beach Island and every now and then , they used to do work like that . Name of the shop was Quik Canvas . I think they're still there . I hope this helps . BobbyR
 

RAC68

Darth Vader
Offline
Hi Bobby,

Thank you for the reference but I am much further North, close to Red Bank. Although my top is old (I installed it in 1971), it is in reasonably good condition but needs a new window and zipper installed. I have removed the top from the car so can bring it to a sail, canvas, and top servicer. I have contacted a number of locals but all seem to see limited dollars and high risk for their time. All have indicated not being available to provide this service, or quote a price, but I expect their reluctance is motivated by the risk of top material separation from past sewing perforations further mitigated by the age of the top. I am still trying to figure how to do this by hand as sewing in a zipper around the turns in the window is more complicated then I ever thought.

Thanks again and suggest you get your car done so you can attend the Positive Earth Driver Club's "Brits on the Beach" car show in Ocean Grove.
Ray(teBJ8P1)
 
Last edited:
Similar threads
Thread starter Title Forum Replies Date
J TR2/3/3A TR2 Fitting/mounting rear wing Triumph 11
B BJ7 Rear View Mirror Mounting Hardware Austin Healey 7
chicken BJ7 Rear Number Plate Mounting Austin Healey 3
Healey Nut Rear Wheel Cylinder Mounting Austin Healey 4
T TR2/3/3A TR3A Hardtop Rear Mounting Brackets Triumph 15
K TR2/3/3A Rear tonneau capping plates and bridge pieces for mounting the Hardtop? Triumph 3
mt10flyer TR2/3/3A Rear shock mounting plate Triumph 28
B rear wing mounting on my 57 Triumph 5
vette Next Question on Rear Springs Mounting Austin Healey 2
J Question on rear brake mounting plates Spridgets 5
N MGB-GT 1971 MGB Rear Shock mounting bolt length MG 0
memphis License Plate [rear] Mounting Location? Austin Healey 12
mountainman TR2/3/3A TR3 Rear Fender Mounting? Triumph 4
tahoe healey rear license late mounting. Austin Healey 11
H IRS diff rear mounting bracket Triumph 0
C Mounting hole location for rear chrome bumper Spridgets 2
chicken mounting of rear seat pans for BJ7 Austin Healey 14
Lin Rear Wing mounting Austin Healey 0
J SOLD!! Triumph TR 2 TR 3 windshield stanchion mounting plates Triumph Classifieds 3
angelfj1 TR5/TR250 TR250 - Lucas 4ST Starting Solenoid-Mounting Location/Details Triumph 2
Got_All_4 TR6 Seal To Body Mounting Bracket Welded? Triumph 7
K TR6 Goodparts Trail arm kits mounting just to the frame( no body) and shims? Triumph 9
SherpaPilot TR6 Engine Mounting Question Triumph 3
K 100-6 Exhaust Front Mounting Bracket Austin Healey 2
WHT Late BJ8 Seat Belt Mounting Points Austin Healey 8
T TR2/3/3A Question on TR3A front body mounting Triumph 6
T SU Fuel Pump Mounting Austin Healey 5
Darwin Spitfire Motor mounting help Triumph 1
Got_All_4 TR6 Distributor Gear Mounting Question Need End Float Washer Triumph 4
S TR2/3/3A Body Mounting Bolts. Triumph 14
M Mounting BJ8 Chassis on Rotisserie Austin Healey 8
D BJ7 Hood frame mounting plate Austin Healey 7
Editor_Reid H6 Carb Mounting Austin Healey 4
M Wanted TR6 Caliper Mounting Plate Passenger/RH Side Triumph Classifieds 1
K TR2/3/3A Upper shock mounting rubber bushs ? Triumph 1
B For Sale Seat Mounting brackets for aftermarket seats Spridgets Classified 0
C Front sway bar mounting? Austin Healey 10
B TR2/3/3A Mounting Toyota Brake Calipers on my TR3 Triumph 5
J TR2/3/3A Body Mounting Strip Adhesive Triumph 10
Gliderman8 TR6 Inertia switch mounting location Triumph 4
R Wanted ISO: Main Link to mounting bracket screw Triumph Classifieds 0
K TR2/3/3A Front brake caliper mounting torque? Triumph 1
BoyRacer windshield wiper motor rubber mounting grommets Austin Healey 9
S TR2/3/3A Mounting a stock steering wheel. Triumph 3
F TR2/3/3A Mounting Slave Cylinder Triumph 41
K TR2/3/3A TR4 motor with overdrive in a TR3 slave cylinder mounting position? Triumph 2
RickPA Mounting number plate on front bumper Austin Healey 4
R Mounting wipers Austin Healey 8
Raymond MGB Wire Wheel Tire Mounting MG 0
T General TR Wire wheels - tire mounting/balancing - Southern California Triumph 14

Similar threads

Top