• The Roadster Factory Recovery Fund - Friends, as you may have heard, The Roadster Factory, a respected British Car Parts business in PA, suffered a total loss in a fire on Christmas Day. Read about it, discuss or ask questions >> HERE. The Triumph Register of America is sponsoring a fund raiser to help TRF get back on their feet. If you can help, vist >> their GoFundMe page.
  • Hey there Guest!
    If you enjoy BCF and find our forum a useful resource, if you appreciate not having ads pop up all over the place and you want to ensure we can stay online - Please consider supporting with an "optional" low-cost annual subscription.
    **Upgrade Now**
    (PS: Subscribers don't see this UGLY banner)
Tips
Tips

Healey Shroud Repair

Martec

Member
Country flag
Offline
Hi
Has anyone had experience welding new repair panels onto the front aluminium shroud. I have TIG and a little aluminium welding experience but not enough yet to tackle this. All advice and photo's etc would be appreciated.
Cheers
 
Country flag
Offline
I had a guy__mobile welding rig__say that welding on the Healey shrouds he was repairing for me wasn't anything special. He was a good TIG welder, but used whatever filler rods he had on his truck, certainly nothing specific for "Birmabright" that the Healeys were stamped from.

If you're wanting to install new repair panels, then you must have some of the original that was cut away. I'd make some practice welds, fixing splits or whatever, until you get your settings right and get your confidence up. If nothing else, you can get the panels all lined up and tacked together. That'll give you the option of closing the gaps, or calling in a pro.

Good luck.
 

RAC68

Darth Vader
Offline
A while back I was hit in the rear that required patch panels installed on the rear shroud. An analysis by an experienced aluminum welder cautioned on having it done as the alloy was quite different from the patch panel and could cause some major issues in the join. He suggested I consider the new glue's that were being used by Audi and the body shop agreed. A small attachment piece was glued to the rear of the shroud and the patch panel glued to it. That was in 2001 and, to date, all seems tight and in good order. I can't say it is or is not as good as a weld but if Audi has bet the future on gluing aluminum structures, you may want to investigate further.

All the best,
Ray(64BJ8P1)
 

Healey Nut

Luke Skywalker
Country flag
Offline
A while back I was hit in the rear that required patch panels installed on the rear shroud. An analysis by an experienced aluminum welder cautioned on having it done as the alloy was quite different from the patch panel and could cause some major issues in the join. He suggested I consider the new glue's that were being used by Audi and the body shop agreed. A small attachment piece was glued to the rear of the shroud and the patch panel glued to it. That was in 2001 and, to date, all seems tight and in good order. I can't say it is or is not as good as a weld but if Audi has bet the future on gluing aluminum structures, you may want to investigate further.

All the best,
Ray(64BJ8P1)
Aston Martin superstructures are glued and Lotus probably others as well .
Welding old to new aluminum is not easy the old has to be scrupulously clean to prevent contamination of the weld .
I would let a pro do it .
 

vette

Darth Vader
Country flag
Offline
When I did my Healey many years ago I had taught myself to rig ally. Since then one of the cracks (there were 5 variously) resurfaced. If I had to do it again I would seriously consider the bonding adhesives from 3m or SEM. I have used bonding adhesives many times on fiberglass and metals. Over many years use with them have never had a failure.
 
Country flag
Offline
Somewhat OT, but my dad had a couple of the usual cracks found on the lower flange of the shroud of our BN2 welded-up. I didn't see it done, but the welds were just blobs, not the nice 'stack of dimes' you'd expect from a skilled TIG welder. My guess is they were done by MIG with a spool gun, commonly used for industrial aluminum welding applications (I wouldn't be surprised if they were done with a stick welder, even). Since you're going to grind the welds flat anyway this could be an option (assuming you have a MIG with spool gun capability, of course). I have seen some MIG welds that were all but indistinguishable from TIG.
 

dougie

Luke Skywalker
Country flag
Offline
Unfornunately, I've had more front shroud work done then most, the race track is an unforgiving place on aluminum. Luckely though, my panel man
is more artist having built whole new panels for Jaguars and Ferrari's. He gas welded my new front panel to the shroud, a clean substrate is the key.

'57 Repair Shroud Front.jpg
 

vette

Darth Vader
Country flag
Offline
A couple points about using the adhesives. One downside is they are rather expensive compared to welding on carbon steel. But of course if you have to hire an ally welder it might be comparable. The next very important consideration is temperature. These adhesives have to have good warmth. I say warmth because all I mean is not cold metal and not hot,hot. I guess what i’m Saying is when I typically work in my shop (especially) winter I don’t mind a cool shop. But these adhesives don’t like a cool shop. So I will always use heat lamps on the areas to be bonded. But not heat lamp bulbs, they are too hot. And dangerous in that they can easily ruin the work or start a fire. I use the lamps with 250w flood lamp bulbs. Just enough to keep the surfaces warm.
 

red57

Jedi Knight
Country flag
Offline
Hi Martec. I'm 5 years in with mine working on it evenings and weekends here and there. It has been a steep learning curve but I am still enjoying the challenges.

I have welded steel for years but never aluminum. I tried oxy/fuel welding first and spent most of a winter practicing but never got to where I would trust my welds on the shroud - too high a percentage cracked during post-weld cooling and I never really got a handle on it so I bought a TIG machine. I spent another winter practicing and reading all I could about TIG welding and finally got to where I decided to go for it.

I'm not going to bash any suppliers but if you need to replace any panels, be prepared to examine them very carefully to see if they will really work. I bought several shroud pieces that, at first glance looked good but ended up not really useable. An example is the piece between the bonnet opening and the top of the grille - the overall shape was good and would have worked great, but the channel shape around the bonnet opening was 3/16" too deep and 1/4" too wide and could not be matched to the existing channel. I ended up searching out NOS body repair pieces over about 3 years. The NOS pieces I found fit perfectly with no odd issues.

Vette does make a good point about cracks - I haven't gotten mine together yet to see how many cracks it develops but I won't be surprised if some show up.

An irony is that I just finished my front shroud last spring and over the last 3 months I've seen 3 for sale within 100 miles for less than $1k - they all looked like they would need some minor repair but nothing at all like mine needed. If I add up the welder, the consumables, the repair pieces I bought, I'm way in the hole but I enjoy the journey and being able to say I did it.

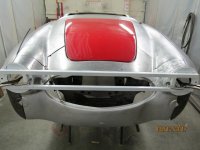
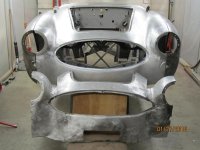
If you do proceed, feel free to pm me. I have lots of pictures of mine step-by-step and the jig I madeIMG_0376.jpg.
IMG_0941.jpg
Dave
 

dougie

Luke Skywalker
Country flag
Offline
Hi Dave -

Your work looks great, hope you can get it back on the track soon. There's never enough big Healeys on the track and your car always looked wonderful.

DavidPhillips PIR T # 11.jpg


Dave & Doug T # 1.jpg
 

red57

Jedi Knight
Country flag
Offline
Thanks Dougie,

Nice pictures I haven't seen before and I'm glad to now have as part of my collection.
Dave
 
Country flag
Offline
Hmm, smooth hood; I don't know quite what to think about that...

attachment.php


Good job though, on the aluminum work! I bought my TIG long after that work was done on my car, so I can't say "I did it!"
 

vette

Darth Vader
Country flag
Offline
Hmm, I hadn't noticed the smooth hood untill Randy mentioned it. Can't say that I have ever seen one before on a 6 cyl. car. I would think that the crown of bonnet (hood) would have to be increased as well. But yes too, great work.
 

red57

Jedi Knight
Country flag
Offline
The smooth hood is something I made about 25 years ago.

My first two Healeys were 100s I bought and sold in the early to mid 70's (when they were $500 cars) but I fell in love with the early 'pure design' cars. Then I played with Harleys for 10 years but always wanted another Healey.

Fast forward to the 1986 and I was finally ready to get another Healey but the 100s were too pricey so I settled for my 100-6 from a friend for $2500.

I never liked the hood scoop on the 6 cylinder cars - far as I could tell the only reason for it was so they could shove the radiator forward to get the 6 in. But, in my opinion, the smooth hood/nose of the 100 is what was originally intended (and I think more elegant).

So, I had a local radiator shop make a custom top tank (in a wedge shape as viewed from the side) so that none of the radiator is above the hood opening in the shroud. I had a mangled hood from a 3000 that had hit a deer and this was the source of the doner radiator (top tank destroyed but bottom tank fine) and the hood hinge and latch inner pieces. So I made this hood out of fiberglass bonded to the stock inner panels and some metal framing. At the same time I installed a 100 windshield because I consider that to be the most incredible, signature piece of a Healey and I love wind in the face. So, it's a wanna-be 100 with 4 seats and a 6.

Funny thing is that when I started racing in 1997 the SOVREN rules were very specific, unless you could document a history in the day as a 'modified' car, you had to comply with SCCA PCS (production car specifications) which did not allow any 'modification to factory bodywork'.... Generally meaning things like wide fender flares or other alterations resulting in more speed (Smokey Unick's Camaro with the smaller nose/frontal area comes to mind). So I sweated bullets worrying that they would not allow my hood. Seventeen years I raced with SOVREN and no one ever noticed the hood. The windshield has been a great feature for me because it is so easily removed at the track (I drove to & from the track like the old days - the small Perspex shield is permanently mounted and does not interfere with the 100 shield).

Dave
 

John Turney

Yoda
Silver
Country flag
Offline
Kevin Adair has a smooth hood on his white 1959 3000. It was factory built for a Canadian series (it won every race.) He won his group last year at the Rolex Reunion in Monterey. Carries number the 171.
 

dougie

Luke Skywalker
Country flag
Offline
Kevin Adair has a smooth hood on his white 1959 3000. It was factory built for a Canadian series (it won every race.) He won his group last year at the Rolex Reunion in Monterey. Carries number the 171.

You mean this car....

Kevin # 171 Corvettes Chasing.jpg

Doug & Kevin Sears Point Pits.jpg
 

worknhard

Freshman Member
Country flag
Offline
When I did my Healey many years ago I had taught myself to rig ally. Since then one of the cracks (there were 5 variously) resurfaced. If I had to do it again I would seriously consider the bonding adhesives from 3m or SEM. I have used bonding adhesives many times on fiberglass and metals. Over many years use with them have never had a failure.

With regard to using adhesives, given your experience would you consider using the adhesive bonding process to install a new nose section to the shroud? I’m restoring a BT7 and the nose section is badly damaged. Either I find a replacement shroud or splice in a new/used front nose section. I understand welding is the traditional process, however, with some of the new structural adhesives available today, it would seem a section could be installed using a doubler/patch on the back side that conforms to the shape of the shroud. My biggest concern is not that the joint would fail, but rather cracking of paint and bondo might occur in the area from vibrations. Any thoughts?
 

vette

Darth Vader
Country flag
Offline
With regard to using adhesives, would you consider using the adhesive bonding process to install a new nose section to the shroud?... with some of the new structural adhesives available today, it would seem a section could be installed using a doubler/patch on the back side that conforms to the shape of the shroud. My biggest concern is not that the joint would fail, but rather cracking of paint and bondo might occur in the area from vibrations. Any thoughts?

Yes I would consider bonding of a new nose section. Things to consider, the quality of fitment of the joint is of utmost importance. Equally to that is good temperature for the adhesive to cure. I also would use a "bonding strip" behind the joint. I wouldn't consider it any other way. All the Corvettes from at least 1963 thru '82 used bonding strips at their panel joints. I would prepare my panels fitment, then remove the new section and make aluminum strips to bond to the underside of the main body part with the strip sticking out about 1". This would create a flange which the new section would lap against. Bond the strip on first, then after "thorough" curing fit up the new section to bond to the new flange & body. I would set up about 4 flood lamp bulbs (i don't use heat lamp bulbs, to hot.) on stands arrayed around the bonding joint. I don't have a concern for cracking, but any polyester or epoxy compound whether it be paint, bondo or adhesives will shrink as they cure. I believe urethane paints, even though hard to the finish, are pretty flexible and are not the cause of the shrink marks but it is what is under them that is shrinking. That's my opinion anyway. The reason I have had little trouble with shrinking is because my work progresses slowly, (I have been at this as a hobbiest for a long time). Sometimes it is days or weeks between my applications. This has allowed allot of cure time between the steps. I have a friend that put a dog leg panel on the rear fender of his MGA over 30 years ago with the bonding adhesive technology of the time. He still owns the car and has driven it regularly every summer. To this day you can not see that patch panel. I use SEMs bonding adhesives. Only because that is what my paint supplier stocks. 3M is good too. You should use the correct adhesive for the material your bonding. But I have mixed them up and they have all worked, but get the right stuff. These adhesives are a twin tube application and you have to have the twin tube applicator gun. These adhesives are expensive and the applicator gun is even more expensive but you really should use it to "guarantee" the best results. Before I bought a gun I did do some projects by squeezing an appropriate amount of adhesive from each tube onto a pallet then mixing it as you would do bondo. Just getting it out of the tube without the gun is a real bear and a stupid way to do it. So get a gun. I would suggest some practice joints to see if you like it. Good luck.
By the way, if the joint is done well and the adhesive cured correctly, Vibrations will have no effect. This stuff is strong.
 

vette

Darth Vader
Country flag
Offline
I would like to say considering all that I said in my previous post, that if you are concerned about the quality of the aluminium welding that you might get, then I do consider bonding with adhesives. But if you are absolutely confident that you can get very good aluminium welding then I would weld it. Once quality welding is accomplished there is no more joint, and no more dissimilar materials to ever be concerned about. But I have no concern about the strength of good adhesive bonding it is only about the skill and expertise or even practical ability of getting the joint together "right". But the same concern can be said for welding as well.
 
Similar threads
Thread starter Title Forum Replies Date
T Austin Healey front shroud FORUM Navigation Questions 1
H Wheight front shroud Austin Healey 3000+transport Austin Healey 18
J Healey BJ8 Front Shroud Phase1 / Phase2 ? Austin Healey 7
Superwrench Healey Rear Shroud Restoration & Tools 0
dougie Jack & Bill Rawles attending The Healey World Challenge Road America September 13-15 Austin Healey 2
Editor_Reid New Edition of "Austin-Healey Quarterly" Available Austin Healey 1
giwplay1 Everything you need to know before purchasing an Austin Healey Austin Healey 15
Editor_Reid Healey 100 Frame Diagram Austin Healey 1
dougie Healey Hardtop on BAT Austin Healey 8
dougie Austin Healey 4000 Austin Healey 3
Patrick67BJ8 Healey Mechanic Needed - El Paso, Texas Area Austin Healey 0
T Healey In An Ice Cube Austin Healey 6
dougie VSCDA Healey World Challenge Road America Austin Healey 0
dougie Healey World Challenge 2024 Road America Racing 0
R Healey 100 Dipstick Stuck Austin Healey 12
L For Sale Austin Healey Parts!!! Austin Healey Classifieds 0
tahoe healey Healey Video Austin Healey 0
W Nash Healey Austin Healey 5
S Wanted WTB: 3.5 ratio diff/pumkin for '67 BJ8 Healey 3000 Austin Healey Classifieds 0
dougie Celebration of Austin Healey Double Event September 2024 Austin Healey 2
E For Sale Austin Healey 100 and 3000 parts Austin Healey Classifieds 1
nevets Letting the Healey go... Austin Healey 4
dougie Healey Racing Road America Fall 2024 Austin Healey 1
R Big Healey 100 Head Austin Healey 4
PAUL161 Photo: What Model of Healey? Austin Healey 7
E Wanted 1963 Healey 300 mark 2 front grille wanted Austin Healey Classifieds 0
Guido36 Webers on a Healey 100 Austin Healey 6
E For Sale Driver quality 1963 Healey 3000 mark 2 Austin Healey Classifieds 1
Editor_Reid Summer Edition of "Austin-Healey Quarterly" Austin Healey 4
dougie Healey Racing Austin Healey 13
P Wanted Wanted: Healey 100-4 frame Austin Healey Classifieds 4
red57 Alternative Healey Austin Healey 2
Dandare Healey Website Links Austin Healey 4
John Turney An Important Healey Up For Sale Austin Healey 1
M For Sale Austin Healey 100-4 Lemans Kit OEM Austin Healey Classifieds 5
V Opinions on 1953 Austin-Healey Austin Healey 26
dougie Did Big Healey Drivers Go Soft? Austin Healey 8
C What to do with my late father's Healey 100 Austin Healey 5
Martinld123 Steering Wheel Alignment [Lost centering on steering box 1956 Austin Healey, BN2] Austin Healey 14
B Healey Won't Start - No Spark Austin Healey 38
Editor_Reid "Austin-Healey Quarterly" e-zine Spridgets 2
Editor_Reid "Austin-Healey Quarterly" e-zine Austin Healey 8
BoyRacer Silver Healey - Chassis Color? Austin Healey 17
HealeyRick Perfect Healey Floor Jack Austin Healey 14
T Netflix Christmas Film with a Healey Austin Healey 4
W For Sale 1954 Nash-Healey Le Mans Coupe Other British Classifieds 2
N For Sale Austin Healey Frogeye Sprite Spridgets Classified 0
dougie 1960 Austin Healey 3000 Works Lightweight vs. 1962 Ferrari GTO Austin Healey 6
Cutrog1 For Sale Healey 3000 BJ8.... a restoration saga Austin Healey Classifieds 0
roscoe An Unusual Healey Mission Austin Healey 2

Similar threads

Top