• The Roadster Factory Recovery Fund - Friends, as you may have heard, The Roadster Factory, a respected British Car Parts business in PA, suffered a total loss in a fire on Christmas Day. Read about it, discuss or ask questions >> HERE. The Triumph Register of America is sponsoring a fund raiser to help TRF get back on their feet. If you can help, vist >> their GoFundMe page.
  • Hey there Guest!
    If you enjoy BCF and find our forum a useful resource, if you appreciate not having ads pop up all over the place and you want to ensure we can stay online - Please consider supporting with an "optional" low-cost annual subscription.
    **Upgrade Now**
    (PS: Subscribers don't see this UGLY banner)
Tips
Tips

TR2/3/3A Fitting the Control Head - Telescoping [Adjustable] Wheel

gecoughenour

Member
Country flag
Offline
Trying to fit the new control head I bought at TRF to my adjustable steering wheel. Lining up the slot in the stator tube and the "keys" on the larger tube from the control head, I can slide the tube over each other to nearly the end of the slot, about 1.5 inches overlap. Then when I push the assembly into the steering wheel / column the outer tube "bottoms out" on something with a metallic clang before the control head is fully in the steering wheel hub. The head is still about 1 inch proud of the hub where the metal disc should seat. When this happens, there is over an inch of the stator tube exposed below the olive nut on the steering box.

Is there an internal ring down the steering column to keep the stator tube centered or something? At the upper end of the column there is an annular gap of 1/8 inch or so around the stator tube.

I am thinking of cutting off the tube coming from the control head [without damaging the wiring I hope]. Before I do I wanted to consult the Forum.

Off topic item from Wikipedia article on the Roman Forum:
"An important function of the Forum, during both Republican and Imperial times, was to serve as the culminating venue for the celebratory military processions known as Triumphs."

Thanks in advance for any experience you can offer.

Cheers,
Glenn
 

TR3driver

Great Pumpkin - R.I.P
Offline
Kind of sounds like you have the wrong stator tube. The ones for the adjustable steering wheel have longer slots, and the tube isn't quite as long over all as the fixed wheel version. With the wheel fully in, the overlap is more like 6".

The longer tube on the control head (& longer slot on the stator tube) is so they stay engaged when the wheel is adjusted all the way out. I wouldn't cut the control head without making some careful measurements.

There are (or should be) something inside to keep the tube more or less centered. IIRC it was a rubber ring on the early solid column cars; later cars use a funny 'lantern' spring. But neither of them should be strong enough to interfere with installing the control head.
 
OP
G

gecoughenour

Member
Country flag
Offline
Randall,

Your diagnosis makes sense, but I wonder why the wrong stator tube would be there. The telescoping wheel column and the fixed wheel column are different. There's always the possible assembly line error of course. Also what the control head tube is hitting does not feel like rubber. I understand your point about the reason for the long overlap, that's why I was reluctant to start cutting.

I need to try putting the control head in without stator tube. If that works, then my approach may be to cut the slot in the stator tube longer as you note so I can get more overlap.

Thanks,
Glenn
 

John_Koop

Freshman Member
Country flag
Online
Glenn,
How about loosing up the olive nut at the bottom of the stator tube which is located at the bottom of the steering box.
This will let the whole stator tube move deeper into the steering column and out the bottom of the steering box with out
having to cut anything.
 
OP
G

gecoughenour

Member
Country flag
Offline
John,

Thanks for that idea. I tried that, but the tube on the control head is hitting something in the steering column that I can't see (need a laser) and won't let it go in far enough to seat in the steering wheel hub. I had the stator tube out of the steering box about 3 inches! [And a pool of gear oil on my garage floor]

Cheers,
Glenn
 

TR3driver

Great Pumpkin - R.I.P
Offline
Is this a one piece or two piece column? If it's two piece, I would pull the upper shaft out and try to find out what is hiding in there. I don't have one handy to look at (although we just packed one away a few days ago, I'm not unloading the trailer to find it), but I think they all should have room for the long tube from the adjustable control head. Something must have fallen in to be blocking it; perhaps a bit of (previously) broken stator tube.
 

sp53

Yoda
Country flag
Offline
The very back metal piece of the control head is also longer by about an inch than the standard. I have one somewhere.
steve
 
OP
G

gecoughenour

Member
Country flag
Offline
Steve,

Yes I believe you are correct. I have an uninstalled standard one for another car I own. The steering wheel is correspondingly deeper though. I can easily get the control head all the way into the steering wheel hub when it's off the steering column.

BTW for everyone else interested, The Roadster Factory told me they have sold "hundreds" of these and no one has reported an issue. Ain't it nice to be "special"?

Glenn
 

sp53

Yoda
Country flag
Offline
I have never owned an adjustable column, so I am not mush help, but pulling out the stator tube is no big deal- just leave the wires in for now anyway. I would pull the stator tube out and have a look. Maybe one of those Chinese lanterns that hold the tube in the center has slipped or you maybe you can see what you are hitting. So you left the tube in and replaced the old control head with a new one? And yes half the fluid will run out when you pull the tube because the tube goes right through the worm gear, so put something down to check it and maybe get a new olive if the old one will not seal.
steve
 
OP
G

gecoughenour

Member
Country flag
Offline
Thanks Steve,

I will try that today. I did anticipate the oil drainage, but it oozes over the wiring cable, frame et al so still made a bit of a mess despite the container I placed to try to catch it.

Glenn
 

sp53

Yoda
Country flag
Offline
This is a guess but perhaps one of the centering deals called Chinese lanterns like in the picture has slipped or you are catching on the edge of something. If you look close, you can see how the lantern only has one keep and slid around. My guess is these lanterns were made of scrap stator tubes and some kind of cutting and crimping machine. Heck I would like to see the machine work. Anyways, the tubes pull up and out easily and you should be able shine a flash light down there.
 
OP
G

gecoughenour

Member
Country flag
Offline
The patient is doing well after successful surgery.....

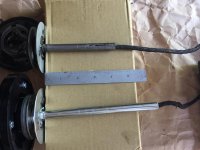
I rummaged around and found the control head I had taken out when I dismantled one of the two cars I used to build this one. Here is a photo:
IMG_1300.jpg

As you can see the new control head tube is nearly 2.5 inches longer than the old one. Although I couldn't clearly see down the steering column far enough, apparently the bore is narrower starting about 5.5 inches where the control head seats in the steering wheel. Nothing larger than the stator tube would pass that point and whatever the obstruction it wasn't moving. The tube on my new control head was 6.5 inches long. My solution was to cut off 1.375 inches from the new control head tube. To protect the cable I made a ferrule from a piece of sheet metal and slid it up the control head tube above where I was cutting. I also used a hacksaw instead of a cutting wheel so I could be cautious. The tube is pretty soft steel, so not difficult to cut.

Result: All fits and there is a little more than an inch of the stator tube extending below the olive nut. The tough part was it was more difficult to thread the cable down the tube after I had pulls it in and out several times while working through this.

Thanks to everyone who shared their experience. Your inputs helped me work this out and anticipate possible problems with my approach.

Glenn
 
OP
G

gecoughenour

Member
Country flag
Offline
Thanks Steve,

If you enlarge the photo you will see that the bakelite base is in shambles. The cable was not in good condition either.

The car I am restoring [almost complete!] is the combination of two cars. Nearly all the mechanicals are from a rust bucket I bought for a few hundred dollars several years ago. The frame and bodywork are the remnants of another restorer's parts car that I got for free. The investment to get where I am was substantial, but it's been a fun challenge. Re. the control head, the grub screws were so corroded I couldn't get them loose, so I had to pry out the control head. After I got the steering wheel off the column I was able to drill them out and re-tap two of the three.

Cheers,
Glenn
 

CJD

Yoda
Country flag
Offline
Well, you found a way to make it work...However!!...The picture you show is for a non-adjustable control head on the top, and an adjustable control head on the bottom. I think your PO (not the assembly line) has mixed the parts in your column. I.e., you are fitting an adjustable wheel on a column which is all or part for a non-adjustable column. At some point you will adjust the column longer and the stator tubes will part ways.

As a note...I have easily swapped the long stator on the control head for a short stator. With a little fiddling the tube unscrews, so you do not have to cut or otherwise modify the tubes to change the use of the control head. And sorry...I should have been following this thread, but I didn't until now?!?
 
OP
G

gecoughenour

Member
Country flag
Offline
Hi John,

I appreciate your comments, but I respectfully disagree. It's possible the old control head I have is not for an adjustable column, since no one knows what a PO has done. I do have a new fixed wheel control head I purchased but haven't installed in a 1960 TR3A I also own. It's tube is only about 2 inches long.

I looked at swapping the tubes between the old control head and the new adjustable one, but the new control head is attached with rivets so not easily done

In any case, the total range of motion on whatever column I have with my adjustable wheel is a bit less than an inch, so there are no risks of the tubes parting. The column is one piece, and since the adjustable columns have a different size end spline than the non-adjustable I don't think it was switched out. I wonder if older cars [I note yours is 1955 while mine is 1958] may have had different adjustable columns than I have. There are parts I have seen in the Moss catalog that I don't have, e.g., the chromed shroud and Randall commented that the overlap of the tubes is much longer than I have [or need]. I suppose another alternative may be the PO may have put an adjustable shaft in an non-adjustable steering column.

Glenn
 

CJD

Yoda
Country flag
Offline
I think you are spot on with your last sentence. The screws are one layer behind the rivets...although rivets are a simple replacement too. Your right, in that we have no idea what a PO has done, but I think it is safe to say the assembly line did not install the wrong parts and have it go to this point in the car's life unnoticed.

My TR2 does not have an adjustable wheel, and that's why I skipped over this thread as long as I did. I do have 2 adjustable columns sitting in the shed. The key is that if you are happy with 1", then that is all that matters!
 
OP
G

gecoughenour

Member
Country flag
Offline
I like my arms nearly straight, so actually push it all the way in. I wouldn't have used an adjustable wheel at all if I had a non-adjustable column with little play in the steering. I haven't seen a replacement adjustable wheel at any of the usual suspect dealers, but fixed ones are available. I have a two - piece fixed column, but it has so much play that the steering inputs are like random number generators.
 

CJD

Yoda
Country flag
Offline
When I was finishing up last year I decided to wimp out and buy a new steering wheel. Although the suppliers all list steering wheels, nobody had any in stock, and had no idea when they would ever be available. I ended up rebuilding my wheel. TRF will rebuild for you, but the lead time is many months.
 

sp53

Yoda
Country flag
Offline
If the wheel is not structurally challenged, you get use some JB in the cracks or find some black epoxy and then put a wheel cover over the wheel. There are few articles out there about rebuilding the wheel and I rebuilt one with JB and the only thing I found sketchy was the gray color of the JB, but I could paint it also, but will probably put a wheel cover on it if I use it.
 
Similar threads
Thread starter Title Forum Replies Date
S Spitfire Cyl head coolant hose fitting Triumph 1
J TR4/4A Strange Problem Fitting Inner Fender Triumph 18
J TR2/3/3A TR2 Fitting/mounting rear wing Triumph 11
K TR2/3/3A Does this fitting need a Whitworth wrench? Triumph 10
D TR2/3/3A Thread and size for tr3 fuel tank vapor line fitting Triumph 0
SherpaPilot TR6 Unidentified fitting on TR6 Engine Triumph 3
S TR2/3/3A brass fitting from a steel brake line Triumph 2
Writer2022 GT6 Overheating after fitting air filters Triumph 4
Writer2022 GT6 K+N Filter Fitting Triumph 2
KVH General Tech Fitting the Hood (Bonnet) Triumph 7
KVH General Tech Fitting the Pistons and Sleeves Triumph 2
A Making an A-series engine stand adaptor fitting Spridgets 2
D TR2/3/3A Windshield frame fitting. Triumph 2
B Fitting the Boot Lid Seal Austin Healey 8
M TR2/3/3A Fuel Line Fitting at the Tank. Triumph 5
Got_All_4 TR6 drill and tap for a grease fitting tr6 rear hub assembly Triumph 4
edkap2002 TR6 lower radiator hose fitting Triumph 2
DerekJ Fitting a 100-Six grille. Austin Healey 10
Jim_Stevens TR2/3/3A Door fitting- graduate level Triumph 25
R TR2/3/3A Fitting windshield Triumph 3
CharlesBN1 need some advice fitting the bonnet on a 54 BN1 Austin Healey 4
D TR2/3/3A front Apron fitting Triumph 5
D TR2/3/3A Fitting the hood. Soft top. Triumph 6
ckeithjordan TR2/3/3A Oil Fiter Fitting Frustrations Triumph 13
M Fitting a modern radio Austin Healey 9
TulsaFred Convertible Top Fitting problems Spridgets 29
M TR2/3/3A Oil Pressure Gauge Line Fitting Triumph 8
TulsaFred Carpet fitting in the Bugeye Spridgets 3
KVH TR4/4A Fitting New Dash--Problem with Dash Pads Triumph 3
PeterK TR4/4A Fitting TWM manifolds for DCOEs Triumph 2
Patrick67BJ8 Poor Fitting New BJ8 Glass Austin Healey 9
M TR2/3/3A Fitting Modern Steel Wheels Triumph 4
I Bugeye fuel fitting Spridgets 3
P Healey 100M Cold Air Box Hose Fitting Austin Healey 20
Jim_Gruber Suspension Reinstall / Fitting Steerig Arm to Tie Rod End Spridgets 15
M TR2/3/3A Fitting on Moss Brake/Clutch Masters Triumph 16
M TR2/3/3A Fuel Pump Fitting Thread Triumph 6
wkilleffer MGB Fitting a new top to a 74 MGB- how tight is too tight? MG 23
H TR2/3/3A Sway bar fitting Triumph 7
F Fitting anti-squeal kit to front calipers on BT7? Austin Healey 7
Got_All_4 TR2/3/3A Fitting the original tr3 transmission cover over a tr6 overdrive Triumph 9
Got_All_4 TR2/3/3A Fitting the trunk floor pad & fuel tank cover Triumph 2
PatGalvin TR2/3/3A Vacuum Hose Fitting Install, Any Suggestions? Triumph 6
P Good fitting car cover recommendation? Austin Healey 9
2 TR2/3/3A Fitting mirror against new windscreen Triumph 5
Dave Richards Rear Brake Cylinders not Fitting Hand Brake Lever Austin Healey 2
Michael Oritt Temperature sender fitting at radiator on BN1 Austin Healey 3
jfarris TR2/3/3A SU H6 Vacuum Advance Fitting Thread Size Triumph 2
DornTRoriginal TR2/3/3A Stone Guard and Fender Fitting Issues Triumph 6
D Re-fitting vinyl on center upper console bj8 Austin Healey 3

Similar threads

Top