• The Roadster Factory Recovery Fund - Friends, as you may have heard, The Roadster Factory, a respected British Car Parts business in PA, suffered a total loss in a fire on Christmas Day. Read about it, discuss or ask questions >> HERE. The Triumph Register of America is sponsoring a fund raiser to help TRF get back on their feet. If you can help, vist >> their GoFundMe page.
  • Hey there Guest!
    If you enjoy BCF and find our forum a useful resource, if you appreciate not having ads pop up all over the place and you want to ensure we can stay online - Please consider supporting with an "optional" low-cost annual subscription.
    **Upgrade Now**
    (PS: Subscribers don't see this UGLY banner)
Tips
Tips

TR4/4A Replacing rear pinion seal - remove driveshaft?

Tr4aJim

Senior Member
Offline
Folks, I need to replace the rear pinion seal on my 1965 Tr4a (solid axle). I crawled under the car to check out the work involved, and it sure looks like it may be a bigger job than I expected.

Due to the way the Tr4a frame angles toward the center of the car, the driveshaft and exhaust pipes both occupy a pretty tight space. There’s also the plate connecting the frame rails at the narrowest point, that precludes dropping the driveshaft straight down.

If I disconnect both ends of the driveshaft, would there be enough room to maneuver the shaft out of the way enough to get the drive flange nut off and remove the flange?

The other thought I had was loosening the differential and rotating it down until the drive flange cleared the driveshaft. Does that sound doable?

I’m hoping I don’t have to completely remove the differential just to replace the pinion seal.

Anyone been down this road before?

thanks

Jim
 

Sarastro

Obi Wan
Silver
Country flag
Offline
Not sure I can answer this very well, but since you've had no replies so far, I'll give it a try. I recently removed the drive shaft from my solid-axle TR4A, but did it after lifting off the body. Not sure you want to do that....!

I suspect you can move the drive shaft out of the way, far enough to take off the flange. In the worst case, you should be able to remove the drive shaft. Remember, you can slide it forward on its spline joint to shorten it a bit, or even undo that joint if necessary. A bigger problem, I think, is getting the seal out. If you have a newer, replacement seal it might not be too hard, but if it's the old rawhide one, it may be more difficult. That motha is really stuck in there, and of course you have the pinion in the way, so a seal puller won't be very useful. You might have to cut it with a chisel or other such implement, carefully so you don't gouge the differential housing.

Don't forget to drain the oil. You'll have to use a suction gun or take off the rear cover, as there is no drain hole.
 

TR4nut

Yoda
Country flag
Offline
I’ve done this on both a TR4 and TR3- I think you can unless the 4A frame is much different. The driveshaft has a sliding spline that will let it move forward 3 inches or so. I’ve never had to remove the shaft.

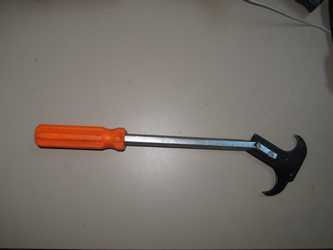
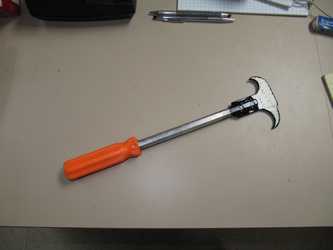
Steve is spot on with his comments that the seal can be a pain to remove. Harbor Freight used to have a great seal puller I’ve found perfect for the job I don’t see it now but here is a similar one:https://www.walmart.com/ip/L-Type-S...39785&wl11=online&wl12=17013440&wl13=&veh=sem

Its a tight fit but a puller with a hook can be used, and with a couple of hammer whacks the seal can be popped out.
 

TR3driver

Great Pumpkin - R.I.P
Offline
If you do remove the cover, you might want to consider adding a magnetic drain plug.

wfFGGqD.jpg
 
OP
T

Tr4aJim

Senior Member
Offline
D3D5F80F-914B-419C-9FFD-FF835C9B581A.jpgD3D5F80F-914B-419C-9FFD-FF835C9B581A.jpg

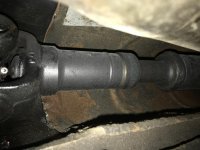
Thanks everyone! I didn’t realize that the driveshaft had a spline joint. Here is a picture of mine. I will try unthreading the cap and see how far back I can slide the front yolk. Maybe that will give me enough clearance to get the drive flange out.

BTW - As for removing the oil seal, on another forum it was suggested to drill two small holes into the face of the seal (assuming it’s a metal seal), insert some sheet metal screws, and pull it with a slide hammer.

Fingers crossed!

jim
 

glemon

Yoda
Country flag
Offline
I did it on my 4a many many years ago. Pretty sure it was a disconnect and slide the driveshaft back and out of the way operation. Don't remember the details, but I don't think I tried to turn the whole housing down, that would certainly help if you could, as access is limited.
 

TR3driver

Great Pumpkin - R.I.P
Offline
Looks like they may have made some changes since I last bought one. On the one I got, the shaft was aluminum, and broke the first time I tried to use it! So I just used a big screwdriver to remove the (original leather) seal.
 

Gliderman8

Great Pumpkin
Country flag
Offline
I used the same tool that Geo shows above. It worked fine.
The seal I replaced was on my TR6 and I elected to remove the diff and do the work on a bench.
 

Sarastro

Obi Wan
Silver
Country flag
Offline
Mine, at least, had a steel shaft, so after it broke, I could weld it back together.
seal_puller_8284_sm.jpg
seal_puller_8285_sm.jpg


I think the puller with the hook would be ideal for a job like this. I wish I had one when I did my rear axle.
 
OP
T

Tr4aJim

Senior Member
Offline
Well, I made some good progress today.

I was able to get the driveshaft out of the way by disconnecting it from the rear drive flange and loosening the spline joint. That allowed me to slide the driveshaft forward about 2 inches or so, and propped it up with a block of wood. It gave me just enough clearance to access the flange nut. I then made a brace out of steel flat bar that I bolted to the top bolt holes of the flange (at roughly 10 and 2). This allowed the brace to sit on top of the frame rails. Then it was fairly easy to get the nut loose, and I removed the drive flange. Tomorrow I will attempt to remove the seal. I have a hook tool similar to what folks show above. However the handle is about a foot long so it will be tight to maneuver.

Jim
 
OP
T

Tr4aJim

Senior Member
Offline
I tried using a hooked seal puller, but with the pinion shaft in the way, I couldn’t get good leverage against the seal. I just chewed up the inner edge of the seal a bit. I’m also concerned about damaging the pinion splines or shaft threads. I’m going to try rigging up a slide hammer and see if that will do the trick.

Jim
 
OP
T

Tr4aJim

Senior Member
Offline
Re: Replacing rear pinion seal - UPDATE - Completed!

Folks, I finished installing the rear pinion seal!
As I mentioned in my first post, I did this on my 65 Tr4a (solid axle), with the differential in the car. First, thanks for all the suggestions you gave me. However I did run into some issues, but it worked out ok. So in case someone else needs to go down this path, here’s what I had to do. It’s a bit long winded, but I didn’t want to leave anything out.


1. Loosen the spline joint on the driveshaft.
2. Disconnect the the driveshaft from the rear drive flange.
3. Slide the driveshaft forward as far as it will go. Then lift the loose end of the driveshaft clear of the drive flange and prop it up (I used a short piece of 4x4 sitting on the rectangular plate that’s welded between the frame rails).
4. Rotate the drive flange so the bolt holes are at 10 & 2, and 8 & 4. Note the position of the cotter pin in the pinion shaft and mark it’s position on the castle nut. Remove the cotter pin. Then using a greasy finger, I marked the location of the 10 & 2 bolt holes onto a piece of paper.
5. To lock the flange in place when removing the drive flange nut, I got a piece of 1 1/4 x 1/8 flat steel and cut it to a length of two feet. This is short enough to maneuver, but long enough to sit on top of the frame rails over the drive flange. I placed the flat steel on the frame in front of the flange, and marked the 10 & 2 holes on it with a pencil. I then used the paper from step 3 to verify the position of the holes. I then drilled two 3/8 holes. I attached a picture of the bar. You’ll see the holes are offset toward one edge of the bar. I also cut a notch between the holes so it will clear the socket to remove the flange nut.
6. Bolt the bar to the flange and remove the nut. Remove the bar.
7. Remove the flange by pulling it forward (a few taps with a hammer will get it moving).
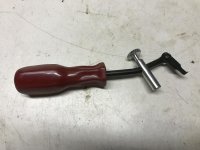
8. I tried using the seal hook tool to remove the pinion seal, but I couldn’t get good leverage with the pinion shaft in the way. So I found a “blind” seal puller (Lisle 58430) that has a hook and a lever bar. I attached a picture of it. It worked very well.
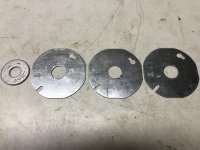
9. The problem now was getting the new seal in. With the shaft in the way, I couldn’t use the seal driver tool I have, plus there’s not a lot of room to drive it in, let alone drive it square. So here’s what I came up with. I bought three round electric box covers that had knockouts in the center. I removed the knockouts, and also got a large 5/8 washer (see the third picture). I put the new seal in place using a little grease to help hold it there. Then I put on the three covers, followed by the washer. I set the handbrake and put the flange nut on and started tightening it. The box covers kept the seal square and distributed the force, driving the seal in. Then release the handbrake.
10. Put the flange back on the pinion shaft (BTW - I used a speedi-sleeve on the flange). Adjust the flange so the top holes are at 10 & 2, and reattach the steel bar. Tighten the pinion nut, aligning the marks made in step 4, and put in a cotter pin.
11. Remove the bar, reattach the driveshaft, and tighten the spline joint. Done!

Again thanks for the help!

Jim
 

Attachments

  • 4C14C917-775F-49E4-B7F6-FF31CCBEBFC9.jpeg
    4C14C917-775F-49E4-B7F6-FF31CCBEBFC9.jpeg
    11.5 KB · Views: 152
  • CBD38217-DACF-486A-8E33-58C6857E0B61.jpg
    CBD38217-DACF-486A-8E33-58C6857E0B61.jpg
    66.4 KB · Views: 120
  • 45EFA206-352C-47E9-9C12-2356E6CB6C18.jpg
    45EFA206-352C-47E9-9C12-2356E6CB6C18.jpg
    53.4 KB · Views: 128

glemon

Yoda
Country flag
Offline
Nice write up, always good to see what (besides a bigger hammer of course) resourceful amateur lbc mechanics can come up with when Standard Triumph Special Service Tool #123xyz is not available. Well done and helpful write up.

Obligatory link to referenced humor https://goo.gl/images/XaQ8WA
 

Geo Hahn

Yoda
Country flag
Offline
Does the 4A require any special consideration when tightening the nut? On my TR4 I marked the location and counted the turns to remove, then tightened to the same spot. The TR3A had a finger tight nut (yikes) so I had to rely on a torque wrench measuring resistance to turning to guess at float.
 
OP
T

Tr4aJim

Senior Member
Offline
Glemon, thanks!

Geo,Since my Tr4a has the solid axle, I assume the techniques described in the shop manual for the Tr4 diff apply.

The Tr4 section of the manual shows a special tool applied to the pinion nut (with the flange removed), to set the preload. It describes installing thicker or thinner shims until the correct preload is achieved. Then the nut is removed, and the seal and drive flange are reinstalled, and the nut tightened.

This leads me to believe that as long as the pinion bearing and shims are not disturbed, that retightening the nut will not alter the preload. To be sure I didn’t under or over tighten the nut, I marked the castle nut in relation to the cotterpin hole on the pinion shaft, before I removed it.

Jim
 

TR3driver

Great Pumpkin - R.I.P
Offline
The TR3A had a finger tight nut (yikes) so I had to rely on a torque wrench measuring resistance to turning to guess at float.
On an axle with shims inside (which includes TR2-early TR6), the nut should be torqued to spec. It's the shims that set the bearing preload (aka negative float).

If you do want to check preload, you should do it before installing the seal. Otherwise the new seal may affect the (very small) torque that is used to check the pre-load.

I'm guessing that on the ones found only finger-tight, someone misread the manual and only torqued the big nut to the 15-18 inch pounds used to check the preload.

In other words, before final assembly, you are supposed to select shims such that it takes 15-18 inch pounds (roughly 1.3 ftlb) to turn the pinion without the ring gear or seal installed and with the nut torqued to 85-100 ftlb. The step in the manual where it talks about leaving out shims and just torquing the nut to give the right preload is only for checking pinion depth.

Later TR6 (and Stag, etc) are a different story, as they use a crush collar instead of shims. On them, you do set the preload by tightening the nut. And, in theory, the collar should be replaced every time you loosen the nut. But marking the nut and returning it to it's original position will usually be close enough (assuming it was done correctly before).
 

JDFIXIT

Freshman Member
Offline
Hi All,
Sorry to bring life back to this post. I’m going to be changing out my pinion seal. The replacement seal I received looks like a old school leather seal. Can I use this seal with success or best to use a more modern seal?
I will most likely be installing a speedi-sleeve also.
Any help is truly appreciated.
Cheers, Josh.
 

Attachments

  • 8495B5A9-EDE6-404A-96D9-5872BDCE6F17.jpeg
    8495B5A9-EDE6-404A-96D9-5872BDCE6F17.jpeg
    125.3 KB · Views: 84

bobhustead

Senior Member
Gold
Country flag
Offline
Hi All,
Sorry to bring life back to this post. I’m going to be changing out my pinion seal. The replacement seal I received looks like a old school leather seal. Can I use this seal with success or best to use a more modern seal?
I will most likely be installing a speedi-sleeve also.
Any help is truly appreciated.
Cheers, Josh.
Do get the modern seal. I second the sleeve.
Bob
 

Gliderman8

Great Pumpkin
Country flag
Offline
Hi All,
Sorry to bring life back to this post. I’m going to be changing out my pinion seal. The replacement seal I received looks like a old school leather seal. Can I use this seal with success or best to use a more modern seal?
I will most likely be installing a speedi-sleeve also.
Any help is truly appreciated.
Cheers, Josh.
I replace the original leather seal on my TR6 differential with a modern one and have not had any problems at all.
 
Similar threads
Thread starter Title Forum Replies Date
fpstude TR4/4A Replacing Rear Flexible Brake Hoses on TR4A w/ IRS Triumph 11
maxwedge5281 Replacing Factory Hardtop Rear Window Austin Healey 24
R TR2/3/3A Replacing rear springs Triumph 51
T TR4/4A Replacing in situ oils sealing gearbox and rear axle Triumph 18
55modified Replacing rear spring eye bushings on a BN1. How difficult? Austin Healey 8
RickB MGB 1980 MGB No rear brakes after replacing MC & booster MG 5
2wrench TR6 Replacing rear seal on W58 HVDA transmission conversion. Triumph 4
A TR2/3/3A Possible problems replacing a Lockheed rear axle with a girling unit Triumph 6
GTP1960 TR2/3/3A replacing rear axle buffer? Triumph 6
bighealeysource recommendation on replacing rear brake cylinders Austin Healey 13
K TR2/3/3A Replacing rear seal on gearbox? Triumph 10
D Replacing rear leaf springs ? Triumph 6
J TR4/4A Replacing TR4 rear wheel studs Triumph 2
KVH Replacing Rear Lever Shocks with Tube Shocks Triumph 24
M Tips for replacing Rear Sway Bar Bushings? MG 0
TonyPanchot TR5/TR250 250/6 replacing rear flex brake hose Triumph 5
T TR6 Any tips for replacing TR6 rear brake lines Triumph 10
vping Need Tips on Replacing Rear Suspension Bushings MG 7
jimbar Replacing rear valance panel Triumph 3
MGretired Replacing rear bearings MG 5
bighly Replacing rear leaf springs Austin Healey 10
S TR2/3/3A Pinion tail bearing replacing Triumph 12
B Replacing the Handbrake Cable Austin Healey 8
drooartz Replacing Bugeye windshield rubber Spridgets 6
K TR2/3/3A Replacing engine and gearbox mounts? Triumph 8
TR3Acustodian TR2/3/3A Replacing "H" front badge Triumph 11
K TR2/3/3A Replacing water pump pulley.....memory refresh. Triumph 7
I Replacing Windscreen Wiper Wheel Boxes Austin Healey 0
S MGB 1978, replacing the clutch. MG 3
PAUL161 T-Series Replacing Transmission MG 3
S TR2/3/3A Replacing the cam shaft Triumph 27
J TR4/4A Replacing springs Triumph 7
Got_All_4 TR5/TR250 Need guidance for replacing steering column bushings Triumph 11
L Replacing veneer on wood dashboard Restoration & Tools 14
D TR6 Replacing Horn insert in steering column Triumph 11
69MGC MGC Replacing an Outer Wheel Well panel MG 3
BN6_2197 Replacing gearbox switch of the overdrive system Austin Healey 10
TomMull replacing walnut veneeron the dash Lotus 17
Jer refresh my foggy memory - replacing clutch in my 67 Midget Spridgets 1
RAC68 Clutch Still Slipping after replacing 30W-Non-Det. for Red Line Austin Healey 52
T Replacing O/D switch with a clock Austin Healey 4
simon1966 Replacing the witches nose in-situ. BN1 Austin Healey 14
KVH TR4/4A Replacing Front Windshield Gasket Triumph 5
Michael Oritt Replacing timing chain tensioner and more Austin Healey 24
Rut Replacing rocker assembly Spridgets 1
J Replacing BJ7 Dash - Detailed Photos/Schematics Austin Healey 3
M Replacing front shocks, torque setting? Spridgets 2
55modified TR2/3/3A warning indicator bulbs need replacing where and what to buy? Triumph 4
Jim_Gruber Replacing Wheel Studs Spridgets 10
P Replacing the crankshaft damper [harmonic balancer] Austin Healey 15

Similar threads

Top