• The Roadster Factory Recovery Fund - Friends, as you may have heard, The Roadster Factory, a respected British Car Parts business in PA, suffered a total loss in a fire on Christmas Day. Read about it, discuss or ask questions >> HERE. The Triumph Register of America is sponsoring a fund raiser to help TRF get back on their feet. If you can help, vist >> their GoFundMe page.
  • Hey there Guest!
    If you enjoy BCF and find our forum a useful resource, if you appreciate not having ads pop up all over the place and you want to ensure we can stay online - Please consider supporting with an "optional" low-cost annual subscription.
    **Upgrade Now**
    (PS: Subscribers don't see this UGLY banner)
Tips
Tips

TR2/3/3A Novice TR3 Engine Rebuild

wifegonnakillme

Jedi Hopeful
Offline
So, I planned are starting this a year ago and posted a preliminary thread looking for a list of things I should consider - but my kids truck projects have been getting in the way. Here is the original post:

https://www.britishcarforum.com/bcf...Engine-rebuild-looking-for-preliminary-advice

and the advice it included:

  • Hardened exhaust valve seats
  • New valve springs
  • Valves and guides (probably)
  • Rod, main and thrust bearings
  • Timing chain tensioner
  • Rear main seal - replace possibly with Mad Marx (find updated mandrel @ TRF or Joe Alexander at A.R.E.)
  • 3/8” push rods
  • Lighten flywheel
  • Shave head
  • Fit harmonic balancer and thermos fan
  • Mild camshaft with remetalled cam bearings fitted and line bored for accuracy. Use dual outlet exhaust manifold.

The VIN is 15308LO and I am a total novice with anything inside the head or block. However, I do at least have a target now of trying to get through the machine shop stage prior to the close of the current Moss sale, so I will be diving in this weekend.

I'll be working from the FSM, the Moss blog pages and any other step by step guides I can find. Please feel free to offer basic advice along the way, I find this pretty daunting, but am keen to learn.

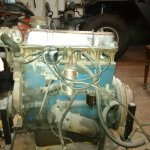
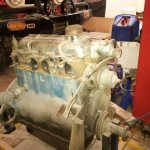
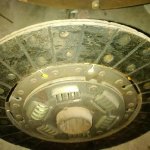
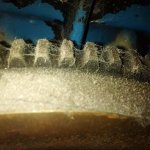
I will try to post as many pictures as I can here both to take advice and correction as well as a photo journal for the next person (if this has been done elsewhere, please let me know - I couldn't find any detailed threads)... starting with the engine as it sits today.

Cheers,
Kerry
 

Attachments

  • tr3engine2.jpg
    tr3engine2.jpg
    50 KB · Views: 251
  • tr3engine.jpg
    tr3engine.jpg
    51.3 KB · Views: 207
Last edited:

TR3driver

Great Pumpkin - R.I.P
Offline
I assume that "FSM" means the factory TR2-3 workshop manual. You might also want to read through that section of the TR4 manual. Same engine (with some very minor but obvious differences) but updated with some factory experience. Download the PDF from https://drive.google.com/open?id=0B2H2NJt34OffN2FkZjI2NjktNWJiMy00YWExLWIyNjctOTYzNmI3OTg2ODM0

My opinion and experience is that having the cam bearings line bored is an unnecessary expense. Just bung in some new inserts (don't mess with trying to remetal old ones), and make certain the holes are lined up properly. It would be different if you had one of the very early engines that didn't have inserts originally, but TS15308 should have them.

I would add to your list to examine and potentially replace:
. Cylinder liners (as a set with new pistons, rings, wrist pins, etc)
. Timing chain and sprockets
. Valve rocker shaft and rockers (the original rockers can be reconditioned)
. head, manifold and rocker studs
. oil pump
. oil pump pickup screen (there is a trick to reinforce the screen so it is less likely to break in the future).

Definitely replace:
. Front main seal (don't forget the fiber washer that goes on the support for the timing cover)
. flat washers to go under the head nuts. These are special hardened washers, don't try to substitute hardware store stuff.
. All nyloc nuts, lockwashers, cotter pins, lock tabs, etc.
 
OP
W

wifegonnakillme

Jedi Hopeful
Offline
I'm going to try and continue to pull from suggestions as they come up later in this thread and place them as a summary here for myself and possibly others.
Just as a note, these are Moss part numbers, I happen to have a supplier in Canada that imports for Moss and saves me brokerage - so its not an endorsement one way or the other re suppliers. Also, as the thread title states, I have not done an engine rebuild before, there are many opinions and views on various aspects of the process and as to what is a must replace and a would be nice:

Main Parts list:

1 814-305 PISTON & LINER SET 87MM
1 824-005 BEARING SET, CON ROD, STD.
1 822-001 MAIN BEARING SET, STD
1 828-000 THRUST WASHER SET, STD
1 823-250 TENSIONER, TIMING CHAIN
1 690-022 GASKET SET, HEAD (edit- ensure compressable)
1 691-001 GASKET SET, LOWER
1 520-000 SEAL, OIL, TIMING COVER
1 832-000 TIMING CHAIN
1 836-005 ROTOR AND VANE, OIL PUMP
4 837-760 TAB WASHER, CON ROD
4 829-010 BUSH, WRIST PIN
1 837-000 OIL SEAL ASSEMBLY (various options here, seems to be a preference to Mad Marx seal from TRF)

and my secondary list:

1 831-000 VALVE SPRING SET,TRIPLE EX SPR
4 821-015 VALVE, EXHAUST, S/S
4 821-000 VALVE, INTAKE, 5/16 IN STEM
4 830-010 VALVE GUIDE, EXHAUST
8 838-510 PUSHROD, ENGINE, 3/8 DIA
1 375-528 CARB KIT, MASTER H6 X 2
1 837-508 PULLEY KIT, ALLOY, 3/8 IN BELT
1 231-688 FAN KIT, ELECTRIC, 12 IN

The following are summary comments edited in from posts that follow:

Additional suggested replacement parts:
1 635-828 Adaptor, Spin-On Oil Filter
3 324-720 WASHER, copper, oil gallery plug
1 591-000 CLUTCH DISC, new
1 827-010 CAM BEARING SET
1 322-865 STUD KIT, Cylinder Head, Heavy Duty (This is Moss’ - it’s expensive there may be other options)
1 836-000 OIL PUMP ASSEMBLY
1 836-500 FILTER ASSEMBLY, oil pump
2 365-720 WASHER, steel (Randall to confirm if these are the ones he meant)
1 838-000 TIMING SPROCKETS
1 837-040 TIMING SPROCKETS
10 325-825 WASHER, cylinder head nut

Hone/replace flywheel if needed
examine, possibly replace or recondition rocker shaft and rockers


Machine Shop Tips:
Don't order main or rod bearings until checked by machine shop
Consider hardened valve seats
Plane head
Crack check everything(head, block, crank)
Check rods for straightness (if not replacing)


Rebuild suggestions:
Lube everything well and don't force parts (STP suggested)
Use Plastigage on main and rod journals
Ensure new liners are proud of block
Don't skip end gapping new rings
Use sealant such as copperkote on head gaskets and figure eights
Front main seal (don't forget the fiber washer that goes on the support for the timing cover)
Oil pump pickup screen (there is a trick to reinforce the screen so it is less likely to break in the future)

Thx,
Kerry
 
Last edited:

Geo Hahn

Yoda
Country flag
Offline
...Harmonic balancer and thermos head...

I don't understand this.

I would second Randall's suggestion to consider new liners & pistons - such a simple thing to freshen even if one is not doing a full rebuild.

Nice Lucas Sport coil in that photo - I would happily buy you a new one in exchange for it.
 

Darrell_Walker

Jedi Knight
Silver
Country flag
Offline
I wouldn't order your main and rod bearings until your crank is checked.
 

DavidApp

Yoda
Gold
Country flag
Offline
If the shop you are going to puts your block and head in a caustic tank to clean it you will need to get the oil gallery plugs as they will be eaten away by the caustic solution in the tank. They are available from Moss in sticks of 3.
At least mine were when they pickled my block. It came back really clean inside and out.

When you come to setting the cam shaft Macy's garage has an article on timing the camshaft if you do not have timing marks on your timing chain sprockets.
https://www.macysgarage.com/myweb6/cam_degree.htm
I used their system and it worked well for me.

David
 

Merlin63Tr4

Jedi Trainee
Country flag
Offline
In addition to DavidApp's warnings about oil gallery plugs, the cylinder head's pushrod tubes and the blanking plug on the top side of the head are made of aluminum. So cleaning the head with solutions that are not aluminum friendly is a no go!

M.
 
OP
W

wifegonnakillme

Jedi Hopeful
Offline
Thank you for the further suggestions,


  • Geo Han, it was a poor copy and paste, edited original post (appreciate the offer re the coil - a generous offer, but will hang on to it :smile: );
  • Regarding the rod bearings, I am trying to get in there deep enough to have things checked and ordered before the Moss sale runs out - not going to order before I have the machine shop look at it - I need so much stuff anyway though that I can easily hit the $1000 to get the 15% off...
  • Will add oil gallery plugs to my shopping list...

Last night I quickly pulled off the clutch plate cover, pressure plate and disc so I could move toward getting the engine on a stand - I assume the odometer that came with the car was correct at 80,000 miles, is the clutch something you can visually inspect, automatically replace or require a professional opinion on? Despite weight, flywheel looked pretty good to my untrained eye...

Thx!
 

Attachments

  • IMG_20160830_204545.jpg
    IMG_20160830_204545.jpg
    48.3 KB · Views: 132
  • IMG_20160830_204602.jpg
    IMG_20160830_204602.jpg
    55.2 KB · Views: 135
  • IMG_20160830_204613.jpg
    IMG_20160830_204613.jpg
    52.6 KB · Views: 134
  • IMG_20160830_205428.jpg
    IMG_20160830_205428.jpg
    49.2 KB · Views: 134

DavidApp

Yoda
Gold
Country flag
Offline
I had my flywheel surfaced while I was dealing with the shop. Cost of a clutch against the agro of pulling the transmission a few thousand miles down the road.

They pickled my block and head.
As the liners had no wear and on size I had them line hone the liners. (Liners bolted down from when the head came off)
Replaced the cam shaft bearings. (I verified the oil passages were clear when the block came home)
Checked and polished the crank. (Standard size no wear)
Replaced the valve guides, springs and valves.
Did not do the hard seats as the shop was not sure/keen to do the job and I decided as I will only do limited driving probable not too important. Also it will be easy to do it later if my driving habits change.
Skimmed the head.

David
 

Darrell_Walker

Jedi Knight
Silver
Country flag
Offline
One advantage of pulling the liners is that you can really clean out the inside of the block. I ground away a lot of rust, probably doubled the coolant capacity of the block!
 

DavidApp

Yoda
Gold
Country flag
Offline
Don't know what the inside of the block was like before the pickle bath but I did pull the liners to replace the Fo8 gaskets and the block was squeaky clean inside. Nothing to scrape off.

David
 

David_Reaka

Freshman Member
Offline
Hi Kerry, I too am a novice and I am doing the same thing and would recommend New Studs from Moss by ARP. Also, I have used Roger Williams "How to restore Triumph TR2, 3, 3A, 4 & 4A". Available on eBay. He gives excellent advice for everything related to a restoration. I have found the engine advice very useful. When discussing the clutch, he suggests replacing the hardened locating pin associated with the clutch release fork "...every time you are inside the bellhousing"...Happy tinkering! David, Nelson, BC
 

bobhustead

Senior Member
Gold
Country flag
Offline
Replace the disc and pressure plate. (or have them rebuilt). Have the flywheel resurfaced. Do the valve system to deal with unleaded gas. Plane the head. Work clean on the rebuild. Use plastiguage on main and rod journals. Make sure new liners are proud of the block. Don't skip end gapping the new rings. Use STP to lube rod and main bearings. Have the machine shop crack check everything (head, block, crank). Have the machine shop check the rods for straightness. Lots of folks on this forum say to replace all structural fasteners. (Rod bolts and nuts, head studs and nuts; haven't heard such about main bolts). Use a compressible head gasket. Use sealant such as copperkote on head gasket and figure eights. The possible tips are endless, but keep us posted as you go.
Bob
 
OP
W

wifegonnakillme

Jedi Hopeful
Offline
You guys are remarkably helpful - except in making this feel less daunting... one bite of the elephant at a time... thanks again for all the tips,
Kerry
(hoping to get engine on the stand to really dig in over the weekend)
 

Geo Hahn

Yoda
Country flag
Offline
I have always replaced the clutch when I had the thing apart for any reason - that is probably why I have never worn out a clutch.

I did get the hardened seats as I got significant valve recession - particularly noticeable after a long day at 80 mph. As David said - may depend on how you drive but I wouldn't think a shop would hesitate to do this.
 

DavidApp

Yoda
Gold
Country flag
Offline
I was in two minds about doing the hardened seats as I felt the miles put on the car will be low. When the shop expressed doubt about being able to do it I decided to put it off till later. Did not see any valve seat recession on the head when I took it down.
May change my mind if I start going on long distance drives. I do have a spare head that I have not checked out yet.

David
 

glemon

Yoda
Country flag
Offline
I have done a number of engines on old British cars, and haven't done the hardened seats, I haven't had problems, I sometimes drive hard and occasionally tour, but probably don't put more than 2000 miles on my cars in any one year. I am not recommending against it, just some other experience to consider. Be sure to replace the timing chain tensioner and the chain of course, they are relatively cheap, and the tensioner wears out. My first rebuild was a TR4A engine, I didn't know about the tensioner wearing out being an issue on these cars, to be honest I am not even sure I knew the car had a timing chain tensioner (the rebuild was a block in car limited kind of thing) in the first few hundred miles after the rebuild the chain actually wore a hole in the chain cover.

As far as reassembly, use plenty of lube, as soon as you have the crank back in and a cap or two on spin it as you put each part on, don't force anything that doesn't want to go, the motor will tell you if something is wrong.
 
OP
W

wifegonnakillme

Jedi Hopeful
Offline
Thanks for all the tips folks - I have started to edit in to the third post on this thread all of the suggestions in terms of parts and rebuild tips; if there are others, or I have missed/misrepresented please let me know. It is my intention to take lots of pictures along the way and post what I can within storage limits to help me and possibly others. Although even last night as I was stripping external bits I found it a pain to pull my blackberry with greasy hands to take pictures, but I will do my best.
 

malbaby

Jedi Warrior
Country flag
Offline
All of the above...
IMHO...line bore of remetalled cam bearings is essential if the bearings need to be replaced.
If you are going to do a harmonic balancer conversion with narrow belt etc, there are other modifications required. ..[overall it is a worthwhile modification for non purists].
Also, fully balance the engine crank, clutch, flywheel etc..
 
Similar threads
Thread starter Title Forum Replies Date
Hamish Racing TR2/3/3A From novice to …errr … less novice ? Triumph 6
C Tacho drive - more help require for a novice Healey owner. Austin Healey 2
60Bugeye Sprite Body Work Tips & Tricks For A Novice? Restoration & Tools 24
livinginthepast Confessions of a novice, shady tree mechanic... Spridgets 3
B TR6 Another novice question re:TR6 tune-ups and chokes Triumph 9
E Novice mechanic with a Starter Problem [Hopefully] Spridgets 12
R BJ8 + Novice. Idle speed adjustment help req'd. Austin Healey 5
jjbunn Novice Decals Question Triumph 4
2wrench TR6 Novice level mechanic seeks views on rebuild TR6 Triumph 4
1 Novice question about vacuum advance line. Austin Healey 26
T Novice seeking advice on starting problem Spridgets 32
mjobrien Novice at points based distributors Austin Healey 3
C Floor Pan Replacement by Novice MG 2
mctriumph For Sale front apron 57 Tr3 Triumph Classifieds 0
Rick_Thompson TR2/3/3A TR3 rack and pinion kit problem... Triumph 17
S TR2/3/3A differential hubs early tr3 and tr2 Triumph 22
S TR2/3/3A Tr2 and early tr3 differential. Triumph 10
71TR6 TR2/3/3A TR3 WIper Wheel box Triumph 2
RonC General TR TR3 Shifter on TR6 Triumph 8
jfarris TR2/3/3A Modern Temporary Donut Spare for a TR3 Triumph 1
G TR2/3/3A What color is my car? TR3 1958 Triumph 16
S TR2/3/3A Rebuilding a tr3 transmission and second gear, Triumph 57
mctriumph For Sale Odd bit for Tr3 and early 3A Triumph Classifieds 0
S TR2/3/3A turn a tr3 non-full syncro transmission into a full syncro Triumph 3
Y TR2/3/3A I cannot get my TR3 in correct timing. Triumph 7
mctriumph TR2/3/3A Safety mods every Tr3 should get Triumph 12
Editor_Reid TR2/3/3A Whitewall Tires for TR3 Triumph 11
curdy TR2/3/3A TR3 Stalling Issues Triumph 8
S TR2/3/3A Anyone cut out the spare tire compartment on a tr3? Triumph 4
S TR2/3/3A put a differential back into a tr3. Triumph 2
S TR2/3/3A tr3 breather pipe Triumph 2
2 For Sale 1957 Triumph TR3 Small Mouth Triumph Classifieds 0
Jim_Stevens TR6 Barn find of TR6 and many TR3 parts Triumph 9
J For Sale 1958 TR3 Partout Triumph Classifieds 12
R For Sale TR3 Dash Triumph Classifieds 0
D TR2/3/3A Thread and size for tr3 fuel tank vapor line fitting Triumph 0
S TR2/3/3A Aluminum door capping for tr3 Triumph 12
tinman58 TR2/3/3A TR3 at Mammoth Lakes Triumph 4
G TR2/3/3A TR3 starter disassembly rebuild early M428G bomb Triumph 6
luke44 TR2/3/3A Calling all Wiring experts TR3 Overdrive Wiring ver A or ver B or are they the same? Triumph 8
A TR2/3/3A VERY wobbly TR3 - help needed!!!! Triumph 53
vpanza TR2/3/3A EARLY TR3 hubs for wire wheel????? Triumph 5
vpanza Wanted TR3 FRONT backplates needed Triumph Classifieds 2
mctriumph For Sale Cluster gears Tr3 Triumph Classifieds 0
T TR2/3/3A TR3 pistons and liners Triumph 14
jfarris Wanted TR3 Luggage Rack Turnbuckles Triumph Classifieds 0
K TR2/3/3A Further question re TR3 red ignition light. Triumph 1
G For Sale 1960 TR3 A Triumph Classifieds 0
S TR2/3/3A Tr3 pics. Triumph 8
P TR2/3/3A TR3 Clutch Bleeding Problem Triumph 10

Similar threads

Top