• The Roadster Factory Recovery Fund - Friends, as you may have heard, The Roadster Factory, a respected British Car Parts business in PA, suffered a total loss in a fire on Christmas Day. Read about it, discuss or ask questions >> HERE. The Triumph Register of America is sponsoring a fund raiser to help TRF get back on their feet. If you can help, vist >> their GoFundMe page.
  • Hey there Guest!
    If you enjoy BCF and find our forum a useful resource, if you appreciate not having ads pop up all over the place and you want to ensure we can stay online - Please consider supporting with an "optional" low-cost annual subscription.
    **Upgrade Now**
    (PS: Subscribers don't see this UGLY banner)
Tips
Tips

A little Thanksgiving Help - Bugsy is now up in the air

Jim_Gruber

Yoda
Country flag
Offline
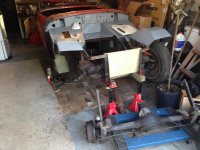
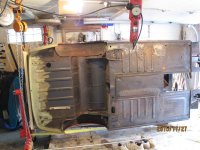
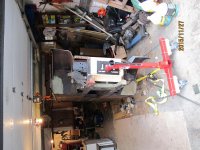
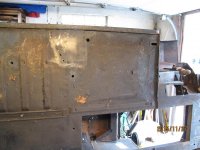
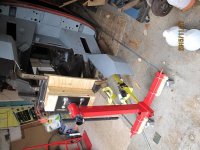
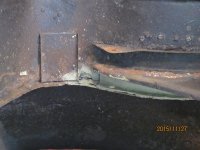
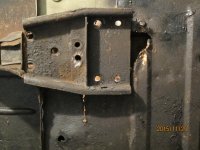
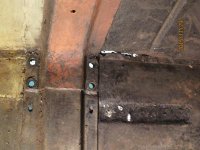
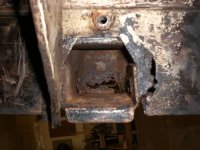
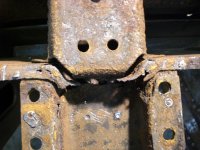
Here is what happens when you have 2 Son in Laws and 4 Grandsons over for Thanksgiving Dinner. Bugsy has gone from waiting patiently to up in the air and on the rotisserie. Now to figure out next steps. Lot’s of repair work was done to the chassis. I did not realize there was a complete passenger floor installed. Lot’s of detail now that I can see underneath and looks like lots of work. I do see that a DS Floor ought to be done but I’ll ask the opinion of BCF to do some more patching or replace the DS Floor Pan.
Notes to anyone using engine stands for a rotisserie. You need bottom braces once you get things up in the air or you will bend things you do not want to bend. Don't know if I did any bending that is not fixable but I think all is well. When we started things looked like this /-----\ from the angle of the engine stands. Again 2 wheels on the engine stands not the center leg in place. Adding a ratchet strap hooked with the strap hook through the bottom of the engine stand and tightening the ratchet strap changed angles to |-----|. I added bracing using electrical conduit on each side. Rotisserie rotates easily and I can go totally upside down if desired. I left chain hoist running to the ceiling in place with a little bit of tension on it to relieve some pressure on the rear mounts. With chain in place the whole assembly feels very stable.
Anyway I'll ask for opinion, leave the DS Floorpan as is or take the opportunity to replace. Next step will be to roll outside and pressure wash and degrease the chassis. Now to formulate a plan.
 

Attachments

  • 215 07 15 Bugsy awaiting rotisserie.jpg
    215 07 15 Bugsy awaiting rotisserie.jpg
    68 KB · Views: 147
  • IMG_2584.jpg
    IMG_2584.jpg
    76 KB · Views: 139
  • IMG_2585.jpg
    IMG_2585.jpg
    84 KB · Views: 136
  • IMG_2589.jpg
    IMG_2589.jpg
    67.8 KB · Views: 130
  • IMG_2590.jpg
    IMG_2590.jpg
    82.9 KB · Views: 134
  • IMG_2597.jpg
    IMG_2597.jpg
    59.4 KB · Views: 131

JPSmit

Moderator
Staff member
Silver
Country flag
Offline
Looks good and nice to have people to sing for their supper. I will leave others to speak of floors, but, can I suggest you attach the stands to one another - even with a long 2X4 so that you won't have them separate when you try to roll them - don't ask me how I know.
 
OP
Jim_Gruber

Jim_Gruber

Yoda
Country flag
Offline
JP that's in the plan. The conduit is drilled so screws go into conduit so there is more than friction holding things together. Having the ratchet strap really stabilized things and got the engine stands parallel to one another.
 

apbos

Jedi Knight
Country flag
Offline
Jim
Patch. With a care you will be able to clean it up seamlessly. New panels are not 100% copies of the originals. I sand blasted, patched, POR 15, primered, and painted with Raptor liner inside and out which can be tinted with your paint color. It will last for centuries in our dry climate.
Paul
 

Rut

Obi Wan
Country flag
Offline
Jim,
Congrats on getting it on the rotisserie! I was trained under the Peter Ploof school of repair and that is to remove as little good metal as possible vs replacing entire panels. I would poke around on the ds floor and see how solid it is and patch what's necessary.
Rut
 
OP
Jim_Gruber

Jim_Gruber

Yoda
Country flag
Offline
Rut, DS was totally redone. New floor on that side and no issues. Discovered major issues by PS floor. Seal sealer was covering some major floor rust. Bulkhead is fine but floor is separated from bulkhead and after I remove the seam sealer major rust and holes began appearing. Trying to remove the lower spring plate caused a tear in the floor. Whoa that is not good. Going to need at least 1/2 PS rear floor. Will know more after I figure out how to get the lower spring bracket removed. Pics tomorrow.
 
OP
Jim_Gruber

Jim_Gruber

Yoda
Country flag
Offline
Houston, We have a problem. Here are pics of the PS floor and where floor joins the bulkhead. The back of the floor is all rotted and does not connect properly to the bulkhead. Originally I thought this was a simple patch but it's going to take more than that. Looking for advice of how come the bottom spring plate won't come off. It may have been welded to the crappy piece of rusty steel??? Now what. Also obvious if the rip in the floorboard from trying to remove the bottom spring plate. How do I cut out without damaging the Spring box which was welded in as a new piece. WTH they would go to the effort of replacing the spring box but not replacing floor on this side is beyond me. That gap in the front of the spring plate was reveled after I removed a piece of seam sealer. Some for rear where attachment is to the bulkhead. Covered with seam sealer. All bolts are out. next thoughts are getting underneath with reciprocating saw and slicing to see of there are welds holding this bottom plate in place. Add the stiffening plate that goes from bulkhead to stiffening plate on the floor is welded up with huge stick welds. Going to be a treat to remove.
Advice guys please.
attachment.php
attachment.php
 

Attachments

  • IMG_2602.jpg
    IMG_2602.jpg
    71.8 KB · Views: 124
  • IMG_2603.jpg
    IMG_2603.jpg
    76.2 KB · Views: 123

Gerard

Luke Skywalker
Country flag
Offline
Jim,

The spring plate is not supposed to come off. It is spot welded to the floor pan, and that's how it came from the factory.

Looking for advice of how come the bottom spring plate won't come off. It may have been welded to the crappy piece of rusty steel??? Now what. Also obvious if the rip in the floorboard from trying to remove the bottom spring plate. How do I cut out without damaging the Spring box which was welded in as a new piece.
Advice guys please.
attachment.php
 

Rut

Obi Wan
Country flag
Offline
Jim,
As Gerard says the spring plate is welded to the floor pan and the weld goes thru to the hanger box. If the floor around the spring plate is solid you can cut the new floor pan to fit. If the steel is rusted you will need to drill out all the welds that hold the 3 piece sandwich together and spot or puddle weld everything back together. The bolt holes are there to hold everything together, but are not strong enough to make it permanent...you gotta weld it! That's one of the welding jobs I farmed out to a professional welder.
Rut
 
OP
Jim_Gruber

Jim_Gruber

Yoda
Country flag
Offline
OK the DS was not welded and just came apart when I pulled the bolts. So that would mean I need to drill out the floor strengthener as well as the bulkhead stiffener. All of that will need to be replaced. This is not going to be a fun job. Why oh why did the body shop cut corners on this side. Going to be a PITA to fix. Anyone got a rear piece of a PS Floorpan taking up space that they want to get rid of. Time to get the spot weld cutter fired up.
 

Rut

Obi Wan
Country flag
Offline
Jim,
The bulkhead and floor stiffeners should be pre drilled and easy to bolt together to make sure everything fits as it should. Sometimes the bulkhead to floor angle will be a little different than the bulkhead stiffener angle and it will need a little massaging. Use grade 5 or 8 bolts and a bfw (wrench or breaker bar) to tighten everything down so you'll know how much it needs to move. After everything is in place, bulkhead and floor stiffeners, floor, spring plate, etc. and screwed together ( I use self tapping machine screws) and nothing is twisted or out of shape/gap (doors are mounted to insure proper gaps) drill holes that are big enough to weld thru in the spring plate. You also have to weld the bulkhead stiffener thru the bulkhead into the spring hanger...I found it easier to do this before I welded in the floor, but after I fit it all together.
Rut
 
OP
Jim_Gruber

Jim_Gruber

Yoda
Country flag
Offline
My concern Rut at this point in time is getting it apart. I do 't want to disturb the Spring Mounting box as it was just rewelds as new metal was put in between stiffener and side of the car. There are big stick welds securing the bulkhead and the bulkhead to floor brace. There is a hole in the middle of the lower spring backing plate I'll assume that is where the lower Spring plate is welder to the floor. Unfortunately that piece of the floor us totally rotten.

Do I need to remove the bulkhead stiffener and floor stiffener to get at the area where floor meets with bulkhead. Assumption is yes and that I will need to add some extra bracing __/ like that between bulkhead and floor to close up gaps back there.

Is there a You Tube Priner on getting things apart before I start drilling out spot welds for the floor seams. Time to retread my Restoration manual. Seemed pretty simple the thought of drilling out a lot of spot welds to replace floor. Getting bulkhead bracing apart seems challenging at this point.
 

Rut

Obi Wan
Country flag
Offline
Jim,
We need more pictures of the bulkhead, spring hanger to better understand what you are dealing with. The bulkhead sheet metal is relatively easy to cut out and replace and the spring plate has about 9 heavy duty welds and it takes some time to cut/drill out to remove. When replacing your floor pan you really need to secure it well around the spring plate and the lower edge of the bulkhead which triangulates the bulkhead-shut panel-floor pan. IF the majority of the floor is good you can patch it and I suspose you could weld extra sheet metal strips between the spring plate and floor to give you a strong joint. You can also weld a new 'foot' to the bulkhead where it attaches to the floor to make it nice and strong. That would be a simple and acceptable solution to me.
Good luck, Rut
 
OP
Jim_Gruber

Jim_Gruber

Yoda
Country flag
Offline
Rut,
will try and get pics tonight or tomorrow AM as I am working from home tomorrow. I can't see right now where welds are that need to be drilled out to remove the lower spring plate. I'll provide detail on bulkhead, spring box, floorpan, etc. right now the floor between spring plate floor is totally rotten both in front of the lower spring plate as well where it attaches to the bulkhead. Spring box itself appears solidly welded in place. If I can install a new floor that does not need to be sandwiched between lower spring plate and spring box I could be fairly simple to fix. Pics are worth a thousand words of course. More to follow. Thanks
 

histerical

Jedi Hopeful
Offline
I found this on mine. Once the thin metal "box" is compromised, the water runs right into the void between the brace, the floor on top of the hanger plate ; truly a bad design. If they had made them just a tad wider, maybe the dirt and water would have drained out.. After rebuilding the boxes, I packed mine with fibrous wheel bearing grease and sealed them up for good.
Bill
 

Attachments

  • CIMG0317.jpg
    CIMG0317.jpg
    65.1 KB · Views: 78
  • CIMG0320.jpg
    CIMG0320.jpg
    74.7 KB · Views: 78
Similar threads
Thread starter Title Forum Replies Date
P General Tech Positive Earth?? Very confused. A little help? Triumph 19
JPSmit Lovely little Spridget video Spridgets 4
charlie74 Spotted this little gem in Bishop, CA Spotted 2
Got_All_4 Wedge Looking at a Local TR8 For Sale Little Ruff Triumph 1
Lin A little "Stay-at-Home" Healey Nostalgia Austin Healey 10
P A little identification help please Other British Cars 10
S TR2/3/3A The little things Triumph 2
S TR2/3/3A little rubber plugs Triumph 3
K TR2/3/3A What is the little white fiber thing for that comes in the Lucas points box? Triumph 2
S TR2/3/3A Tr7 and a little extra Triumph 2
S TR2/3/3A source for those little drain hoses Triumph 6
S TR2/3/3A this little miss in the engine Triumph 17
D Best little tube bender Restoration & Tools 8
N TR6 Need a little wiring help with a 74 Tr6 Triumph 6
S TR2/3/3A little caged nut headlights Triumph 2
S TR2/3/3A little more door gap Triumph 14
S TR2/3/3A What's a little thing that made a huge difference in your vehicle? Triumph 37
HighAltitudeTR3 TR2/3/3A Running a little hot... Triumph 14
drooartz A little winter drive Spridgets 3
C Brakes....a little help please? Austin Healey 9
B The little silver indicator knob Austin Healey 0
S TR2/3/3A little miss problem Triumph 12
catfood Must have a little more faith in my system... Austin Healey 4
John Turney A Little Early Austin Healey 11
Joe Reed MGB A little different DGV installation... MG 12
Jim_Gruber A Little Saturday Night Time with Bugsy II Spridgets 6
trrdster2000 GT6 Another little difference, big problem. Triumph 11
Rut MGB Last little bit MG 0
TomMull TR2/3/3A Little Bits and part numbers Triumph 3
S My New Little Friend... Spridgets 2
Jim_Gruber A Little Bling for Bugsy II Spridgets 8
NutmegCT Tom's new SLBC [Sorta Little British Car] ! Other British Cars 46
Boink Bugeye gets a little attention... Spridgets 0
M Clutch problem, a little different than usual Spridgets 8
T 1933 Standard Little Nine Carburetor Other British Cars 8
Rut Pushed it a little too hard, eh? Spridgets 1
A TR4/4A My next restoration with a little help from "Fantom Works" Triumph 2
D Off Topic Little British Car Day Triumph 1
Gerard An education on how Fedex does business - a little off topic Spridgets 21
drambuie No sound affects when breaking those little Christmas lights! Austin Healey 16
S Off Topic Reason 193 why I love little british cars [especially TRs] Triumph 8
pkmh Interesting little jack stand discovery, "Drednaut" Austin Healey 0
RickB Poor little MK2 Sprite - Seattle Craigslist 'Sebring bonnet' Spridgets 24
RickB Anyone doing a steering wheel swap - a little loctite might be a good idea Spridgets 2
DNK TR6 Well I'm a Little Confused Triumph 4
DrEntropy MGB A little thing MG 4
Basil Admin Note One more little change MG 1
Trevor Jessie The Ugly Bug just got a little uglier Spridgets 20
S My little 68' Sprite Spridgets 24
UltimateQuestion Just a little rust Triumph 7

Similar threads

Top