 Hey there Guest!
 Hey - did you know if you click on the title of a thread it will take you to the first unread post since you last visited that thread?
 but were afraid to ask:
  STOP!! Never post your email address in open forums. Bots can "harvest" your email! If you must share your email use a Private Message or use the
  smilie in place of the real @
 Pretty Please - add it to our Events forum(s) and add to the calendar! >>
max71
Member
Offline
I've been dealing with low OP and trying experiments on changing springs, packing, etc. Everyone I talked to who did this job said its hours of work and one of the most miserable jobs with the engine in the car. After having a special tool made and trial and error I got it down to ~ 20 minutes and pretty painless. I once took the car to a mechanic who spent almost 2 hours trying to get it in using a lift.
Here's the recipe:
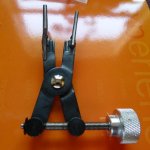
1. Get some kind of spreader. I bought a tool that was used to remove C clips and had a couple parts welded on. Photos attached.
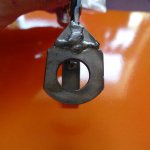
2. Known tip: Play with the cap nut to find where it starts to thread in and mark that place.
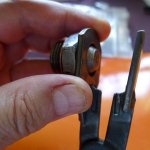
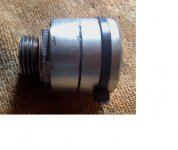
3. Although the tool I made was meant to be used just with the cap nut directly the problem arose when trying to turn the nut due to very limited space. So using a tip from Peter Burgess, I cut down a 1" socket. You cannot get the socket wrench in there until the nut is pretty far down. So I put put a lock tie on the socket with the nub positioned to where I could get to it with the socket positioned where the threads start on the cap nut/block. (see above) and mark the socket to correspond.
4. With everything in place (also a bolt at the bottom of the socket so it can be held by the spreader) you just begin to use the spreader worm screw until it mates up with the threaded hole. Not difficult but may take a couple practice runs to make sure its straight in
5. Use whatever you can to then spin the socket/cap screw using the nub from the lock tie. One full half turn does it.
6. Unscrew the spreader and turn the socket by hand until its pretty close to the block
7. Take you socket wrench and finish the job.
Really easy. If you require more photo's let me know. BTW, make sure to use a copper washer or copper crush washer. The fiber washer that many parts houses sell leaks.
Here's the recipe:
1. Get some kind of spreader. I bought a tool that was used to remove C clips and had a couple parts welded on. Photos attached.
2. Known tip: Play with the cap nut to find where it starts to thread in and mark that place.
3. Although the tool I made was meant to be used just with the cap nut directly the problem arose when trying to turn the nut due to very limited space. So using a tip from Peter Burgess, I cut down a 1" socket. You cannot get the socket wrench in there until the nut is pretty far down. So I put put a lock tie on the socket with the nub positioned to where I could get to it with the socket positioned where the threads start on the cap nut/block. (see above) and mark the socket to correspond.
4. With everything in place (also a bolt at the bottom of the socket so it can be held by the spreader) you just begin to use the spreader worm screw until it mates up with the threaded hole. Not difficult but may take a couple practice runs to make sure its straight in
5. Use whatever you can to then spin the socket/cap screw using the nub from the lock tie. One full half turn does it.
6. Unscrew the spreader and turn the socket by hand until its pretty close to the block
7. Take you socket wrench and finish the job.
Really easy. If you require more photo's let me know. BTW, make sure to use a copper washer or copper crush washer. The fiber washer that many parts houses sell leaks.
Attachments
Last edited:


 PJ
PJ A friendly reminder - be careful what links you click on here. If a link is posted by someone you don't know, or the URL looks fishy, DON'T CLICK. Spammers sometimes post links that lead to sites that can infect your computer, so be mindful what you click.